


Deciding to install a new sliding screen door is one of those fantastic DIY projects that pays off immediately. It’s all about bridging that gap between your home and the outdoors, letting the breeze in without the bugs. The job itself is pretty straightforward: you'll measure the door frame, pop out the old door (if there is one), give the tracks a good cleaning, and then set and adjust the new door so it glides like a dream.
A little patience and the right prep work are all it takes to get a result that looks like a pro did it, and you can usually knock it out in an afternoon.
Getting Started with Your Screen Door Project
Before you can kick back and enjoy that fresh air, a bit of groundwork is key. A successful installation isn’t just about the final fit—it’s about making the whole process smooth and headache-free. That means getting your tools together, knowing what parts you're working with, and picking materials that can handle your local weather.
Think of this first phase as laying the foundation. Spending a few minutes now to get organized will save you from scrambling for a tool mid-job or, worse, wrestling with a door that refuses to cooperate.
Your Essential Toolkit and Materials Checklist
You definitely don't need a high-end workshop for this, but having the right tools ready to go makes all the difference. Nothing stalls a project faster than a stripped screw or a bad measurement. Here's a quick rundown of what you should have within arm's reach.
| Item Category | Essential Items | Optional but Recommended |
|---|---|---|
| Measuring & Marking | Tape Measure, Pencil | Speed Square, Level |
| Hand Tools | Phillips & Flathead Screwdrivers, Utility Knife | Stiff Putty Knife, Pry Bar, Pliers |
| Cleaning Supplies | Stiff Brush, Vacuum Cleaner, Rags | Silicone-Based Lubricant, All-Purpose Cleaner |
| Safety Gear | Work Gloves, Safety Glasses | Knee Pads |
Having these basics organized before you start means you can flow from one task to the next without any frustrating interruptions.
This project is more than just a home upgrade; it’s a growing trend. The broader sliding door market was valued at USD 12.5 billion in 2024 and is projected to hit USD 18.46 billion by 2032, with screens often adding up to 20% to property value. You can find more market analysis about sliding doors and their value on VerifiedMarketResearch.com.
With your tools in hand, you're officially ready to get to work. The next step is all about getting those precise measurements and clearing the old door out of the way to make room for the new one.
How to Measure and Prepare for a Perfect Fit
Getting your new sliding screen door to fit perfectly starts long before you even have the new door. Honestly, this is where most DIY installations go wrong. Get the prep work right, and the rest of the job is a breeze. It all boils down to one thing: accurate measurements.
I can't tell you how many times I've seen a project stall because someone was off by just a quarter of an inch. That tiny mistake can mean your door either jams up in the frame or leaves a gap big enough for bugs to waltz right in. The trick is to use what we call the three-point measurement technique. It’s a simple method that accounts for the reality that most door frames, especially in older homes, aren't perfectly square anymore. They settle over time.
Mastering the Three-Point Measurement
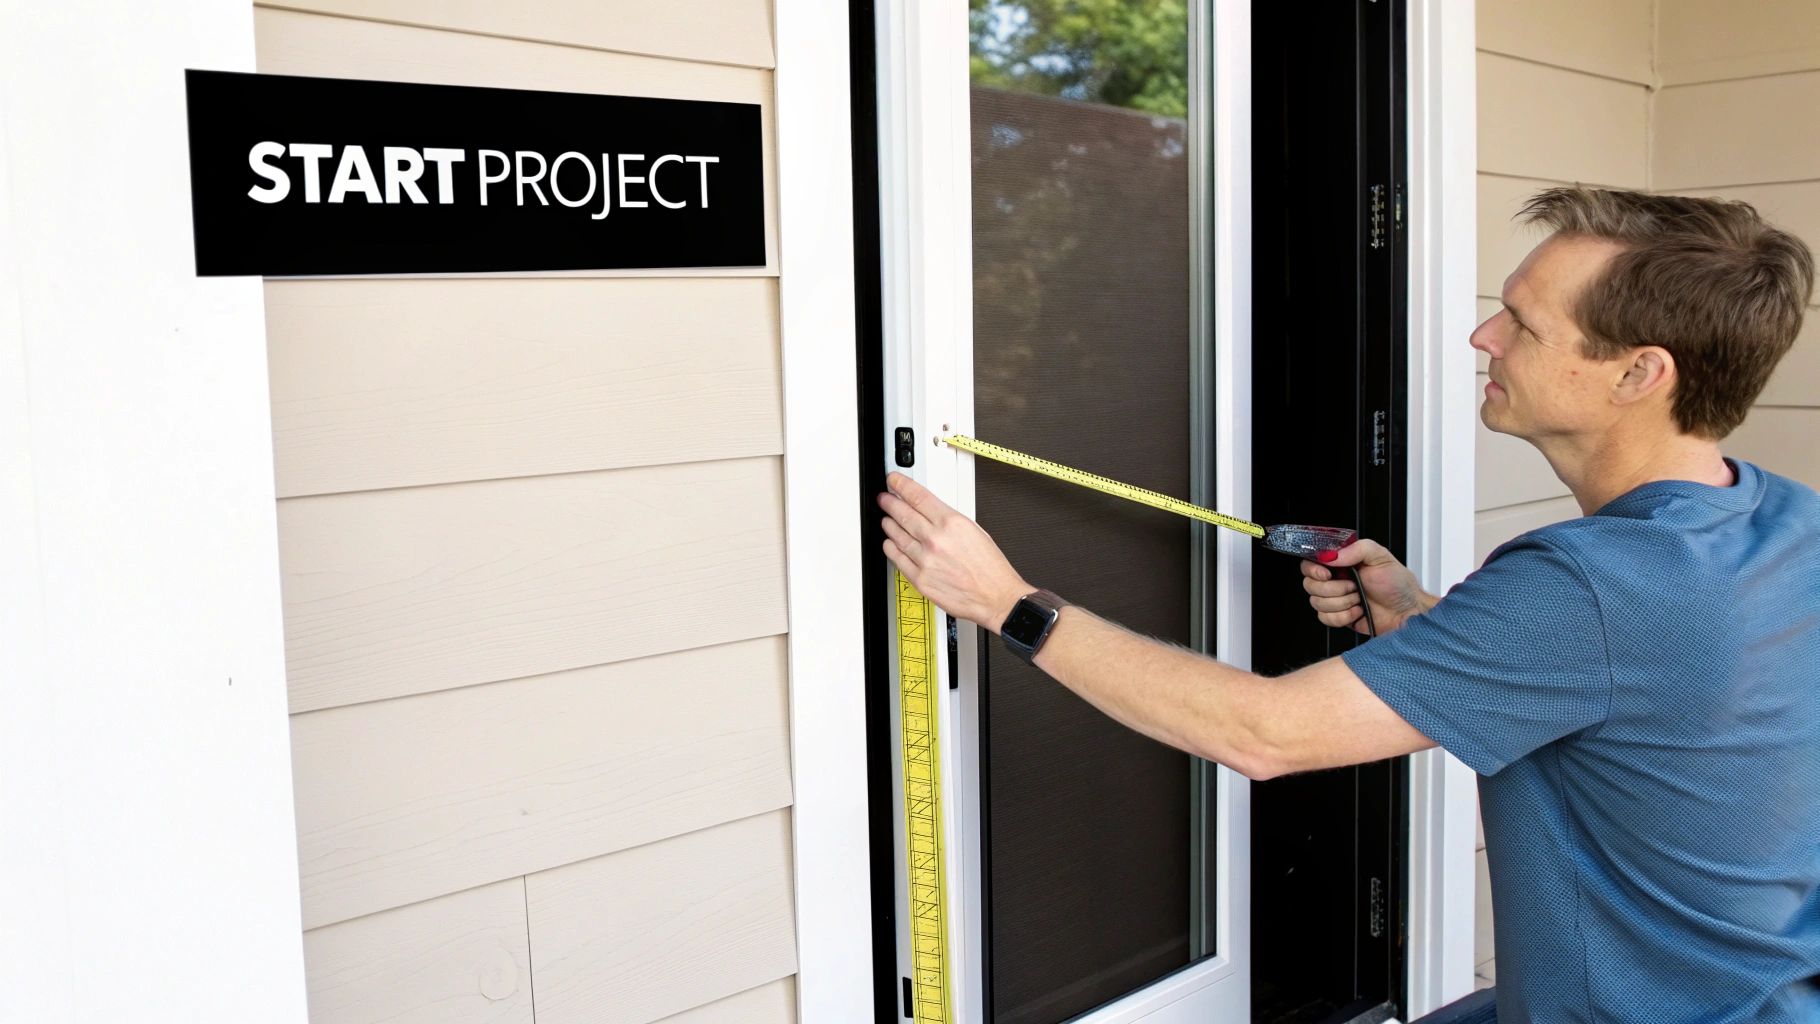
To make absolutely sure your new door will glide in smoothly, you’ll need to take a total of six measurements: three for the height and three for the width.
- For the Height: Grab your tape measure and check the distance from the inside of the top track down to the inside of the bottom track. Do this on the far left, then dead center, and finally on the far right.
- For the Width: Now, measure horizontally from one side jamb to the other. Again, do this across the top, in the middle, and at the bottom of the opening.
Jot down all six numbers. Here’s the crucial part: always use the smallest measurement for both the height and the width when you place your order. This guarantees the door will fit into the tightest point of the opening without getting stuck. If you want to walk through this step by step, our guide on how to measure for a screen door breaks it down even further.
Removing the Old Door Without a Fight
Okay, measurements are done. Now it's time to get that old, rickety door out of your way. This might look tough, but it's usually pretty simple once you know the secret: releasing the tension on the rollers.
Look for the adjustment screws, which are almost always at the bottom corners of the door (sometimes at the top, too). With a Phillips head screwdriver, start turning them counter-clockwise. You'll feel the door start to lower as the spring-loaded rollers retract. After a few turns, you should have enough play to lift the entire door up, into the top track, and then swing the bottom out towards you. No need to muscle it.
Prepping the Tracks for a Smooth Glide
With the old door gone, you're left with an empty track. And chances are, it's packed with years of dirt, grime, pet hair, and whatever else the wind blew in. You can't skip this step. A clean track is essential for that effortless, silent glide you want from a new door.
A clean, undamaged track is the foundation of a functional sliding screen door. Neglecting this step is the number one cause of a new door feeling sticky, loud, or wobbly right from the start.
First, grab a vacuum and use a crevice tool to suck up all the loose gunk. Then, get in there with a stiff brush and some all-purpose cleaner to scrub out anything that’s caked on. As you clean, run your fingers along the track itself. Feel for any dents, dings, or warped spots that could trip up the new rollers. You can often straighten out minor bends with a pair of pliers, but use a small block of wood between the pliers and the track to prevent scratching the metal. Spending just 15 minutes on the tracks now makes all the difference—it's what separates a wobbly door from one that glides like a dream for years.
Putting Your New Sliding Screen Door in Place
Alright, you’ve done the prep work. Your tracks are clean, your measurements are double-checked, and you have your new door ready to go. Now for the fun part: the actual installation.
If you bought a door kit, start by laying out all the pieces on a soft surface like a blanket or a piece of cardboard. This keeps the new frame from getting scratched up before you even install it.
Most of these kits are pretty straightforward, usually just connecting the corners with inserts and a few screws. The real trick here is making sure the frame is perfectly square before you tighten everything down for good. A rubber mallet is your friend—use it to gently tap the corners into alignment. Once it's square, tighten the screws, but don't go crazy. Over-tightening can easily warp the aluminum frame.

This whole process—measure, remove, clean—is the foundation for a hassle-free installation. As the image shows, getting this prep work right is what stops most common headaches before they even start.
Getting the Door on the Tracks
This is the moment of truth. Getting the door into the frame can feel like wrestling a clumsy octopus if you don't know the technique. But there’s a simple method that makes it a breeze.
The absolute golden rule? Never try to force the door into the frame. If it’s not going, something is wrong.
First, you need to retract the bottom rollers. Just turn the little adjustment screws counter-clockwise, which pulls the wheels up into the door frame and gives you more clearance.
Now, here’s the method that works every time:
- Stand inside your house, looking out through the doorway.
- Lift the door and angle the top edge, guiding it up into the deep channel of the top track.
- With the top securely seated, gently swing the bottom of the door toward you.
- Help the bottom rollers land right on top of the rail in the bottom track. You should feel it settle into place.
If you have to shove it, stop. You probably just need to retract the rollers a little bit more.
I've seen it a hundred times: the door feels just a hair too tall, even with the rollers all the way up. Before you panic, check that the top of the door is fully seated in its channel. A tiny bit of leftover gunk can be enough to block it, throwing off the fit at the bottom.
Taking your time here prevents you from denting your new frame or damaging the tracks. It’s also a reminder of why good components matter. The global market for sliding door hardware was worth USD 2.61 billion in 2023, and it's growing because people understand that quality parts make a difference. In fact, a smooth, high-quality installation can see up to 25% less wear and tear than old-school hinged doors. You can read more about the hardware market at Business Research Insights.
A little patience right now is what makes this a successful DIY project instead of a frustrating mess. If the door isn't seating right, take a breath, pull it back out, and look closely at the rollers and tracks again. A tiny pebble you missed can bring the whole operation to a screeching halt.
Once it’s sitting nicely on the track, you’re on the home stretch. All that's left are the final tweaks to get that perfect, satisfying glide.
Fine-Tuning the Rollers for a Silky-Smooth Glide
Alright, your new door is hanging in the track. You're about 90% of the way there. This last 10% is what separates a decent installation from a professional one. It’s all about the fine-tuning that makes the door glide like it's on ice and seal up tight.
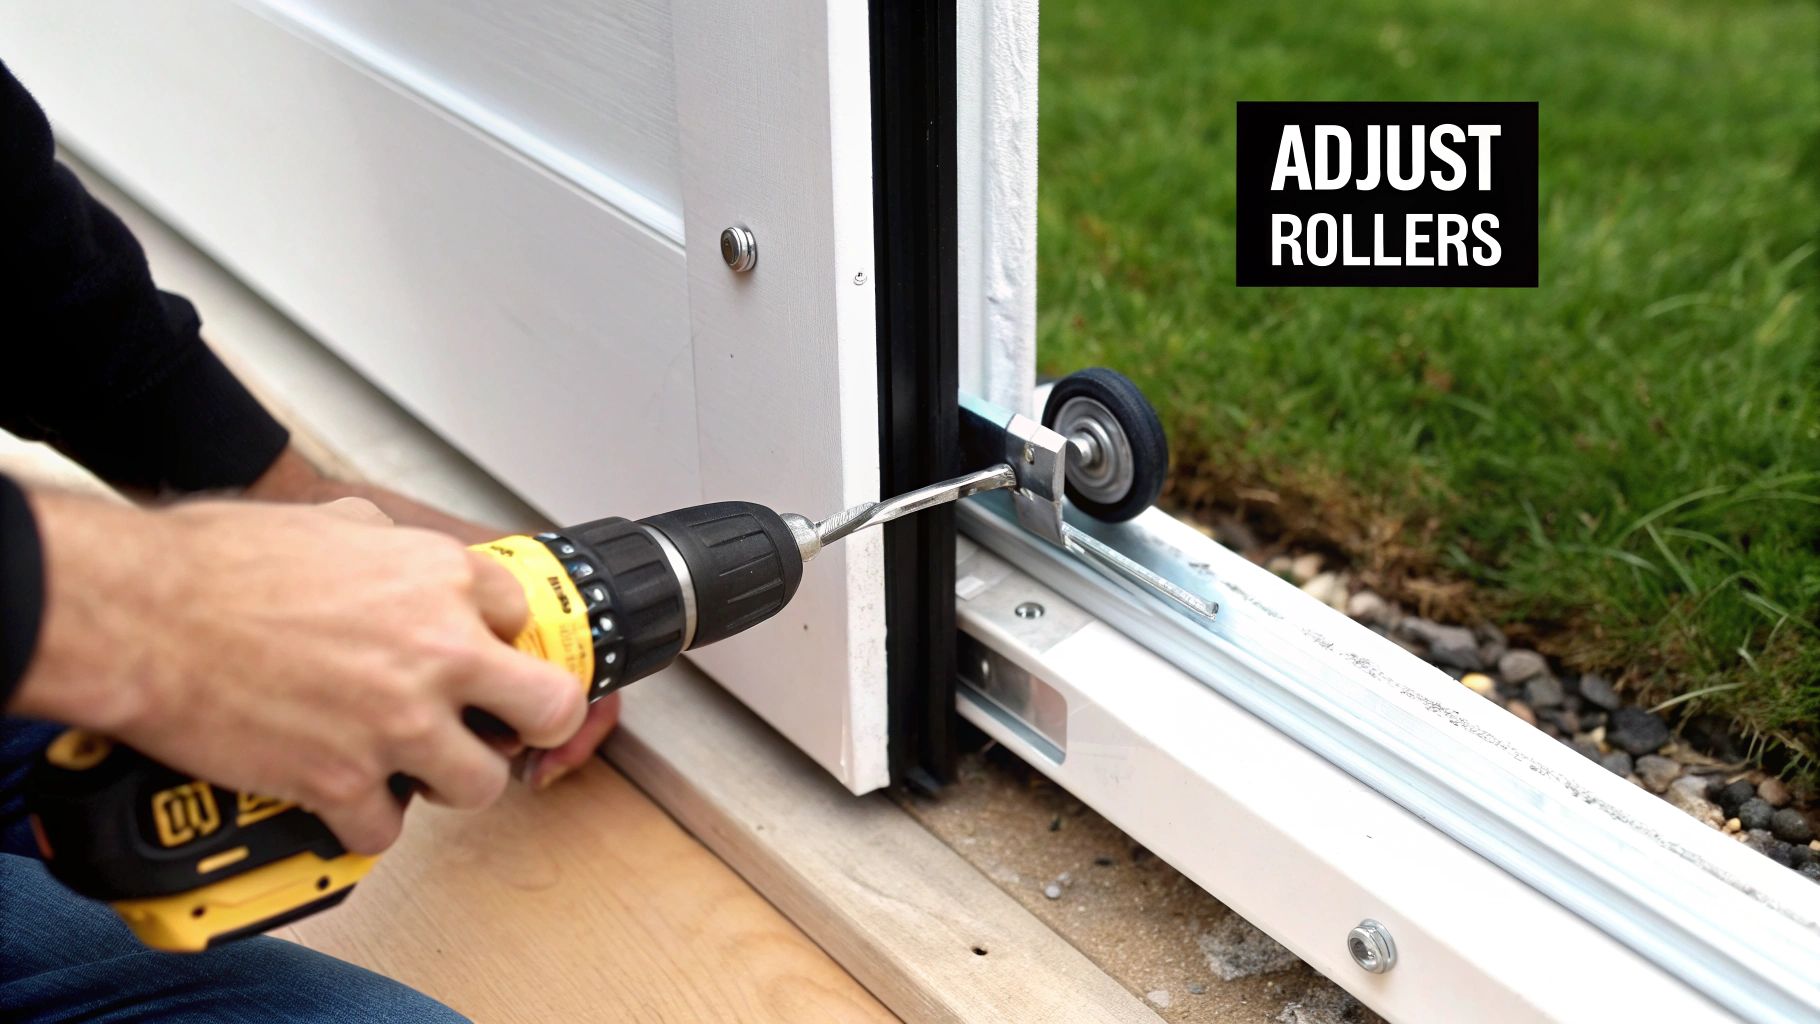
The magic happens with the small adjustment screws you'll find on the sides of the door frame. Look near the bottom corners; some doors have them at the top, too. These screws raise and lower the spring-loaded rollers, giving you precise control over the door's height on each side.
Dialing in the Perfect Balance
What you're aiming for is a door that hangs perfectly level in the frame. Grab a Phillips head screwdriver and start turning the screws clockwise. You should see the door lift ever so slightly. Tweak both sides until you have a nice, even gap between the door and the side jamb all the way down.
A level door isn't just about aesthetics—it's about function. When it's balanced, it won't scrape, catch, or leave little gaps for bugs to sneak through.
Pro Tip: A well-adjusted door is a quiet door. If you hear grinding or scraping sounds, that's your cue that one side is rubbing against the track. The goal is a whisper-quiet glide with almost no resistance.
If you really want to get into the weeds and master this part, we have a detailed guide on sliding screen door adjustment that covers all the nuances. Nailing this step is key to making sure your door works perfectly for years to come.
Checking the Latch and Final Seal
Once the door is gliding beautifully, it's time to test the latch. Slide it shut and check if the latch lines up with the keeper (the part on the door frame that it catches).
If they don't meet up, resist the urge to mess with your perfectly adjusted rollers. The keeper itself is designed to be moved. Just loosen the two screws holding it in place, slide it up or down to align with the latch, and tighten it back down. Give it a few test runs to make sure it latches securely without you having to force it.
Last but not least, don't forget the bug seal. This is usually a flexible flap that runs along the back edge of the screen door, closing the gap against the glass panel. It’s a small piece, but it’s absolutely essential for creating a complete barrier against insects. Follow the instructions to get it installed, and you'll be set for a bug-free home.
Troubleshooting Common Installation Issues
Even the most carefully planned installation can hit a bump in the road. It happens. The good news is that most sliding screen door problems are easy to fix and don't require you to start from scratch. A minor hiccup shouldn't derail your whole project.
Nine times out of ten, the problem comes down to one of three things: the roller tension, gunk in the track, or a simple alignment issue. Before you get frustrated, take a moment to breathe and walk through these common scenarios. You'd be surprised how often a tiny tweak is all it takes to get that perfect, smooth glide.
The Wobbly or Scraping Door
You've got the door in, but when you slide it, it wobbles around or makes an awful scraping sound. That's a classic sign of uneven roller adjustment. It just means one side of the door is sitting higher than the other, causing it to drag against the track or hang crookedly in the frame.
The fix is usually pretty simple. Grab your screwdriver and find the roller adjustment screws, typically on the bottom corners of the door. If the door is scraping the top track, you'll need to lower that side. If it's rubbing on the bottom track, raise it up a bit. The key is to make small, quarter-turn adjustments on each side until the door sits perfectly level and glides without a sound.
A perfectly tuned door is a quiet one. Your goal should be a whisper-soft slide. Any grinding or scraping is a clear signal that the door isn't properly balanced on its rollers.
The Door That Jumps Its Track
A door that constantly pops off its track is more than just an annoyance—it means the rollers don't have enough upward tension to hold them in place. This is a common mistake if you forgot to adjust the rollers after setting the door into the frame. The door needs to feel snug, but not so tight that it's hard to move.
To fix this, turn the roller adjustment screws clockwise. This will raise the door and push the rollers more firmly up into the track, giving it the stability it needs. You want it just high enough that it feels secure, but you could still lift it out with a little bit of effort if you needed to. That's the sweet spot for a stable glide that stays put.
- Door feels loose? Increase the tension by turning the roller screws clockwise.
- Door is too tight or hard to slide? Decrease the tension by turning them counter-clockwise.
- Latch won't catch? Make sure the door is perfectly level first, then adjust the keeper (the part on the door frame) up or down until it aligns.
It's interesting to see how screen door technology has evolved. Newer designs, like retractable models, can actually cut installation time by 40%, but you have to think about material durability. At the same time, innovations like fiberglass mesh have really extended the lifespan of screens and can even contribute to a 10-15% reduction in energy costs by allowing for better airflow. You can find more details on the benefits of modern screen door technology.
Should You DIY or Call a Pro?
So, you've seen what it takes to install a sliding screen door. Now comes the big decision: do you roll up your sleeves and do it yourself, or is it time to call in a professional? Honestly, there’s no single right answer. It really boils down to your own skills, budget, and how much your weekend time is worth to you.
Tackling it yourself can be a really satisfying project, especially if you're working with a standard-sized door kit.
The DIY Route
Going the DIY route is often about saving money on labor. You can expect the materials to run you somewhere between $100 to $300. Block out a good chunk of your afternoon, probably three to four hours, assuming you have all the tools handy and don't hit any snags—like discovering your door frame is warped or the track is a mess.
When to Hire a Professional
Hiring an expert starts to look like the smarter choice when things get complicated. If you're dealing with a custom-sized opening, a badly damaged track, or you just want the peace of mind that comes with a flawless, guaranteed installation, calling a pro is the way to go.
If you're on the fence, it's worth seeing what professional installation services offer to help you compare the costs and benefits.
A pro brings more than just a toolbox; they bring experience. They can instantly spot subtle issues a first-timer might miss, like a settled frame, and make the tiny adjustments needed for a perfect glide.
Professional installation will add a labor cost, usually between $75 and $200, but what you're really buying is expertise and speed. An experienced installer can often have the job done in under an hour.
For a fast, reliable fit, especially if you have a tricky or custom situation, our screen installation services ensure it's done right the first time, saving you the headache.
DIY vs Professional Installation at a Glance
To make the decision a little easier, here's a quick breakdown of what to expect from each path.
| Factor | DIY Installation | Professional Service |
|---|---|---|
| Total Cost | Lower (materials only) | Higher (materials + labor) |
| Time Investment | 3-4 hours (or more) | Typically under 1 hour |
| Skill Level | Basic-to-moderate handy skills | None required |
| Tools | You need to own or buy them | All tools are provided |
| Result | Good, but may have minor issues | Guaranteed perfect fit & function |
| Best For | Standard doors, simple installs | Custom sizes, damaged frames, peace of mind |
Ultimately, whether you DIY or hire it out depends on what you value most. If saving money and the satisfaction of doing it yourself are key, grab your tools. If you want a perfect, hassle-free result in record time, calling a pro is your best bet.
Your Screen Door Installation Questions, Answered
Even with the best guide, you're bound to have a few questions before you get your hands dirty. Let's tackle some of the most common ones we hear from homeowners just like you.
How Much Time Should I Block Out for This?
For a first-timer working with a standard kit, I always recommend setting aside a solid 2 to 4 hours. That's not because it's terribly difficult, but it gives you a comfortable buffer to get the old door out, give the tracks a really good cleaning (don't skip this!), and put the new one together without feeling rushed.
An experienced pro can knock this out in less than an hour, but they've done it hundreds of times. That extra time for a DIY job is your secret weapon for getting the adjustments just right.
What's the #1 DIY Mistake People Make?
Bad measurements. Hands down. Being off by just a quarter of an inch can be the difference between a door that glides like a dream and one that jams, scrapes, or leaves a gap big enough for every mosquito in the neighborhood to fly through.
The trick is to measure the height and width in three spots: top, middle, and bottom. Always, always use the smallest of those three numbers when you place your order. It's a simple step that prevents a world of headaches.
Another classic blunder is skimping on track cleaning. I've seen brand-new, perfectly measured doors that feel awful on day one simply because of a tiny pebble or some built-up gunk left in the track.
Can I Just Replace the Screen and Keep the Frame?
You absolutely can, and it's a great way to save some money if the frame is still in good shape. If the door itself isn't bent and the rollers aren't shot, rescreening is a fantastic option. You'll just need to pull out the old spline (that rubber cord holding the screen in), lay down the new mesh, and roll a new spline in to hold it tight.
Whether you're rescreening a panel or installing a whole new door, a job done right is a job you only have to do once. If you decide you'd rather leave it to the experts for a guaranteed perfect fit, Sparkle Tech Screen Service is here to help. We offer same-week service and can get you a quick quote.
Let's get your project handled right. Visit us at https://sparkletechscreenservice.com to get started.


