


Getting a new window screen installed is a pretty straightforward process, but success truly hinges on doing the prep work right. It all boils down to a few key actions: measuring the frame accurately, picking out the right screen mesh and spline, and then using a special little tool to lock it all in. If you get your tools and materials sorted out before you start, you'll be set up for a smooth project.
Gathering Your Screen Installation Toolkit
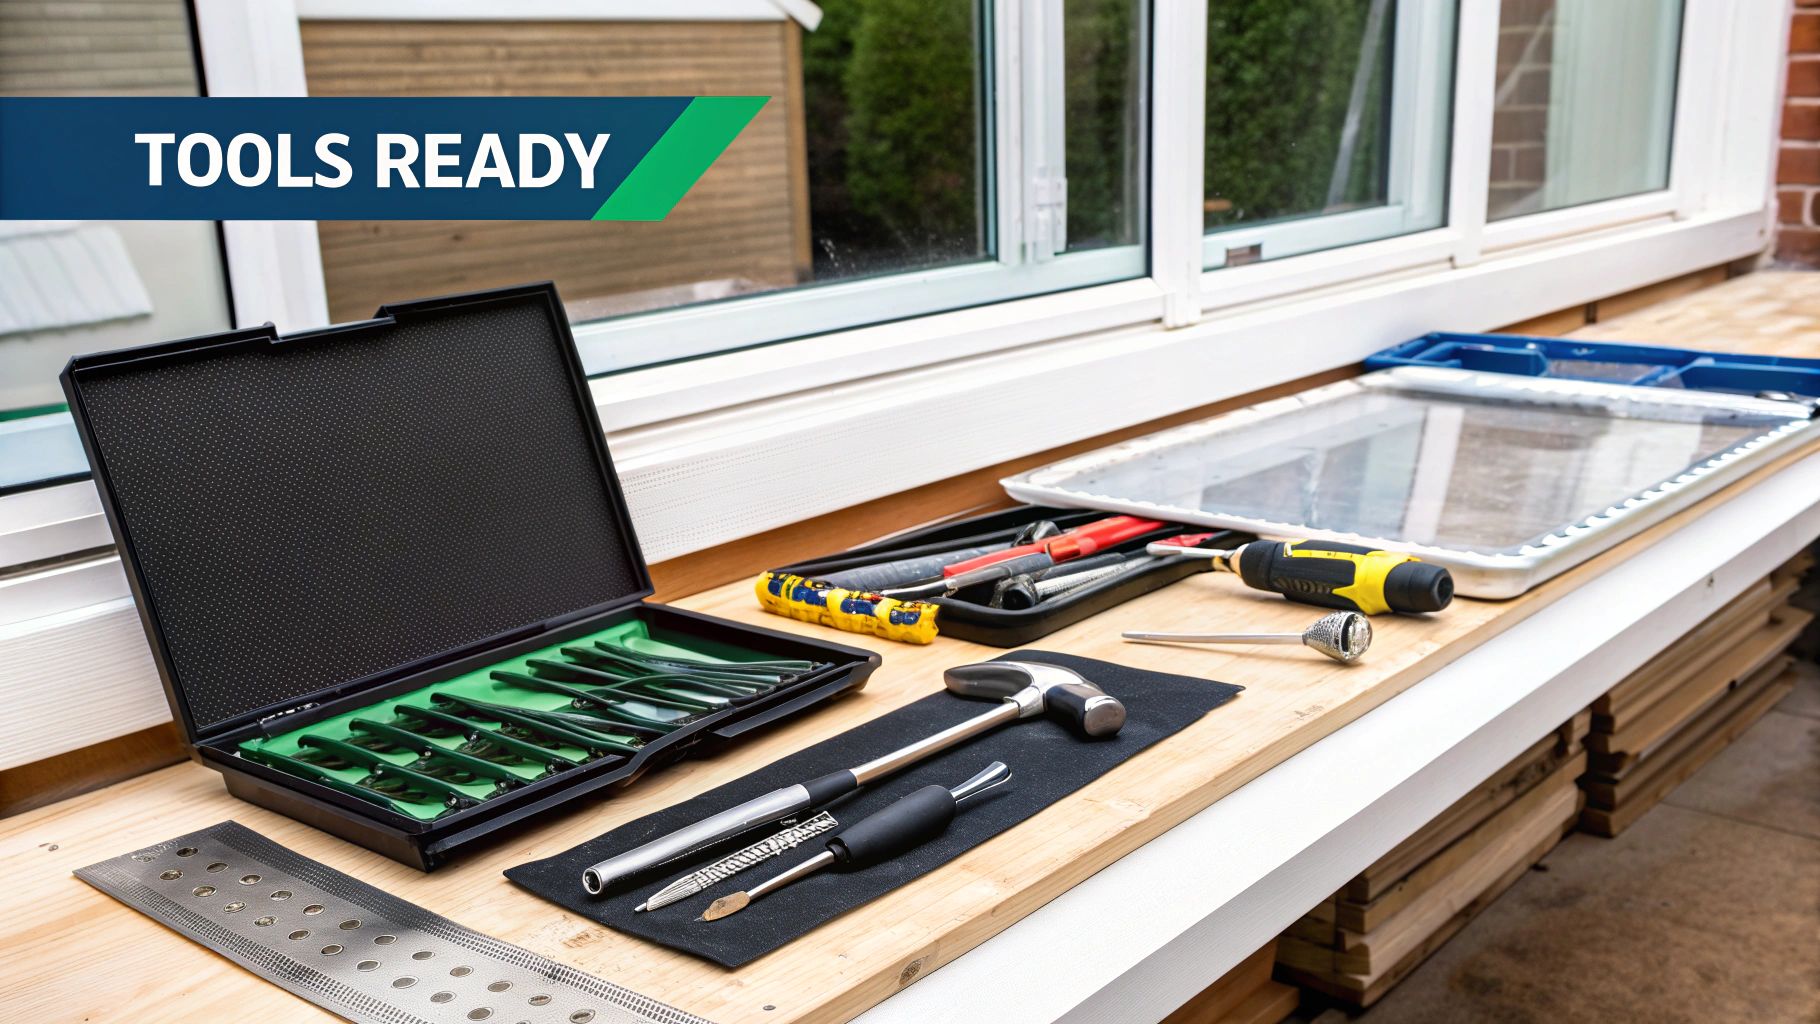
I can't stress this enough: the secret to a professional-looking screen installation isn't some hidden technique. It’s simply having everything you need within arm's reach before you even begin. A little organization at the start saves you from those maddening mid-project hunts for a tool you forgot, paving the way for a clean, tight finish. This is the cornerstone of learning how to install screens correctly on your first go.
It’s no surprise that more people are taking this on themselves. The global market for insect screens is on a serious upward trend, expected to grow from USD 3.45 billion to almost USD 5.92 billion by 2033. This boom is all about homeowners wanting to improve their living spaces with better comfort and airflow. If you're interested in the market side of things, you can learn more about these trends in the full report.
Before you start, let's make sure you have everything you need. A well-prepared workspace is a happy workspace.
Essential Tools And Materials For Screen Installation
| Item | Type/Specification | Why You Need It |
|---|---|---|
| Spline Roller | A dual-wheeled tool (convex and concave) | This is the non-negotiable hero of the project. The convex wheel gently presses the mesh in, and the concave wheel seats the spline. |
| Utility Knife | Sharp, with fresh blades | A dull blade will snag and tear your new screen. You need clean, precise cuts. |
| Measuring Tape | Standard retractable tape measure | For getting accurate dimensions of your screen frame. Accuracy is key. |
| Flathead Screwdriver | Small and thin | Perfect for prying out old, brittle spline without damaging the frame channel. |
| Screen Mesh | Fiberglass (standard), aluminum, or pet-resistant | Choose based on your needs. Fiberglass is great for beginners as it's flexible and forgiving. |
| Screen Spline | Rubber or foam core, correct diameter | The "rope" that holds the screen in place. Matching the diameter to your frame's channel is critical. |
Getting these items together beforehand makes the entire process feel less like a chore and more like a satisfying home improvement project.
Essential Tools for the Job
You don’t need a massive toolbox for this, but a couple of items are absolutely essential for a quality job. The most important one, by far, is the spline roller. It’s a small hand tool with a wheel on each end: one is convex (rounded) and the other is concave (grooved).
Here’s how it works:
- The Convex Wheel: You'll use this side first. It’s designed to gently push the screen mesh down into the frame’s channel without ripping it.
- The Concave Wheel: This side comes next. Its groove fits perfectly over the spline, letting you push it firmly into the channel over the mesh to lock it all in place.
Trust me, trying to use a screwdriver or some other makeshift tool is a recipe for disaster. You’ll almost certainly tear the screen or end up with a loose, sloppy fit. A good spline roller costs less than $10 and is easily the best investment you can make for this project. You'll also want a sharp utility knife for trimming excess screen and a small flathead screwdriver, which is perfect for digging out that stubborn, old spline.
Choosing the Right Materials
Picking the right materials is every bit as crucial as having the right tools. Your choices here will directly affect how your new screen looks, how long it lasts, and how easy it is to install.
The single biggest mistake I see beginners make is grabbing the wrong size spline. If it’s too thin, your screen will sag and look terrible. If it’s too thick, you’ll fight to get it into the channel and might even bend the frame.
The best way to get it right? Take a small piece of the old spline with you to the hardware store and match the diameter exactly. If you don't have a piece to compare, just measure the width of the channel in the frame.
As for the screen itself, fiberglass mesh is the go-to for most DIYers. It’s flexible, affordable, and forgiving. However, if you've got pets who love to climb or live somewhere with harsh weather, you might want to step up to a tougher material like pet-resistant polyester or even a rigid aluminum screen.
Precise Measuring and Frame Preparation
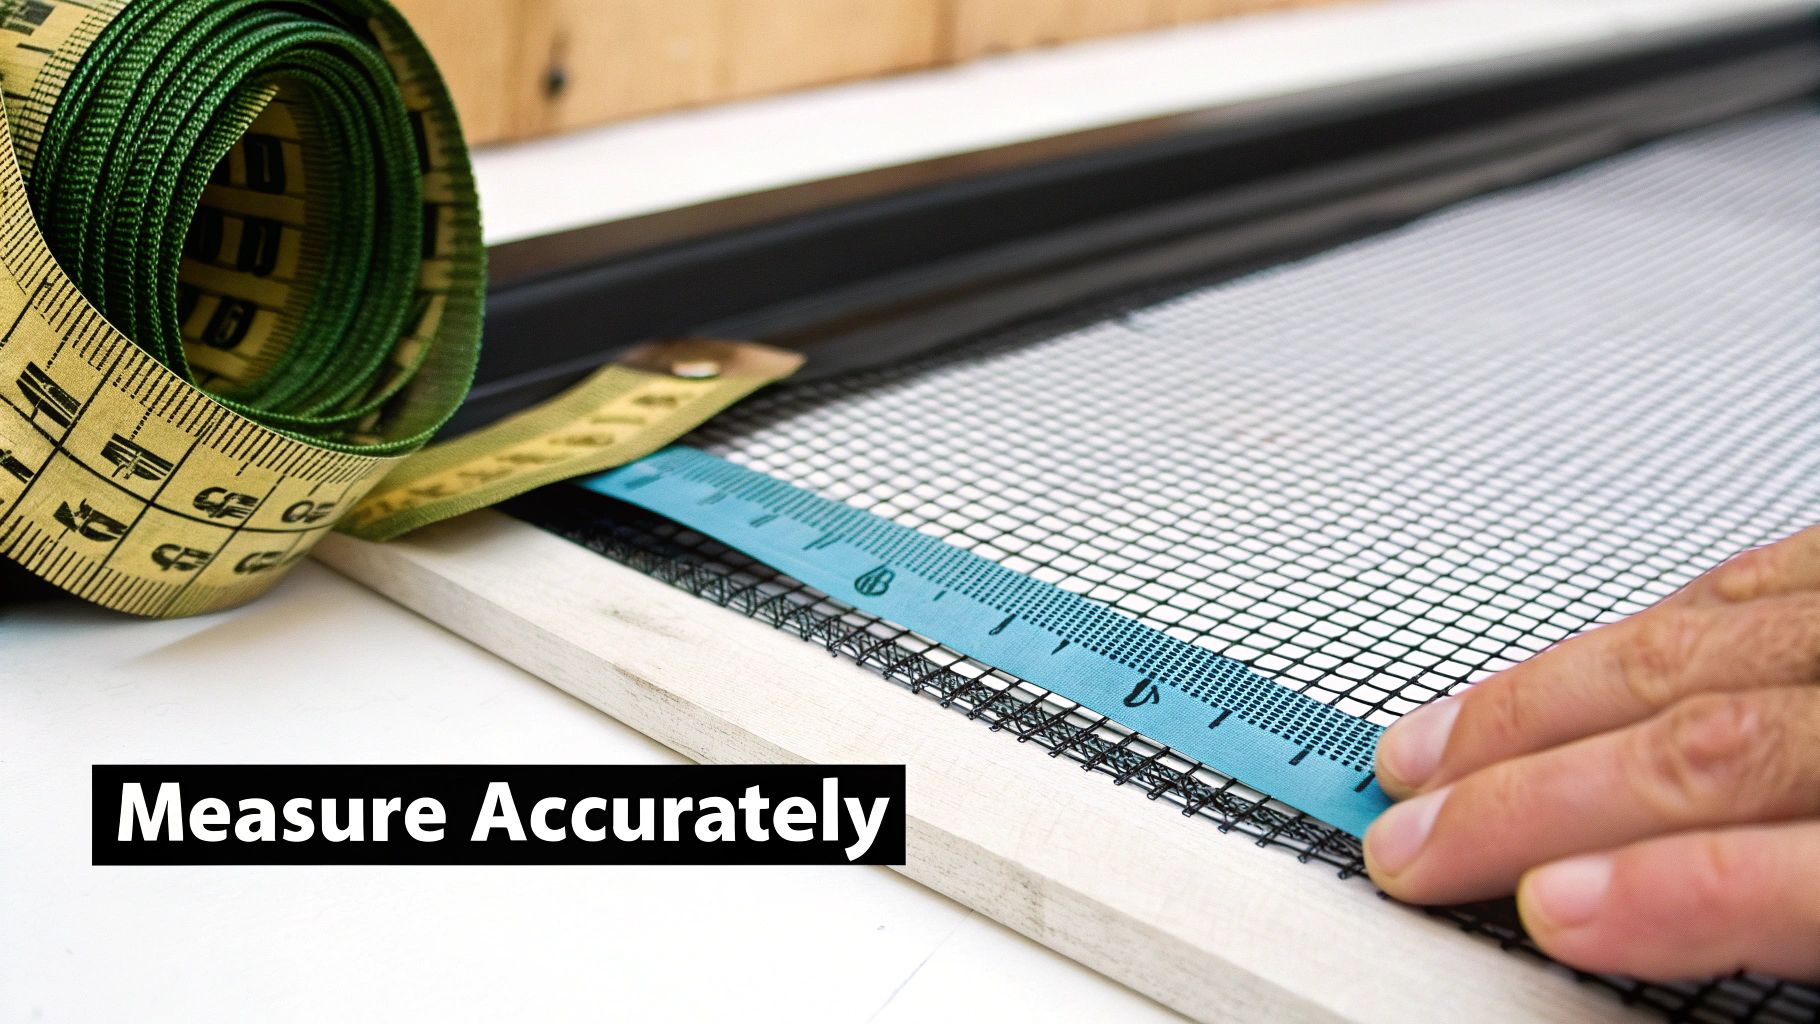
Let's get down to business. If you want a screen that looks professionally installed, this is the stage where you need to be meticulous. Getting your measurements and frame prep right from the start saves you a world of frustration later. It's the difference between a tight, clean finish and a saggy, disappointing mess.
First things first, grab your tape measure. You need to measure the inside of the screen frame, running your tape from the inside edge of one channel directly across to the other. Get both the height and the width.
Here's the most critical tip I can give you for measuring: add a working margin. Once you have those dimensions, add at least two to three inches to every side. I can't tell you how many times I've seen people cut the mesh to the exact size of the frame, only to find they have nothing to grip while they work. That extra material is your best friend during installation.
Removing the Old Damaged Screen
With your new mesh dimensions sorted out, it's time to get the frame ready. The goal here is to remove the old, torn screen without accidentally bending the aluminum frame. Even a slight warp will prevent your new screen from sitting perfectly flat.
The key to it all is the spline—that rubbery cord tucked into the frame’s channel. It’s what holds the screen material in place.
- Look for the end of the spline. It’s usually tucked into a corner, sometimes with a small indentation marking the spot.
- Take a small flathead screwdriver, an awl, or even a sturdy pick and gently pry up the end of the spline.
- Once you've lifted a small piece, you should be able to grab it and pull. In most cases, the whole thing will come out like one long, satisfying string.
If the spline is old and sun-baked, it might get brittle and break into pieces as you pull. Just be patient. Work your way around the frame, prying out any stubborn bits until the entire channel is clear. After that, the old screen mesh will lift right off.
Pro Tip: A clean frame channel is non-negotiable. Any leftover bits of old spline, dirt, or debris will create bumps under the new screen and can keep the new spline from seating properly.
Prepping the Frame Channel
After you've stripped out the old materials, take a minute to really clean the channel. An old toothbrush or a stiff-bristled brush is perfect for scrubbing out any caked-on dust and grime. If you've got some stubborn gunk, a cloth with a bit of mild cleaner will get the job done.
Finally, run your finger along the inside of the groove. Feel for any sharp metal burrs or rough spots left over from manufacturing that could snag and tear your brand-new screen. If you find any, just knock them down with a small metal file.
Getting this prep work right makes the rest of the installation go so much smoother. It's the secret to that tight, wrinkle-free finish you're after.
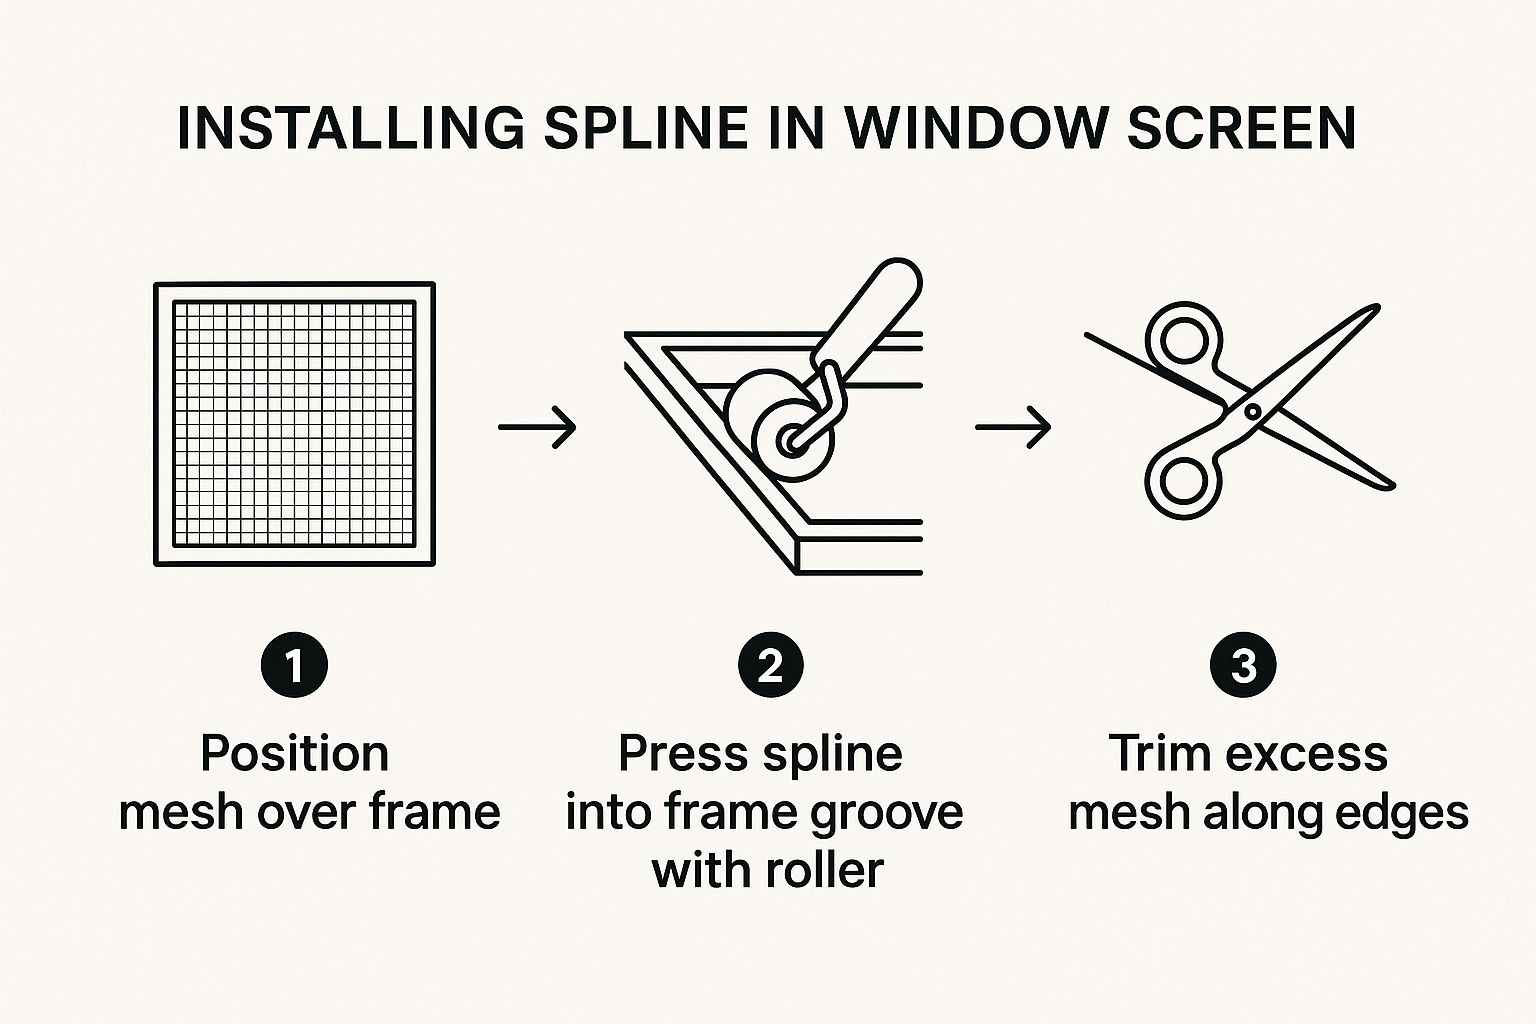
Setting the Screen and Spline Flawlessly
Alright, with the frame prepped and ready, we’ve arrived at the most important—and frankly, the most satisfying—part of the job. This is where your technique really makes or breaks the final look. The goal here is a perfectly taut, drum-tight finish with zero wrinkles or sags. It all comes down to smooth, consistent pressure and getting comfortable with the two-pass method using your spline roller.
First things first, lay your new screen mesh completely over the frame. Make sure it’s flat and straight, with that 2-inch working margin you measured hanging over evenly on all four sides. Don't pull it tight just yet. Just let it rest smoothly. This extra material gives you something to hold onto and is your insurance against coming up short.
The process below is the core of getting a professional result. Following these steps in order is the key to success.
As you can see, this is about being methodical. Rushing at this stage is a recipe for frustration.
Your First Pass: Setting the Stage
Grab your spline roller and look at the two wheels. You’re going to start with the convex wheel—the one that's rounded outward, like a pizza cutter. Pick one of the shorter sides of the frame to begin. Starting at a corner, use this wheel to gently press the screen mesh down into the channel. You're not trying to lock it in; you're just creating a neat crease.
This initial pass is all about pre-forming the screen into the groove. It’s a crucial step that helps prevent tearing the mesh when you install the spline. Once you've done one side, move to the opposite side and do the same, gently pulling the mesh taut as you go. Then, finish the remaining two sides. This back-and-forth technique is a pro-level trick for distributing tension evenly.
It's no surprise that screen repair is such a common DIY project. The global window market, which drives screen installations, is projected to hit 307.8 million units by 2029. Much of that growth comes from home renovations where people are upgrading old windows and adding screens for better comfort. You can see more on this by reading the complete research from Meticulous Research®.
The Second Pass: Locking It All In
With the mesh creased into the channels, it's time to lock it in for good. Take the end of your new spline and use your thumb to press it firmly into one of the starting corners. Now, flip your spline roller around to the concave wheel—the one with a groove in it.
Lay the spline over the channel and use that grooved wheel to roll it right into place on top of the mesh. If you're doing it right, you’ll feel a satisfying little "pop" as it seats securely in the channel. Roll with a steady hand down the entire length of that first side. Use your free hand to keep gentle tension on the screen fabric, pulling away from the roller just slightly to prevent wrinkles from forming.
A Quick Tip for Corners: Corners are where most people mess up and tear the screen. To get it right, stop rolling about two inches before you hit the corner. Use a small flathead screwdriver or even a utility knife blade to gently poke the spline into the corner, making sure the screen is tucked in neatly. Then, you can start rolling down the next side without risking a tear.
After finishing the first side, move directly to the opposite side, then complete the final two. This method maintains that even, professional tension you’ve been working so hard to create.
The Two-Pass Spline Method: A Recap
Let's break it down one more time. Thinking of this as a two-stage process for each side of the frame is the surest way to avoid sags and tears.
-
Pass 1: The Prep Pass (Convex Wheel)
- This is your setup pass using the rounded wheel.
- Its only job is to gently push the screen fabric into the frame's channel.
- Think of it as creating a perfect guide for the spline, which drastically reduces stress on the mesh.
-
Pass 2: The Lock-In Pass (Concave Wheel)
- This is the final step, using the grooved wheel.
- It seats the spline firmly on top of the mesh, locking everything tightly in place.
- Apply firm, consistent pressure to ensure the spline is pushed all the way down.
Take your time and check your work as you go. If a wrinkle suddenly appears, don't sweat it. Just use your screwdriver to pop out the spline from that section, smooth out the mesh with your hand, and roll it again. A little patience at this stage pays off with a flawless result that will last for years.
Trimming and Finishing for a Clean Look
Now that the spline is locked in place, it's time for the finishing touches. This is the part of the job that separates a decent repair from a truly professional one. A clean, sharp edge is what makes all the difference, and getting it right comes down to having a steady hand and the right technique.
For this step, all you need is a sharp utility knife. And I really can't overstate the importance of the word "sharp"—a fresh blade is non-negotiable here. If you try to use a dull one, it'll just snag and pull the mesh, potentially fraying the edges and ruining the taut screen you just worked so hard to create.
Mastering the Trimming Technique
Your goal here is simple: trim away all the excess mesh without nicking the new spline or, even worse, the screen itself. The trick is to let the frame's spline channel do the work for you.
You'll want to hold the utility knife at a low, shallow angle, somewhere around 45 degrees. Place the tip of the blade on the outside edge of the channel, right against the frame. Think of it as letting the blade ride along the outer shoulder of the groove, pointing away from the center of the screen.
With the blade in position, apply a bit of gentle pressure and just draw the knife smoothly down the length of the frame. The frame acts as a perfect guide, giving you a straight, clean cut every time. You'll see the extra mesh just fall right off, leaving a beautiful, factory-perfect edge behind.
Take your time and repeat this on all four sides. Slow, deliberate movements are your best friend here.
A word of caution from experience: avoid holding the knife straight up and down at a 90-degree angle. It's a common mistake, but it dramatically increases the chance that the blade will slip out of the channel and slice right across your beautiful new screen. Always keep that blade angled outward.
The Final Inspection
Once all the excess mesh is trimmed off, your new screen is basically done. But before you pop it back in the window, give it one last look-over. It's a quick quality check that ensures your work will last.
- Check for Loose Spots: Gently run a finger along the spline. It should feel consistently and firmly seated deep in the channel all the way around.
- Inspect the Corners: Corners are a common trouble spot. Make sure they're tight, with no bunched-up mesh or spline trying to pop out.
- Test the Tension: Give the center of the screen a light push. It should feel tight and springy, with no noticeable sagging or wrinkles.
This final check takes less than 60 seconds, but it's what guarantees your screen not only looks fantastic but will stand up to the elements for years to come. It’s that last bit of detail that makes all the difference.
Troubleshooting Your Screen Installation: What to Do When Things Go Wrong
Even the most seasoned pros run into a snag now and then when installing a new screen. Don't get discouraged if your first attempt isn't perfect. Most of the common issues, from a saggy screen to a stubborn spline, are surprisingly easy to fix once you know what to look for.
Frankly, tackling these small jobs yourself is becoming more popular than ever. The whole window covering market, which includes screens, is booming right alongside the home renovation trend. More homeowners are realizing they have the skills to get this done. You can see the data for yourself and learn more about the growth of the window covering market at Straits Research.
Most problems you'll face boil down to two things: getting the tension just right or using the wrong size materials for your specific frame. Let's break down how to spot and solve them.
Why Is My Screen Wrinkled or Saggy?
This is, without a doubt, the number one frustration I hear about. A wrinkled, loose, or saggy screen almost always points to an issue with tension.
If you pull one side super tight before the others are locked in, you create uneven stress across the mesh. That’s what causes those annoying puckers and sags. The key is to apply gentle, consistent pressure all the way around.
Another frequent culprit is using the wrong size spline. If the spline is too thin for the channel in your frame, it simply won't have enough girth to firmly grip the screen mesh. No matter how much you pull the screen taut, it will end up looking loose.
What to Do When the Spline Won’t Stay Put
Ever have a corner or section of spline just pop right back out after you've rolled it in? This usually happens because you’re stretching the spline as you install it.
Think of it like a rubber band. When you pull the spline tight and force it into the channel, its "material memory" will try to shrink it back to its original length. That shrinking action is what pulls it right out of the groove, especially at the corners.
The fix is simple: Don't stretch it. Just lay the spline into the channel and let the roller tool do all the work of pressing it into place.
My Pro Tip: Fight the urge to pull the spline tight with your free hand. Let it lay loosely in the channel and use your roller to methodically press it down. This simple change in technique prevents it from shrinking and popping out later.
These same principles apply to bigger projects, too. If you’re wrestling with a patio door, the job is bigger but the problems are the same. For a more focused walkthrough, check out our guide on how to fix a sliding screen door.
Common Screen Installation Issues And Solutions
Sometimes, you just need a quick answer. I've put together this table to help you diagnose and fix the most common problems you might hit during a DIY screen job.
| Problem | Likely Cause | How to Fix It |
|---|---|---|
| Wrinkles or Sags | Uneven tension across the mesh. | Gently pry out the spline on the wrinkled side and its two neighboring sides. Smooth the screen mesh by hand and re-roll the spline using even, gentle pressure. |
| Spline Pops Out | The spline was stretched during installation. | Pull out the popped-out section. Lay it back in the channel without pulling it tight. Use your roller to firmly seat it. |
| Small Tear Near Frame | The roller was pressed too hard, or your utility knife slipped during trimming. | For a tiny tear right next to the frame, a small dot of clear superglue can stop it from getting worse. For anything bigger, it's best to start over with a new piece of mesh. |
Knowing these common pitfalls ahead of time puts you in a much better position to handle whatever your project throws at you. A little bit of troubleshooting is just part of the DIY process. Honestly, figuring out these small fixes makes that final, perfect result feel that much more rewarding.
Answering Your Screen Installation Questions
When you're tackling a new DIY project, you're bound to have questions. It’s just part of the process. Even with the best instructions, you’ll hit a snag or two. Let’s walk through some of the most common questions I hear from people learning to install their own screens.
Don't worry if you make a small mistake. Most screen installation issues are surprisingly easy to fix.
What’s the Best Screen Material to Use?
For most situations, standard fiberglass screen mesh is your best bet. It’s what I recommend to almost every beginner. It's flexible, which means it’s forgiving if you don't get the tension perfect on your first try. It also doesn't crease permanently, and best of all, it’s the most affordable option.
Now, if you’ve got a dog that paws at the patio door or a cat that thinks your window screen is a climbing gym, you'll want to upgrade. Pet-resistant polyester screen is a lifesaver. It’s significantly tougher and built to handle claws. For maximum durability, especially in areas with harsh weather, you might also look at traditional aluminum screening—it’s rigid and lasts a very long time.
How Do I Figure Out the Right Spline Size?
Getting the spline size right is probably the most important part of the job. If it’s wrong, the whole project fails. The absolute best way to guarantee you get the right size is to cut out a small piece of the old spline and take it with you to the hardware store. You can physically hold it up to the new options and find a perfect match.
If the old spline is long gone, you'll have to measure the channel in the screen frame itself. A measuring tape or, even better, a caliper will give you the most accurate reading. Most standard window frames use a spline somewhere between .125 inches (1/8") and .140 inches in diameter.
Whatever you do, don't guess the spline size. I’ve seen it happen too many times. Being off by even a tiny fraction of an inch will either make the spline impossible to roll in or result in a screen that sags right away. Measure twice, buy once.
I Finished, but My Screen Is Wrinkled. What Did I Do Wrong?
Wrinkles happen. It’s almost always a sign that you pulled the screen too tight in one area as you were rolling in the spline. Luckily, the fix is simple.
Just take a small flathead screwdriver and carefully pry out the spline from the wrinkled section and the two adjacent sides. With the spline removed, use your hand to smooth the mesh out again, letting that excess tension go. Then, gently tuck the screen back into the channel and reinstall the spline, focusing on maintaining even, steady pressure this time.
While we're talking about window screens here, these same ideas apply to bigger jobs. If you're wrestling with a door, our guide on how to fix a sliding screen door offers more specific advice.
If you'd rather leave it to the pros or just don't have the time, Sparkle Tech Screen Service handles everything. We do expert new screen installations, rescreening, and repairs for all types of bug screens, sun screens, and window sliders. We're known for quick quotes and can usually get you scheduled for same-week service.


