


Before you can tackle a stubborn sliding screen door, you’ve got to play detective. A quick but thorough inspection will tell you exactly what you’re up against, revealing the hidden culprits behind a door that sticks, sags, or just won’t slide right. This is the most important step in figuring out if you have a simple weekend fix on your hands or if it’s time to call in a pro.
How to Diagnose Your Sliding Screen Door Issues
That sliding screen door driving you crazy? The one that shudders, jumps the track, or looks sad and saggy? Those aren't just minor annoyances—they're clear signs that something is breaking down. While a gaping hole in the mesh is impossible to miss, the real troublemakers are often the less obvious parts like the frame, rollers, and track.
It’s tempting to just yank a sticky door open, but you’re likely doing more harm than good. The problem is almost never about a lack of strength; it’s about a mechanical failure. A few minutes spent on a proper inspection can save you a ton of frustration and point you straight to the real issue.
A Quick Inspection Checklist
Let's walk through a quick check-up. As you slide the door back and forth, use your senses—feel how it moves and listen for any strange sounds.
- Feel the Glide: Is the movement smooth and easy, or does it feel gritty and bumpy? If you have to fight it at certain spots, you’re probably dealing with worn-out or gunked-up rollers.
- Listen for Clues: A healthy screen door is a quiet one. Any grinding, scraping, or screeching is a dead giveaway that the rollers are shot or the metal frame is dragging directly on the track.
- Check for Gaps: Stand back and look at the door from both inside and out. Do you see daylight peeking through between the door frame and the doorway? Gaps often mean the frame itself is bent or the whole door has popped off its track.
- Examine the Mesh: Don’t just look for big tears. Gently push on the screen fabric. Does it feel taut or is it wavy and loose? Sagging mesh is usually a sign that the spline—the little rubber cord holding the screen in place—has shrunk and pulled out of the frame's channel.
Common Problems and What They Mean
Once you’ve gone through that checklist, you can start connecting the dots. Understanding what each symptom means will help you grasp the full scope of the repair.
For instance, a door that feels like you're dragging a boulder probably has rollers that have been flattened into squares after years of use. Here in Arizona, that relentless sun also does a number on the spline, making it brittle until it cracks and lets go of the screen. That’s where that dreaded wavy, sagging look comes from.
Pro Tip: Don't overlook the track! It’s a magnet for dirt, pet hair, and all sorts of grime. Sometimes, a "stuck" door is just a door fighting its way through a track full of debris. A few minutes with a stiff brush and a vacuum can make a world of difference.
Knowing these details puts you in control. You might realize a simple screen replacement is a perfect DIY project. On the other hand, if you're looking at a bent frame or finicky roller replacements, you’ll know it’s time to get an expert from Sparkle Tech Screen Service to handle it right.
Common Sliding Screen Door Problems and Solutions
To make things even clearer, here’s a quick-reference table to help you match what you’re seeing with the likely cause and solution. It can help you decide whether to grab your tools or your phone.
| Problem | What It Looks Like | Likely Cause | Possible Solution |
|---|---|---|---|
| Sticky or Jerky Movement | The door fights you, stutters, or grinds as it moves. | Dirty tracks or worn-out, flattened, or broken rollers. | DIY: Clean the track thoroughly. PRO: Replace the roller assemblies. |
| Sagging or Wavy Screen | The mesh looks loose and ripples, especially in the middle. | The rubber spline has shrunk, cracked, or popped out of the frame. | DIY/PRO: Rescreening the door with new mesh and spline. |
| Door Jumps the Track | The door frequently pops out of the bottom or top track. | Damaged rollers, a bent frame, or a misaligned track. | DIY: Try to reseat the door. PRO: A professional may need to replace rollers or adjust/fix the frame. |
| Gaps Around the Frame | You can see daylight or feel a draft when the door is closed. | The frame is bent, warped, or no longer square. | PRO: This often requires a frame repair or a full door replacement, as bending aluminum back perfectly is difficult. |
| Tears, Holes, or Rips | Obvious damage to the screen mesh itself. | Pet claws, accidental impact, or sun-rotted material. | DIY/PRO: The screen needs to be completely replaced (rescreened). Patching is only a temporary fix. |
Diagnosing the issue correctly is half the battle. Once you know what’s wrong, you can confidently move on to the repair itself.
Essential DIY Screen Repairs You Can Do This Weekend
Fixing a sliding screen door is one of those weekend projects that's genuinely satisfying. You don't need a pro-level workshop or a bunch of fancy tools—just some patience and a clear plan. Those common issues you spotted earlier, like a torn screen or a cracked spline, are completely manageable for most homeowners.
Maybe the dog forgot the screen was there (again), or perhaps the Arizona sun finally turned the mesh brittle and faded. Whatever the cause, replacing it is surprisingly straightforward. Think of it less as a chore and more as a quick home upgrade that brings back your view and keeps the pests out.
Rescreening Your Sliding Door
The most common job by far is a full rescreen. The first step is to create a good workspace. Lay a big, old blanket or a tarp down on a flat spot like your driveway or garage floor. This simple step saves both your screen frame and your new mesh from getting scuffed up.
Once you’ve carefully lifted the door out of its track and laid it down, your first job is to get that old spline out. That’s the rubbery cord tucked into the frame’s groove that holds the screen material tight.
- Find the end: Scan the groove for a little seam or break where the spline starts and ends.
- Pry it loose: Grab a small flathead screwdriver or an awl and gently lift one end of the spline.
- Pull it out: Once you get it started, the old spline should pull out of the channel in one long piece. After that, the damaged mesh just lifts away.
This diagram walks through the key things to check before you dive in, making sure you’re fixing the right problem from the start.
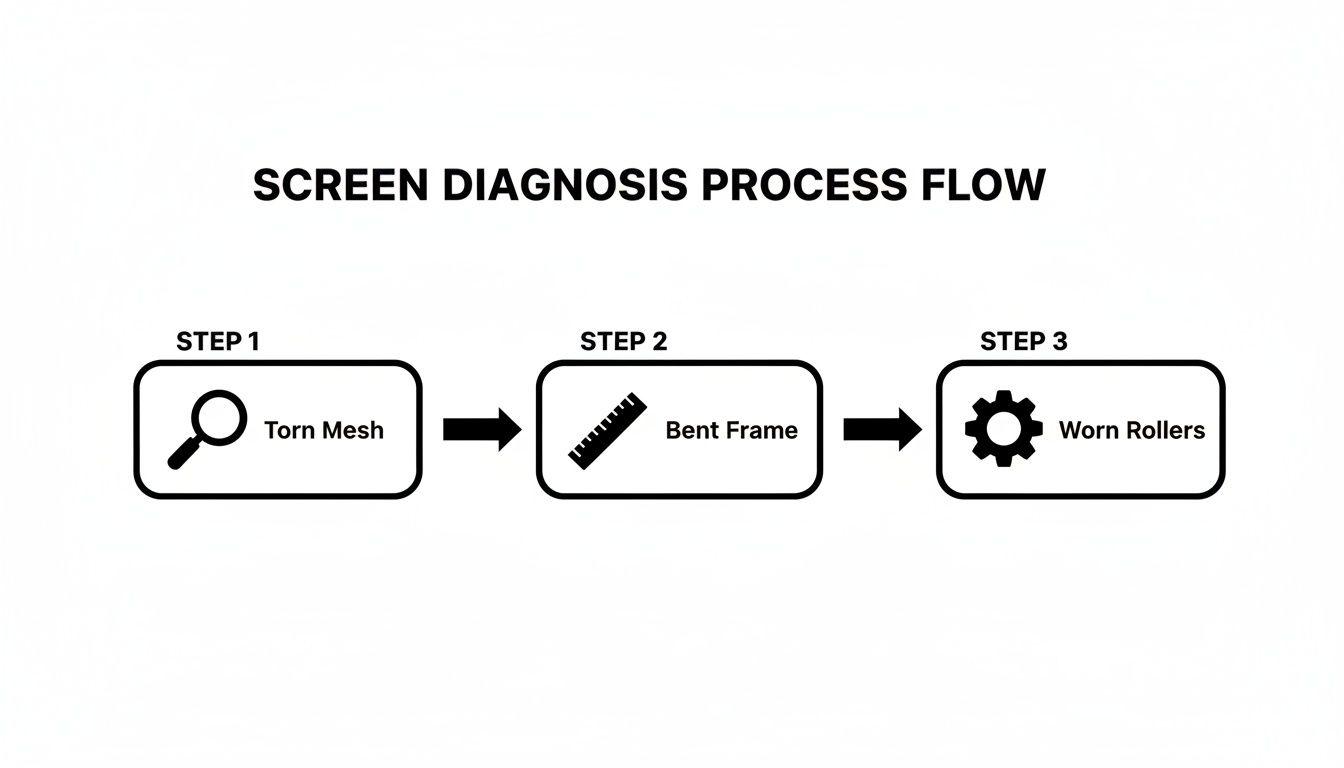
It's a great reminder that while a tear in the mesh is easy to spot, a truly solid repair also relies on a straight frame and smooth rollers.
Installing the New Mesh and Spline
Now for the fun part. Unroll your brand-new screen mesh over the frame. Make sure it hangs over the channel on all four sides by at least an inch or two. It doesn’t matter if you’re using standard fiberglass or a heavy-duty sun screen; the technique is the same. You want it taut, but not stretched to its limit.
Crucial Tip: Resist the urge to pull the screen super tight as you work. If you do, you can actually bend the frame inward, causing a warped, concave shape people in the business call "hour-glassing." The goal is a smooth, flat surface, not one that’s tight as a drum.
With the mesh laid out, you’re ready to lock it in with the new spline. A spline roller is the one tool you absolutely must have for this. It has two different wheels: a rounded (convex) one to push the mesh into the groove and a grooved (concave) one to press the spline in right after it.
Start in one corner. Use the convex wheel to gently push the screen fabric into the channel for a foot or so. Next, lay the end of your new spline over that section and use the concave wheel to roll it firmly into the groove, locking the mesh in place. Continue this process all the way around the frame, keeping the screen smooth as you go.
When you're done, all that's left is to trim the excess mesh with a sharp utility knife for that clean, professional look.
Troubleshooting Frames and Rollers for a Smooth Glide
So, you've checked the mesh and the spline, but your screen door still fights you every time you try to open it. If it grinds, shudders, or jumps the track, it’s time to investigate the hardware. The problem is almost always a bent frame or—far more often—worn-out rollers.
These little wheels are the unsung heroes of your sliding door screens. Day in and day out, they carry the weight of the door. But after years of exposure to dirt, dust, and moisture, they can wear down. You’ll know they’re failing when you hear that awful grating sound—that’s the metal frame dragging directly on the metal track because the rollers have given up.
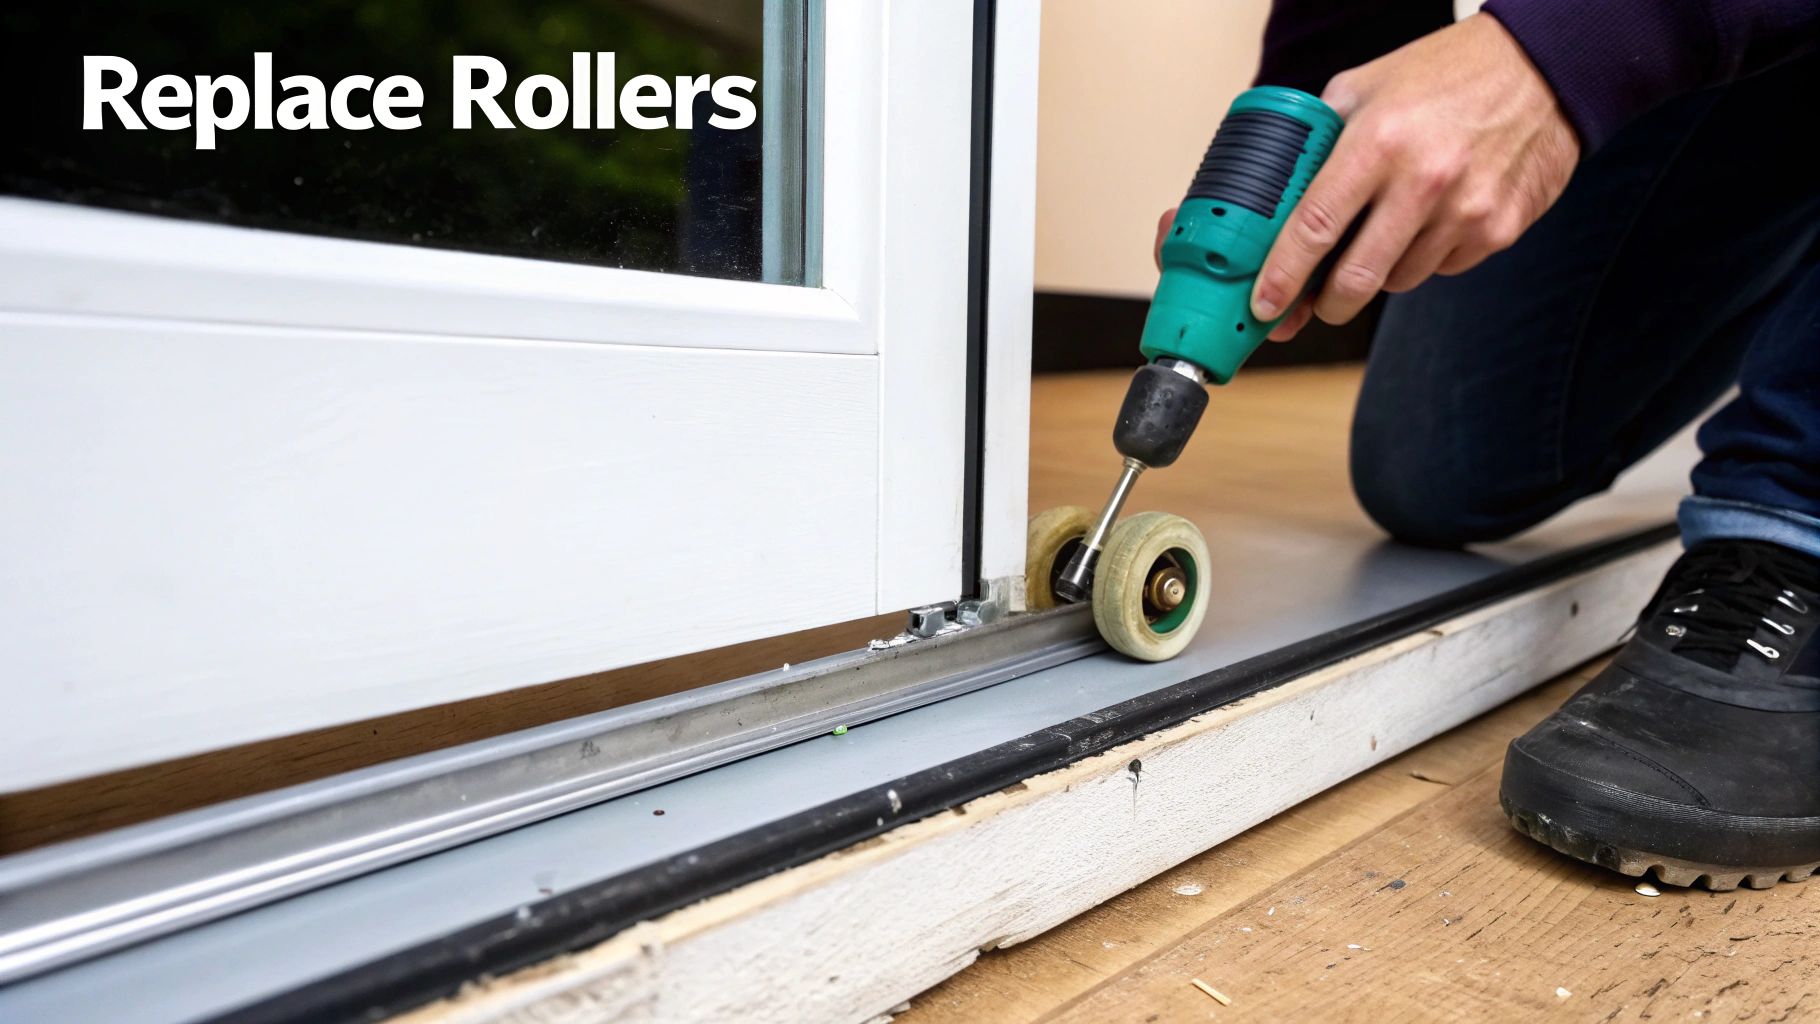
Addressing Worn or Broken Rollers
Getting a look at the rollers means taking the door off its track. Be careful here. Lay it down on a tarp or some cardboard to avoid scratching it, then take a look at the corners on the top and bottom. You should see the roller assemblies housed right inside the frame.
Replacing them is usually a pretty manageable job. Here's the typical process:
- Find the adjustment screw. It's usually on the side edge of the door, near the top or bottom. Loosening this often gives you the slack needed to pop the old roller assembly out.
- Remove the old assembly. Sometimes you have to completely remove the screw holding it in place.
- Get an exact match. Take the old, busted roller with you to the hardware store. It's critical to match the size, shape, and wheel material perfectly.
- Install the new roller. Pop it in, secure it with the screw, and then adjust it until the door hangs level and glides smoothly once you put it back in the track.
For a more detailed walkthrough, our guide on sliding door roller repair has some extra pro tips to make sure you get the right parts and the job goes off without a hitch.
When the Frame Is the Problem
Once in a while, the issue isn't the rollers but the frame itself. If it’s just a minor bend, you might be able to fix it. Lay the door on a flat, solid surface and use a rubber mallet and a small block of wood to gently tap the bent area back into place. The key is to go slow and check your work frequently so you don't overdo it.
But a severely warped or cracked frame is a whole different beast. If the corners are pulled apart or the aluminum is creased and weakened, a simple fix just won't cut it. Trying to bend a badly damaged frame back into shape is a recipe for frustration—it will never operate correctly again.
In cases like that, the best, and honestly, the most time-saving solution is to replace the entire screen door. A brand-new door will glide effortlessly for years, saving you from the daily annoyance of a door that just refuses to cooperate.
Measuring and Ordering a New Sliding Screen Door
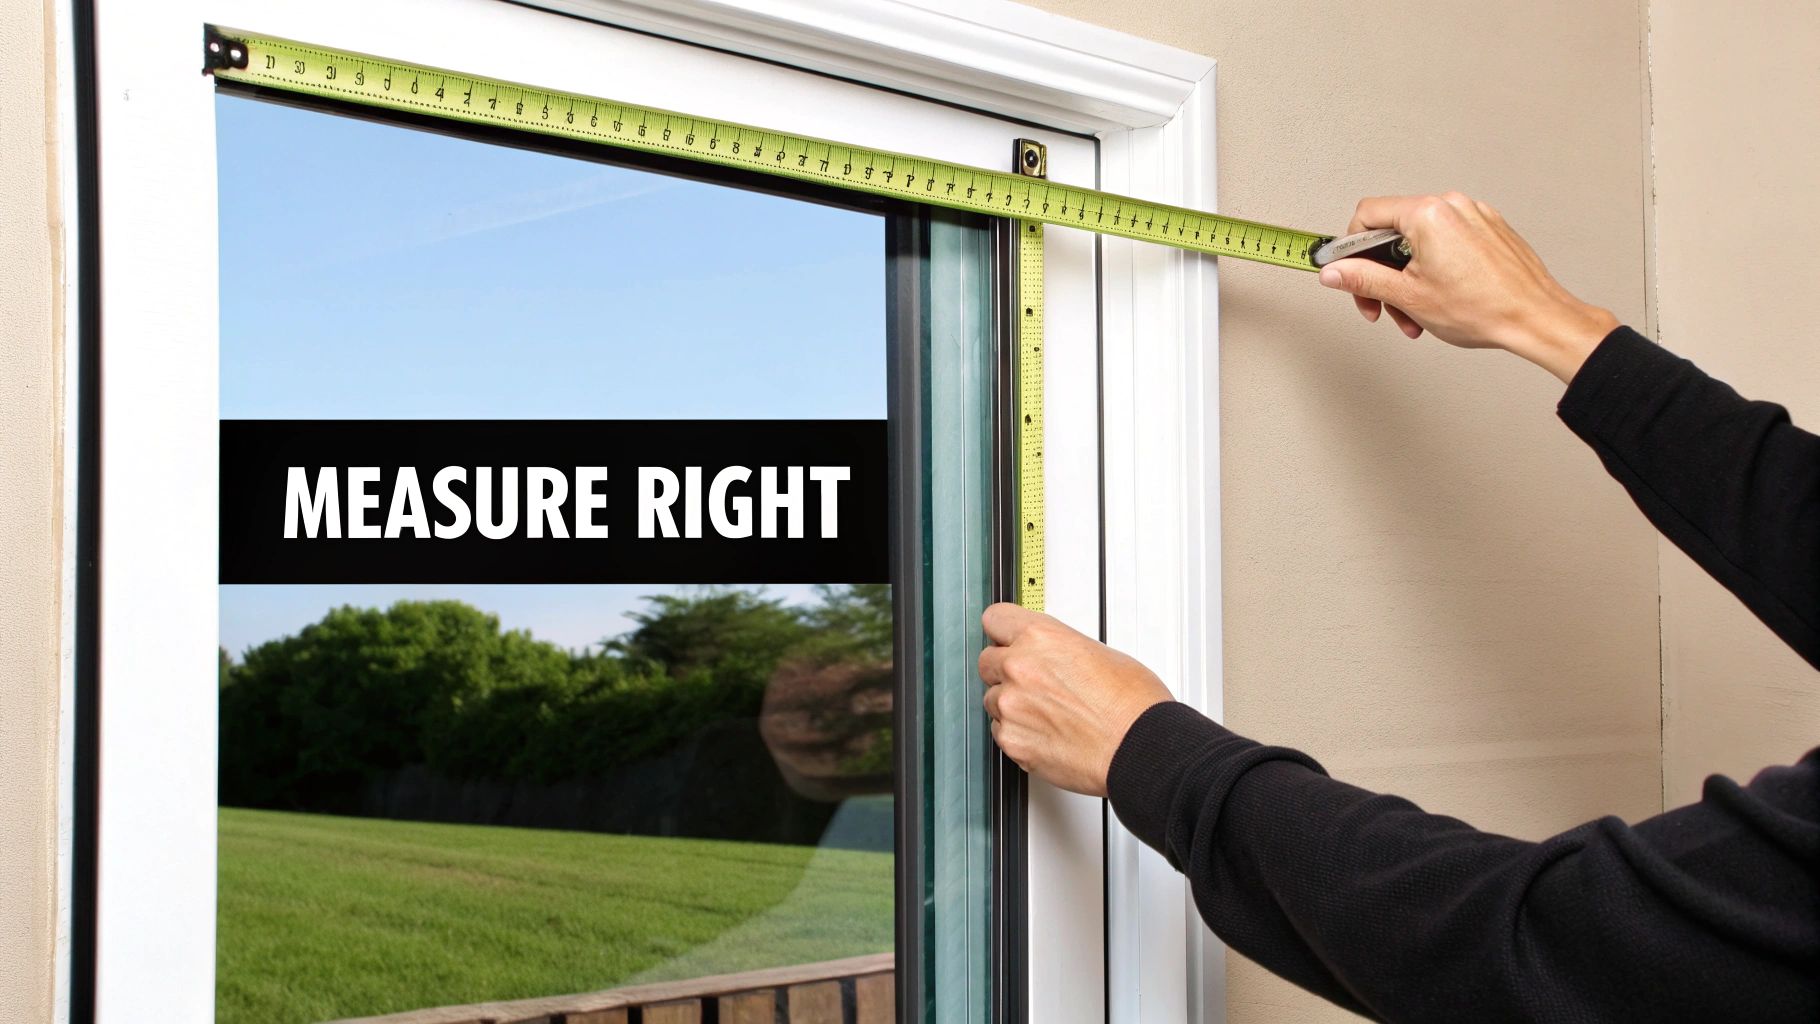
When your old sliding screen door has seen better days and repairs just won't cut it, starting fresh is often the best move. But getting that perfect, smooth-gliding new door all comes down to one thing: accurate measurements. It's the one step you absolutely can't afford to rush.
I've seen it countless times—a door that's just a quarter-inch off can stick, jam, or leave gaps for bugs to sneak through. The most common mistake? Measuring the old, warped door itself. You have to measure the door frame, specifically the tracks where the new screen door will actually sit. This way, you're fitting the door to the opening, not to the flaws of the old one.
How to Take Accurate Measurements
Grab a tape measure and let's get this right. We're looking for the height and width of the opening, measured directly from the tracks.
-
Measuring the Height: Hook your tape measure into the top track and pull it down to the top edge of the bottom track. Do this three times: once on the left, once in the middle, and once on the right. Frames can sag over time, so always use the shortest of the three measurements.
-
Measuring the Width: Run your tape measure from the inside of the side jamb (the vertical part of the frame) to the center of the divider where the sliding door and stationary panel meet. Just like with the height, take this measurement at the top, middle, and bottom. Again, use the shortest number you get.
This "measure-thrice" method ensures your new door will fit perfectly, even if your frame isn't perfectly square anymore. For a deeper dive, check out our complete guide on https://sparkletechscreenservice.com/how-to-measure-for-screen-door/.
Choosing the Right Screen Material
With your dimensions in hand, it's time for the fun part: picking the materials. The market for sliding door screens has exploded with new, energy-efficient options. Here in Arizona, aluminum frames paired with sun-blocking screens are incredibly popular for their durability and ability to cut down on cooling costs.
A professional service like Sparkle Tech takes all the guesswork out of it. We come out, take precise measurements, walk you through the best screen and frame options for your home, and handle the entire ordering and installation process. It's the surest way to get a flawless fit and a door that operates smoothly for years to come.
Thinking about the project as a whole can also be helpful. For example, understanding how professionals approach large openings, like when sizing curtains for sliding glass doors, reinforces the importance of precision. With the right numbers and the right material, your new screen door will be a fantastic, long-lasting upgrade to your home.
DIY Repair Or Calling A Pro? Making The Right Choice
So, you’ve figured out what’s wrong with your sliding screen door. Now comes the classic homeowner dilemma: Do I fix this myself, or should I just call someone? There’s no denying the satisfaction that comes from a successful DIY project, and of course, you can save a few bucks upfront.
If you’re just dealing with a simple rescreening job on a standard door, it can be a great way to spend a Saturday afternoon.
But it’s important to go into it with your eyes open. Getting that new screen mesh perfectly tight, like it came from the factory, is a lot trickier than it looks on a YouTube video. A common rookie mistake is ending up with a screen that sags or has waves in it. Even worse, you can accidentally bend the frame by pulling the mesh too tight. And don't get me started on the hardware store trip—trying to match up the exact roller or find the right diameter of spline can turn a quick errand into a frustrating scavenger hunt.
When DIY Is The Way To Go
For certain smaller, more contained issues, rolling up your sleeves and tackling it yourself is a fantastic option. It really comes down to the scope of the work and your own patience level.
You should feel confident going the DIY route if:
- It’s a Small, One-Off Job: You just need to rescreen a single door, and the frame is in good shape.
- The Problem is Simple: You're looking at a clear-cut tear in the mesh, but the rollers and track are perfectly fine.
- You've Got Time to Spare: You're not in a hurry and are willing to take your time, learn the process, and maybe even start over if the first attempt isn't perfect.
The Clear Advantage Of Bringing In An Expert
Hiring a professional service like Sparkle Tech is about more than just getting the job off your to-do list; it’s about ensuring a perfect, long-lasting result. Our technicians work on sliding door screens every single day. They show up with specialized tools, a truck stocked with every part imaginable, and the seasoned eye to spot issues you might not even notice.
What might look like a bad roller to you could actually be a symptom of a bent track that needs careful adjustment. A pro sees these things immediately, saving you from a “fix” that just breaks again in a few weeks. This expertise is more critical than ever, as the market for retractable screen doors is expected to boom from USD 2.1 billion in 2024 to USD 4.3 billion by 2033. Homeowners want more advanced systems, and that means repairs are getting more complex, too.
Hiring a pro is an investment in peace of mind. You get a flawless, durable repair backed by a guarantee, all completed in a fraction of the time it would take to do it yourself.
To help you decide, here’s a quick breakdown of what to expect from each path.
DIY vs. Professional Screen Service A Quick Comparison
| Factor | DIY Approach | Professional Service (Sparkle Tech) |
|---|---|---|
| Cost | Lower upfront cost for materials. | Higher initial cost but includes labor, parts, and expertise. |
| Time | Can take several hours to a full weekend, including trips to the store. | Typically completed in under an hour for standard repairs. |
| Tools | Requires purchasing or borrowing specific tools (spline roller, etc.). | Technicians arrive with all specialized tools needed for the job. |
| Quality | Results can vary; risk of sagging screens or warped frames. | Guaranteed tight, professional finish with durable materials. |
| Hassle | You're responsible for measuring, buying parts, and cleanup. | A completely hands-off experience. We handle everything. |
| Warranty | No warranty on your own labor or if parts are installed incorrectly. | Our work is backed by a satisfaction guarantee and warranty. |
Ultimately, the choice comes down to the complexity of the job and your comfort level. For homeowners weighing their options, getting information from local window screen professionals can offer some great perspective.
If you’re juggling multiple damaged screens, a seriously bent frame, or rollers that just won’t cooperate, calling an expert is easily the most efficient path forward. And remember, at Sparkle Tech, we also provide comprehensive window screen repair services to get your whole home looking its best.
Simple Tricks to Make Your Screen Last
Once your sliding screen door is back in action—whether it’s a fresh repair or a brand-new installation—a little bit of care can make a huge difference. Think of it less as a chore and more as a way to protect your investment. Keeping it in great shape preserves that smooth, easy glide and adds years to its life.
A few minutes of simple, seasonal maintenance stops the grit and grime from building up. That’s the stuff that eventually leads to bigger headaches like worn-out rollers and damaged tracks. You’ll save yourself the frustration (and the cost) of future repairs down the road.
A Quick Seasonal Cleaning Plan
Here in Arizona, we all know dust and pollen are part of life. That fine debris gets everywhere, settling into the screen mesh and packing tightly into the door tracks. Over time, it acts just like sandpaper, grinding away at the components every single time you open and close the door. A gentle cleaning each season is your best defense.
-
Tackling the Mesh: Grab a bucket of warm water and add a few drops of mild dish soap. Using a soft-bristle brush or a microfiber cloth, give both sides of the screen a gentle scrub. Steer clear of harsh chemicals or a pressure washer—they’re way too aggressive and can easily tear or stretch the mesh. A light rinse with a garden hose is all you need, then just let it air dry.
-
Clearing the Tracks: The tracks are magnets for pet hair, dirt, leaves, you name it. Start by vacuuming out all the loose gunk with a crevice tool. For anything caked on, use that same soapy water and a stiff brush to get it clean. A clear, clean track is absolutely essential for a smooth glide.
This focus on upkeep is backed by what we see across the industry. The platform screen door market, valued at over USD 980 million in 2023, is all about longevity and performance. After all, a good residential screen can reduce insect entry by up to 90%. Using quality materials like corrosion-resistant aluminum is a huge part of that, especially in our Arizona climate. You can explore more market insights on gminsights.com.
The Secret to an Effortless Glide: Lubrication
With everything clean and dry, it’s time for the final touch. Lubrication is what gives you that whisper-quiet, one-finger slide. Now, it’s crucial you don’t reach for an oil-based lubricant like WD-40. It seems like a good idea, but it actually attracts more dust and dirt, quickly creating a sticky, gritty mess that makes the problem worse.
The real pro-tip is to use a silicone-based lubricant spray. It goes on clean and dries quickly without leaving behind any greasy residue.
Give the top and bottom tracks a light spritz, and don't forget the roller assemblies. Just slide the door back and forth a few times to spread the lubricant evenly, and you’re all set.
This simple two-step routine—a quick clean and a light lubrication—is all it really takes to keep your sliding door screens working like new. It’s a small bit of effort that protects your investment and ensures you can enjoy that fresh breeze without a fight.
When maintenance isn't enough and you need a repair or replacement done right, trust the experts at Sparkle Tech Screen Service. We offer fast, reliable solutions to get your doors sliding perfectly again.


