


That little rip in your lanai screen might look like a small problem, but it’s basically a welcome mat for every mosquito and no-see-um in the neighborhood. More importantly, small tears have a bad habit of becoming big ones. A real, lasting screen enclosure repair starts with a good, honest look at the entire structure, not just a quick fix on the obvious hole.
Taking the time to understand the full picture is the difference between a repair that lasts for years and one you’ll be redoing next season.
How to Diagnose Your Screen Enclosure Damage
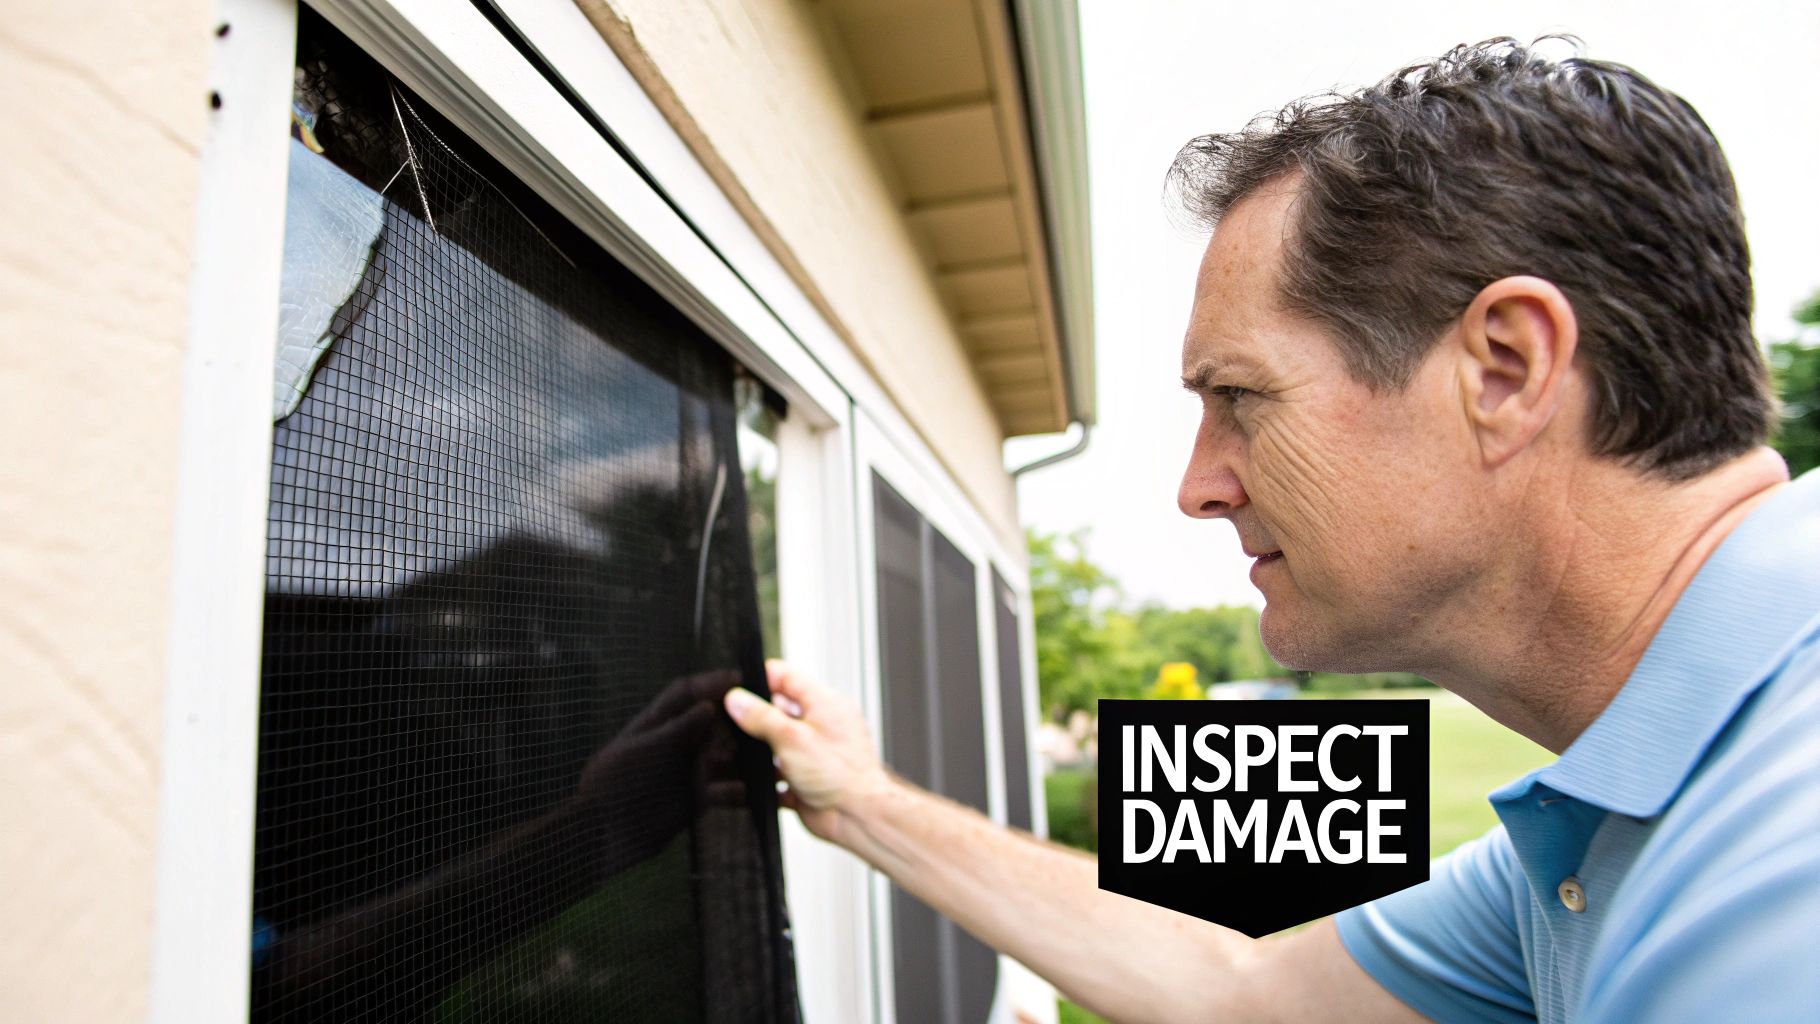
Before you even think about grabbing your tools, the first and most critical move is a thorough inspection. It’s easy to get tunnel vision and focus on the one tear from a fallen palm frond, but often, that’s just a symptom of a bigger issue. This is where a lot of DIY repairs go wrong—fixing one spot while ignoring the three others that are about to fail.
Start by looking past the obvious damage. Go panel by panel and really examine the screen mesh itself, paying close attention to the sections that bake in the sun all day. The sun is the number one enemy of screen mesh, slowly cooking the life out of it until it becomes brittle.
Gently poke the screen in a few different areas on each panel. If you hear a faint crackling sound or feel the material is stiff and has zero give, that screen is on its last legs. A patch on brittle mesh is like putting a band-aid on a sunburn—it’s not going to solve the underlying problem.
Inspecting the Spline and Frame
Once you've checked the mesh, your eyes should go to the spline. That's the rubbery cord tucked into the frame's channel that holds the screen tight. Just like the screen, the spline gets destroyed by heat and UV rays, causing it to shrink, harden, and pop out of its groove.
Look for any spots where the spline is pulling away, which creates those telltale saggy areas. If the spline is loose, the screen’s tension is gone.
While you're at it, give the aluminum frame a once-over. You’re looking for a few key things:
- Corrosion or Rust: Pay special attention to the screws and fasteners. Any rust is a red flag that can compromise the strength of the whole structure.
- Bent Sections: After a big storm, it's common to find bent frame pieces from flying debris. This warps the frame, puts uneven stress on the screens, and creates gaps.
- Loose Anchors: Wiggle the base of the frame to make sure the entire enclosure is still firmly anchored to your patio or foundation.
A simple 15-minute walk-around can save you a world of headache. You might find brittle mesh on the roof panels you never look at or a loose door frame that’s just as important as that big tear. This is how you figure out if you're dealing with a quick patch job or if it's time for a full panel replacement.
Creating a Repair Strategy
With your inspection notes in hand, you can now map out a smart plan of attack. A methodical approach to your screen enclosure repair ensures you’re fixing the actual cause, not just slapping on a temporary solution.
Use this quick reference to decide whether to patch, replace a single panel, or plan for a larger rescreening project based on what you find during your inspection.
| Type of Damage | Key Indicators | Recommended Action |
|---|---|---|
| Small Punctures | A clean hole (less than 3 inches) in otherwise flexible, newer mesh. | Patch it. A simple adhesive patch kit works perfectly here. |
| Single Panel Failure | A large tear, or a small tear in old, brittle, and sun-faded mesh. Loose spline on one panel. | Replace the single panel. Patching brittle mesh is a waste of time. |
| Widespread Wear | Multiple panels have faded, brittle mesh. Spline is popping out in several places. Visible rust on fasteners. | Plan a full rescreening. Addressing panels one by one becomes inefficient and costly. |
Categorizing the damage like this helps you make the right call. A tiny hole in a new screen is a five-minute patch job. But if you see multiple panels with faded mesh and spline pulling away, you might realize it’s more cost-effective in the long run to tackle a bigger rescreening project.
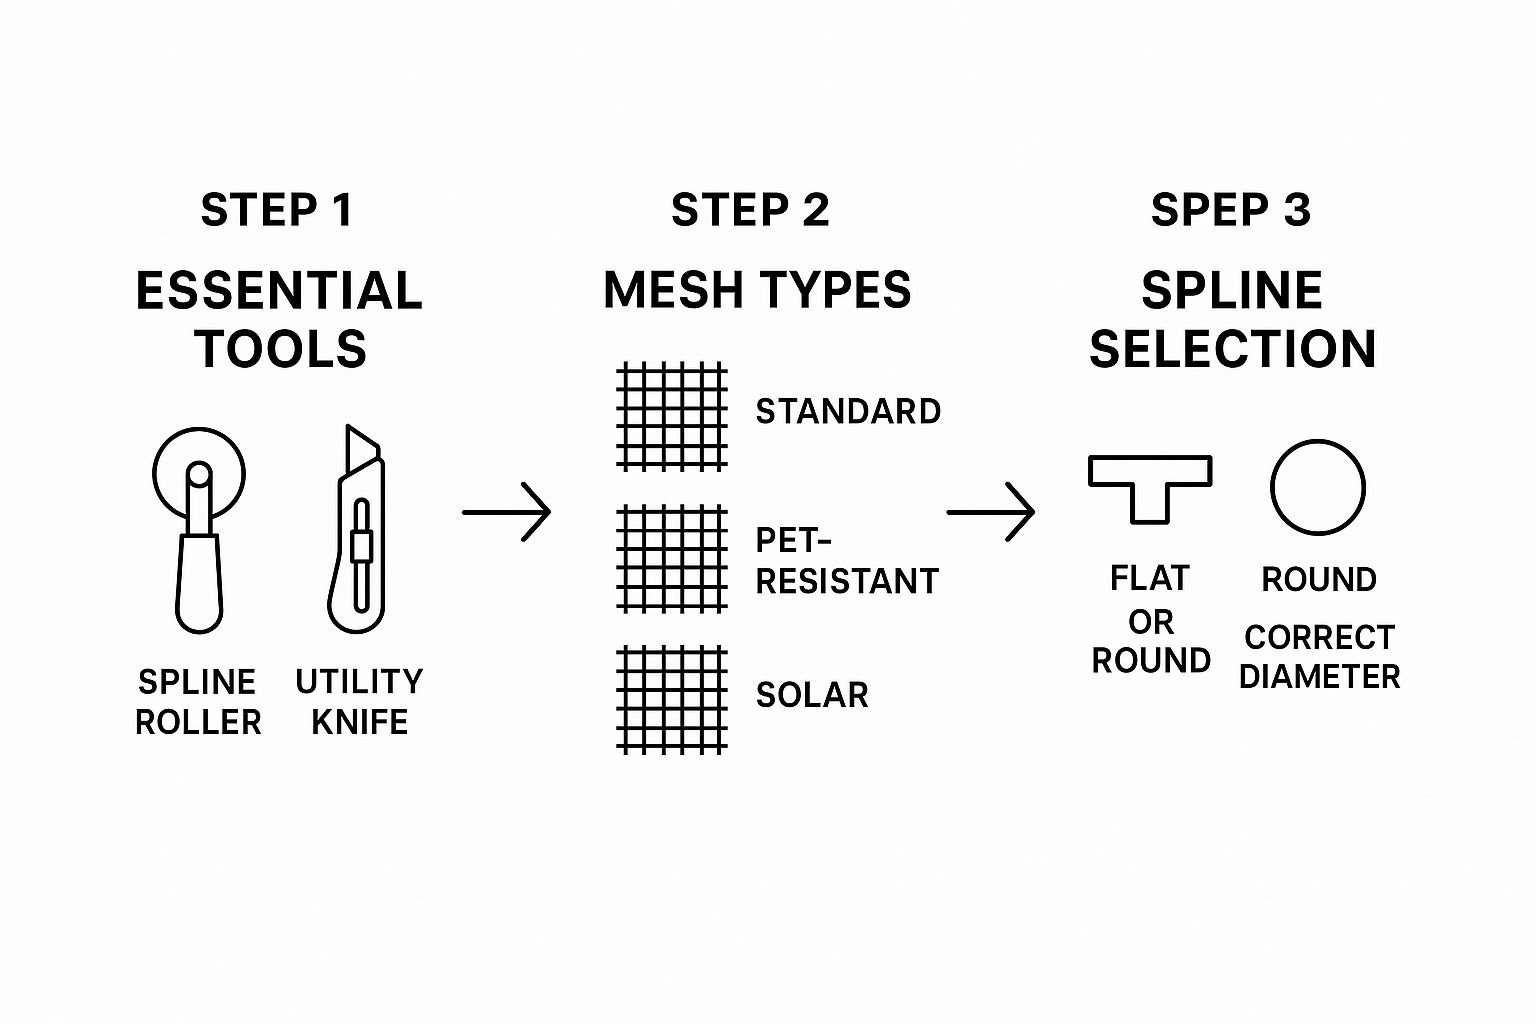
Choosing the Right Tools and Materials
Walking into the hardware store for a screen repair project can feel like a pop quiz you didn't study for. The aisles are full of options, and it's easy to grab the wrong thing. But with a little prep, you can walk in confidently, get exactly what you need in one go, and set yourself up for a successful repair. Honestly, getting the right supplies is half the battle.
The good news? You don't need a massive, expensive toolbox for this. A few key items are all it takes to get a professional-looking finish.
- Utility Knife: Don't even think about using a dull blade. A fresh, sharp utility knife is your best friend for trimming the new mesh. It will give you a clean, crisp edge. A dull one will just snag and fray the screen, leaving a sloppy mess.
- Spline Roller: This little gadget is the one specialized tool you absolutely need. It’s designed with two wheels: one to push the screen into the channel and the other to firmly seat the spline on top of it. Don't skip this.
- Flathead Screwdriver: A small, thin flathead is perfect for digging out the old, brittle spline. It helps you get started without gouging or scratching the aluminum frame.
If you want to get into the nitty-gritty of which tools work best, we've got a full breakdown in our guide on essential window screen repair tools.
Selecting the Right Screen Mesh
The type of mesh you pick has a huge impact on everything from how long your repair lasts to how comfortable your patio is. Standard fiberglass is the default for many, but it's definitely not a one-size-fits-all solution. You have to consider your home, your family, and your climate.
This simple infographic boils down the key decisions you'll face when getting your materials together.
Think of it as your cheat sheet for matching the right supplies to your specific needs. Getting this part right is what separates a temporary patch from a long-term fix.
- Standard Fiberglass Mesh: This is the workhorse of the screen world. It’s budget-friendly and gives you great airflow and visibility, making it the perfect choice for most general pool and patio enclosures.
- Pet-Resistant Screen: Have a dog that leans or a cat that climbs? This stuff is a game-changer. It's a vinyl-coated polyester that is roughly seven times stronger than the standard fiberglass mesh. It's a must for any panels within reach of your four-legged family members.
- Solar Screen: If your patio feels like an oven in the afternoon, this is your solution. Solar screens are dense enough to block up to 90% of the sun's harsh rays, which keeps the space cooler and protects your furniture from fading. The only trade-off is that it’s a bit darker to look through.
The biggest mistake I see homeowners make is not matching the screen to their lifestyle. If you put standard fiberglass on the bottom panels and you own an energetic Golden Retriever, you'll be doing this whole repair again before the year is out.
Matching the Spline Correctly
Now for the final piece of the puzzle: the spline. This little rubber cord is what locks the screen mesh into the frame's channel, and getting the size right is critical. This is where so many DIY jobs go wrong.
If the spline is too thin, your screen will look saggy and will eventually pop out. If it's too thick, you'll fight and sweat and probably won't be able to get it in at all.
The foolproof way to get it right? Snip off a small piece of the old spline from your damaged panel and take it with you to the store. You can match it up by hand right there in the aisle. Also, pay attention to the shape—most spline is round, but some frames use a flat profile. Make sure you get the right shape and the right diameter.
Getting Your Hands Dirty: A Practical Guide to Replacing a Screen Panel
Alright, this is where your prep work pays off. With the right tools and a bit of patience, swapping out a damaged screen panel is a really satisfying job. We’ll walk through it, starting with getting that old, torn screen out of the way.
The first part of any screen enclosure repair is a little bit of careful demolition. The goal here is to remove the old material without damaging the aluminum frame and creating a bigger headache for yourself.
Tearing Out the Old Screen and Spline
Your first mission is to find an end to the old spline. I usually grab a small, thin flathead screwdriver or even a scratch awl to carefully pry up one end of that rubbery cord from its channel. Just be gentle—you don't want to gouge the metal frame and leave a permanent mark.
Once you’ve got a little piece lifted, you can usually just grab it with your fingers or a pair of pliers and pull. More often than not, the whole thing will come zipping right out in one long piece. With the spline gone, the old screen mesh basically falls out of the frame. Easy enough.
Sizing Up and Cutting the New Mesh
Now for the new screen. This is a classic "measure twice, cut once" moment, and it really matters here. Unroll your new mesh and just drape it over the frame's opening. Don't worry about pulling it tight yet; just let it lie flat.
Here’s a pro tip that will save you a world of frustration: always give yourself extra material to work with. Use your utility knife to cut a piece of mesh that’s at least two to three inches larger than the opening on all four sides.
That extra couple of inches is your safety net. It gives you something to grip while creating tension and makes sure you don’t end up a half-inch short on one side. You can always trim the excess later, but you can't magically add more screen if you cut it too small.
This one simple step is the key to avoiding the most common DIY mistake in screen repair. Of course, different frames can have their own quirks; for example, the process for a screen replacement for a patio door can be slightly different due to the hardware involved.
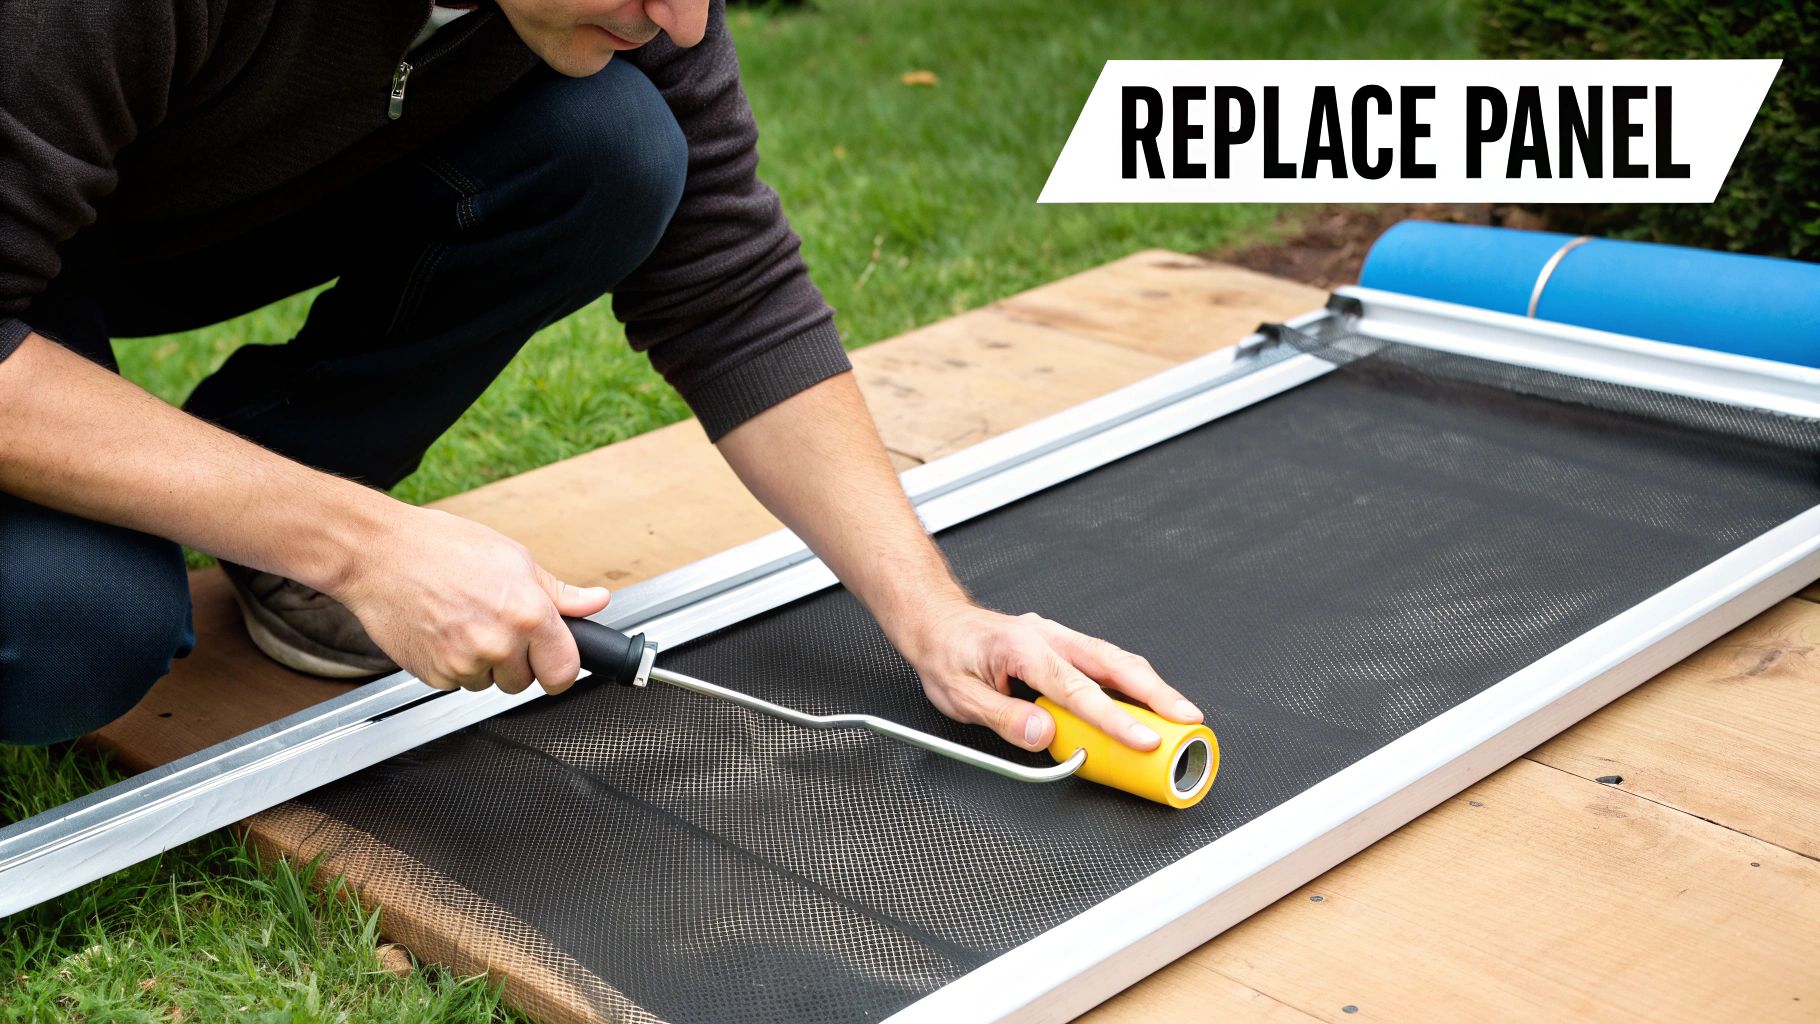
Installing the New Screen and Spline
With your oversized piece of mesh cut, it's time for the main event—the splining. This is what gives you that tight, drum-like finish and makes a repair look professional instead of saggy.
Lay the new mesh over the opening, making sure its grid lines are running straight and parallel with the frame. Now, take your spline roller. Using the convex wheel (the one without the groove), gently press the screen into the channel along one of the shorter sides. This pre-forms a little trough for the spline to sit in.
Next, start pushing the new spline into that same channel. Switch to the concave wheel on your roller and press the spline firmly down, locking that first side of the screen in place. Just focus on getting this one side done for now.
Move over to the opposite side of the frame. This is where you create the tension. Gently pull the screen mesh taut—not so hard that you warp the grid pattern, but with enough force to eliminate any slack. While holding that tension, use your roller to press the spline into the channel on this second side.
With two opposing sides locked in, your screen is anchored. Now you just repeat the process for the last two sides. As you go, maintain that light, consistent pull away from the frame. This is what guarantees the panel will be perfectly flat, with no wrinkles or sags. The corners can be a little tricky; just slow down and use the edge of your roller tool to really press the spline in tight.
Finally, grab your sharp utility knife and carefully trim off the excess mesh. I find it’s best to angle the blade away from the new spline so you don't accidentally nick it. The result is a clean, sharp edge and a brand-new screen panel that looks fantastic.
Getting That Pro-Level Finish: Insider Tricks of the Trade

You know, there's a big difference between a DIY repair that looks "good enough" and one that looks like a professional was just there. It really just comes down to a few small, but absolutely critical, techniques. These are the little details that ensure your new screen panel is drum-tight and actually stays that way for years.
The "Bowing" Method for a Taut Screen
Here's a trick we use all the time to get a perfectly taut screen: the "bowing" method. After you've got the first side splined in, move to the opposite side. Instead of just yanking the screen straight across, apply some gentle, steady pressure to the center of the mesh. You want to create a slight "bow" or arc in the material.
While you're holding that bow, start pushing the spline in from the center of that second side, working your way out toward the corners. This little maneuver creates perfectly even tension across the entire screen surface. No sagging, no wrinkles.
Perfecting Your Trim Work
Okay, all four sides are splined in, and you've got that excess mesh hanging off the edges. This is your last chance to make the job look truly polished. A sloppy trim can make an otherwise perfect installation look amateur.
The secret? A brand-new, razor-sharp blade in your utility knife. Don't try to get one more use out of an old one. Place the tip of that fresh blade on the outside edge of the spline, angling it just slightly away from your new screen. Using the spline channel as your guide, run the knife along the perimeter in one smooth, continuous motion. This slices the mesh right at the edge, leaving a clean, almost invisible line.
A clean cut isn't just for looks—it prevents premature fraying. Those little frayed bits can get caught on things and pulled, which can eventually work the screen loose from the channel. Taking an extra 30 seconds here makes a huge difference down the road.
Timing is Everything: Working With the Weather
Believe it or not, the weather can be your best friend or your worst enemy on a screen repair job. The absolute ideal time to work is on a calm, overcast, and moderately warm day. Try to avoid tackling this in the direct, intense heat of the sun if you can.
Here’s why it matters: screen mesh, especially fiberglass, expands a little when it gets hot. If you install a screen in the scorching midday sun, it's at its most expanded state. When it cools down that evening, the mesh contracts. Sometimes it tightens up so much that it pulls itself loose or puts way too much strain on the spline and frame.
- Avoid Direct Sun: The heat makes the screen expand, which can lead to a saggy, wrinkled mess when it cools.
- Dodge the Wind: Even a slight breeze can make wrestling a large piece of mesh incredibly frustrating.
- Ideal Conditions: An overcast day with temperatures between 70-85°F gives you the most stable and predictable working environment for the materials.
It's interesting how much screen repair needs can change based on where you live. The demand for screen door repair services varies a lot by region, mostly due to climate and common housing styles. You can actually find more insights on these market trends at Data Insights Market. By keeping these simple tips in mind, you can take your work from a simple patch-up to a truly professional-grade improvement.
Knowing When to Call a Professional
Taking on a DIY project can be incredibly satisfying, but there’s a lot of wisdom in knowing your limits. Some screen enclosure repairs are much more involved than just popping in a new panel. These are the jobs where calling a professional isn't just a convenience—it's a necessity for safety and the long-term integrity of your structure.
The moment you see a bent support beam or any real damage to the main aluminum frame, that’s your cue to stop. Think of the frame as the skeleton of your enclosure. If it's compromised, you're looking at a potential collapse, especially when a storm rolls through. This kind of fix goes way beyond a spline roller and requires specialized equipment and expertise.
Another huge red flag is height. Any repair on a second-story enclosure or a high-up panel immediately introduces serious safety risks. Juggling large rolls of screen while perched on a ladder is a dangerous game. Pros have the right safety gear, scaffolding, and experience to tackle these jobs without incident.
Assessing the Scope and Cost
The sheer scale of the project is another factor to consider. Swapping out one or two torn panels? That's a perfect weekend project. But if you're looking at a dozen or more brittle, sun-damaged panels, you've crossed over into full rescreening territory.
This is where you need to run a quick cost-benefit analysis in your head.
- Your Time: A full rescreen can easily eat up an entire weekend, or even two, for someone without experience. It can be frustrating work.
- A Pro’s Time: An experienced crew can often knock out the same job in a single day.
- The Result: Professionals have the touch. They know how to get every single panel drum-tight, a look that’s tough to achieve across a large area without a lot of practice.
Weigh the value of your own time against a pro’s efficiency. You might save a few bucks on labor, but you'll spend your valuable free time on a tough job, and you might not be thrilled with the final look.
Knowing what professionals charge can help you decide. The national average cost for pool enclosure repair can shift depending on how bad the damage is and where you live. For smaller, individual jobs, you can see what we offer for our window screen repair services. If you do decide to hire out, understanding digital marketing for home services can offer some good insights into how the best pros market themselves and connect with homeowners like you.
Common Questions About Screen Enclosure Repair
When you're getting ready to tackle a screen enclosure repair yourself, a few questions always come up. I've been there. Getting the right answers from the start can be the difference between a project you’re proud of and a major headache. Let’s walk through a couple of the big ones.
The first fork in the road is always the material. Picking the right screen is everything—it determines how long your repair will last and how well it stands up to everything from bugs to harsh sunlight.
What’s the Best Screen for a Pool Enclosure?
For most pool cages, the industry standard and my usual go-to is an 18×14 fiberglass mesh. It hits that perfect sweet spot: great visibility, good airflow, and it keeps the no-see-ums out. It's the reliable workhorse for a reason.
But what if your situation isn't "standard"? Maybe you have a dog that loves to lean against the screen, or you live next to a golf course. In those cases, it’s smart to upgrade. I often recommend a tougher, pet-resistant screen for the lower panels. It's built to take a beating that standard mesh just can't handle.
A quick pro-tip I always share: Never reuse old spline. The sun bakes all the elasticity right out of it, making it brittle and weak. Trying to reuse it is one of the most common DIY mistakes, and it almost guarantees you’ll have a saggy screen that needs redoing way too soon.
How Do I Know What Size Spline to Buy?
This one is absolutely critical. If your spline is too thin, the screen will pop right out. Too thick, and you'll fight it the whole way, probably tearing your brand-new screen in the process. You need a perfect fit for that tight, professional finish.
Forget the guesswork. The most reliable way to get it right is dead simple:
- Grab a Sample: Use a small flathead screwdriver or an awl to carefully pry out a small piece of the old spline from the frame.
- Take it Shopping: Bring that little piece with you to the hardware store.
- Match It Up: Hold your old spline right next to the new rolls. This lets you match the diameter and shape (some are round, some are flat) perfectly.
Sure, you could try measuring the channel in the frame, but nothing beats having the real thing in your hand. It takes all the uncertainty out of the equation and saves you from that frustrating second trip to the store.
Whether you're fixing one panel or ten, having the right materials and a bit of know-how makes all the difference. Of course, if you decide you'd rather hand the job over to the pros, Sparkle Tech Screen Service offers same-week service to get your enclosure looking brand new. Contact us today for a quick, hassle-free quote.


