


Fixing a ripped window screen is one of those classic home improvement projects that feels incredibly satisfying to finish. But before you can get that fresh, tight screen in place, you need to gather the right tools. Honestly, getting the prep right is half the battle, and showing up with the proper gear will make the difference between a frustrating afternoon and a quick, professional-looking repair.
Your Window Screen Repair Toolkit: What You'll Actually Need
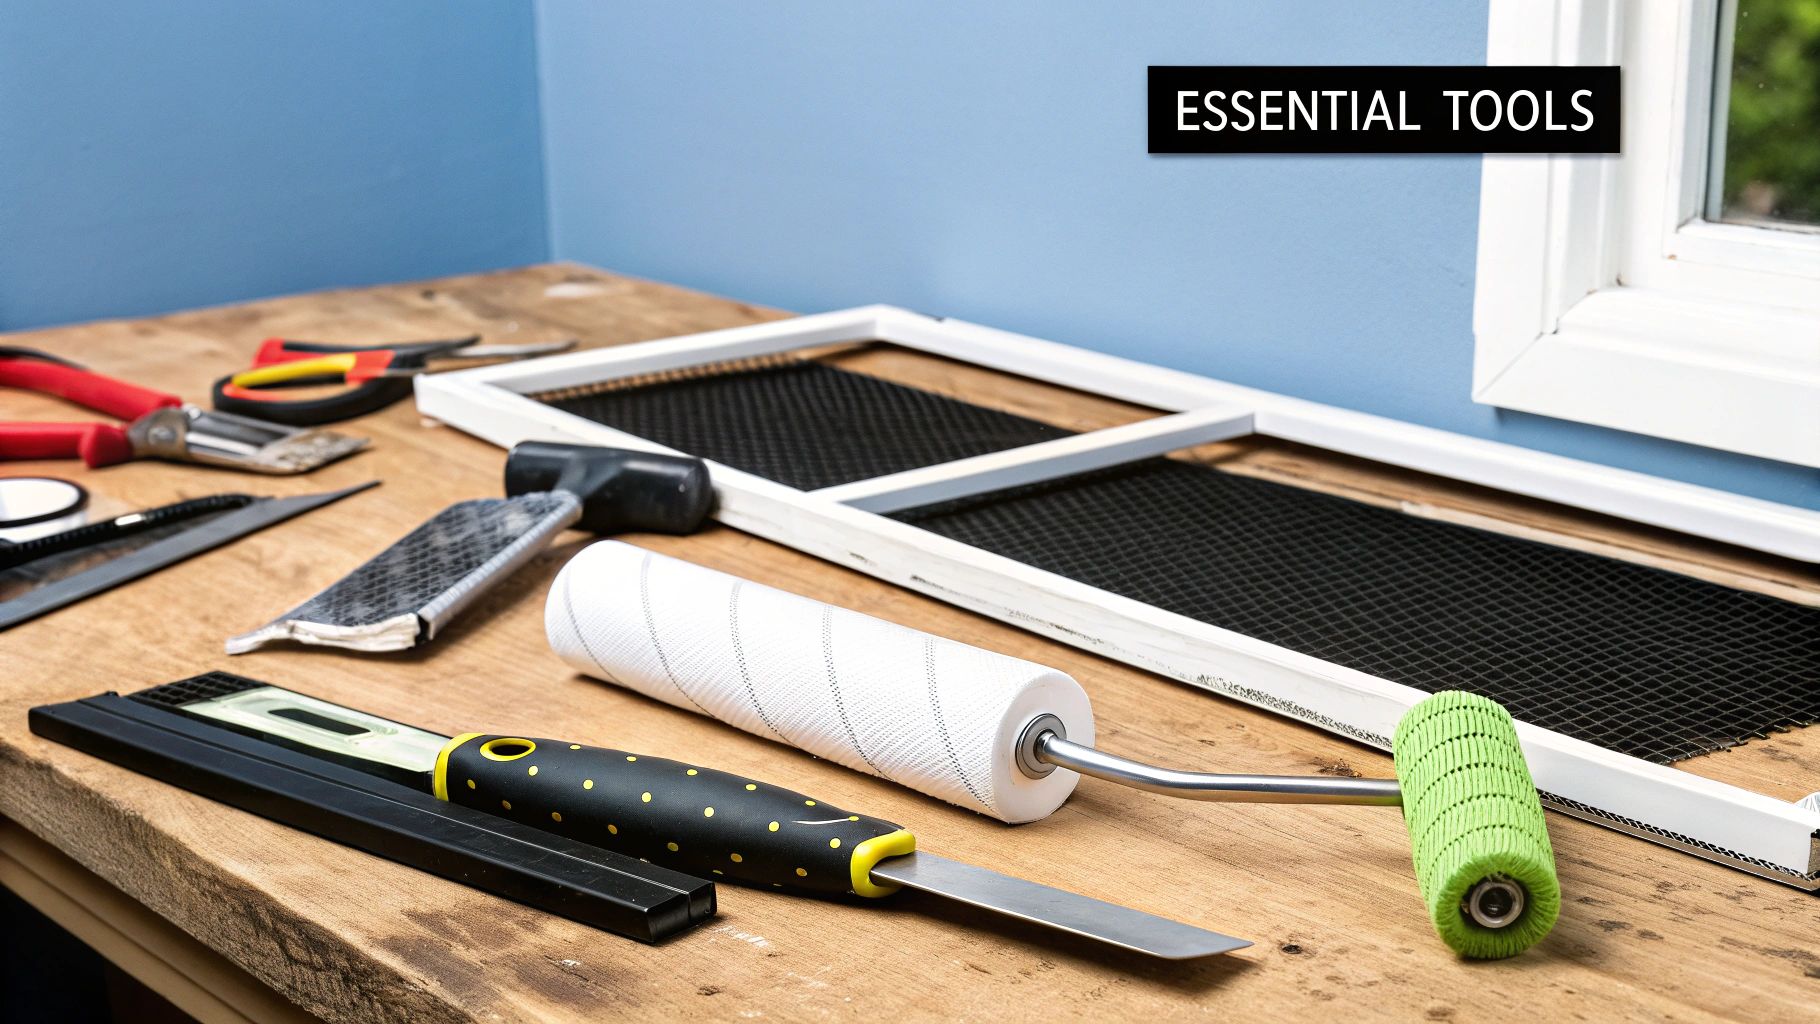
Let's walk through the essential tools that every pro and experienced DIYer has on hand for this job. It’s not a long list, and most of these items are inexpensive, but trying to get by without them is a recipe for a sloppy finish.
It's a smart move to learn this skill. The market for window repair services was recently valued at USD 3.2 billion and is expected to grow by about 6.5% each year. This shows just how many people are choosing to repair rather than replace, saving a ton of money in the process. You can dig into the specifics of these trends in this detailed report on VerifiedMarketReports.com.
The Must-Have Tools
If you don't have these, stop and go get them. Trust me, improvising here will only lead to bent frames, torn screens, and a whole lot of regret.
- Spline Roller: This is the one specialized tool you absolutely cannot skip. It’s a simple gadget with a handle and two wheels—one rounded outwards (convex) and one curved inwards (concave). Each wheel has a specific job in pushing the screen material and then the spline securely into the frame's channel.
- Utility Knife: You need a fresh, sharp blade. A dull knife will snag and pull the delicate fibers of the screen mesh as you trim the excess, completely ruining your hard work right at the finish line.
- Flathead Screwdriver or Awl: Something thin and strong is required to dig out the old, brittle spline from its groove without damaging the frame itself.
Here’s what the star of the show, the spline roller, looks like.
See how it has two different wheels? You'll use one to press the screen into the groove first, then the other to roll the spline in over it.
Before we move on, here's a quick-reference table that breaks down the essentials.
Core Window Screen Repair Tools and Their Functions
| Tool Name | Primary Function | Why It's Essential |
|---|---|---|
| Spline Roller | Presses the screen and spline into the frame's channel. | Ensures even tension and a secure fit without tearing the mesh. |
| Utility Knife | Trims excess screen mesh for a clean finish. | A sharp blade prevents snagging and pulling, which can ruin the new screen. |
| Flathead Screwdriver/Awl | Pries out the old, hardened spline from the frame. | Allows for clean removal of old material without bending or scratching the frame. |
Having these three core items ready to go will set you up for success.
Nice-to-Have Tools for an Easier Job
While the list above covers the bare necessities, a couple of extra items can make the entire process go much more smoothly.
These aren't strictly required, but they're what separate a decent repair from a perfect one. They help you control the screen material and work more efficiently, which is the key to avoiding common headaches like wrinkles or a screen that's too loose.
Think about grabbing these as well:
- Spring Clamps: A few small clamps are a lifesaver. They hold the new screen mesh taut against the frame, acting as a second set of hands while you work with the spline roller.
- Tape Measure: Don't just eyeball it. A tape measure is crucial for cutting your new screen material to the right size, leaving just enough overlap to work with.
- Work Gloves: Protect your hands. You'll be pulling the screen tight, and the edges of the aluminum frame can be surprisingly sharp.
Ultimately, the quality of your repair comes down to two things: your tools and your materials. Now that you know what tools to grab, you can learn more about picking the right screening with our guide to the best window screen material.
Setting Up for a Flawless Repair
The secret to a professional-looking screen repair isn't brute force—it's smart preparation. Before you even think about tearing out the old mesh, take a few minutes to get your workspace in order. This little bit of prep work is what separates a clean job from a frustrating one filled with bent frames and lost parts.
Find yourself a large, flat surface. A garage floor, a solid workbench, or even a patio table will do the trick. If you’re working on a surface you care about, like a nice wooden table, definitely lay down an old blanket or a piece of cardboard first. Those aluminum screen frames can leave scratches surprisingly easily.
You'll also want a small container for parts. I usually grab a magnetic tray, but an old yogurt cup works just as well. This is for all the tiny screws or clips holding the screen frame to the window. It’s a simple move that will save you from crawling around on the floor looking for a screw that rolled away.
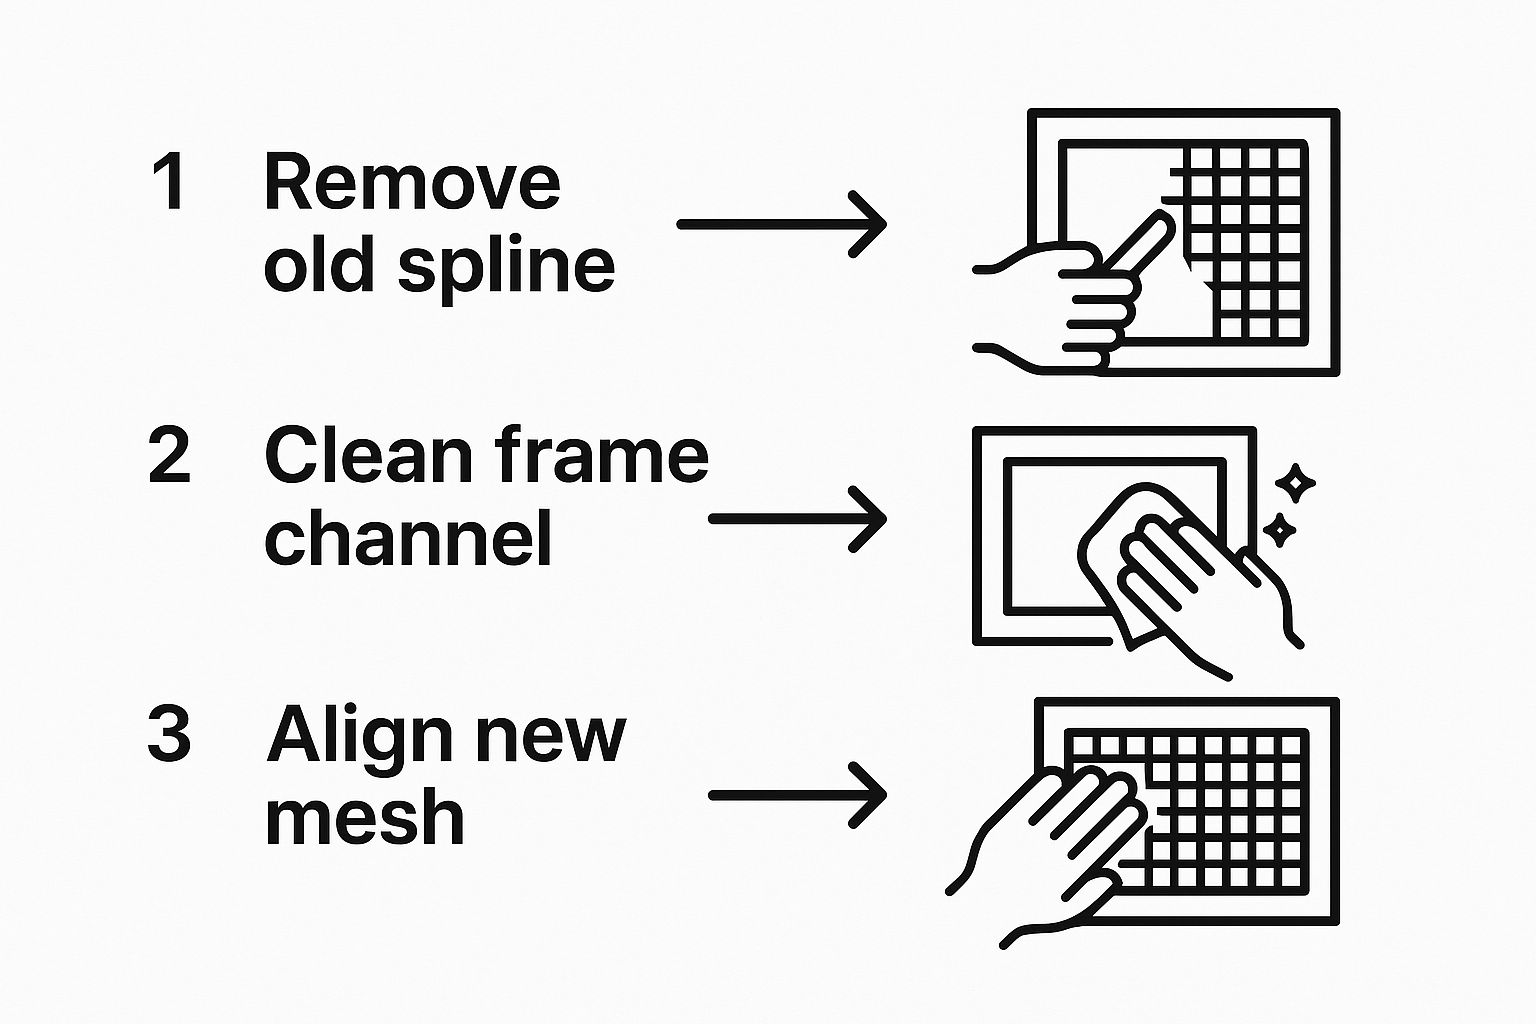
Removing the Old Screen and Spline
With your workspace ready, the first step is getting the screen frame out of the window. How you do this really depends on your window style. Many modern vinyl windows have small pull tabs and tension springs hidden on the sides. Just give the tab a little pull and gently push the frame outward to pop it free.
Once you've got the frame on your work surface, it's time to tackle the old spline. That's the rubbery cord tucked into the groove that holds the mesh tight. After years of sun exposure, it's probably become hard and brittle.
The condition of the old spline is a big clue about how this job will go. A stubborn, sun-baked spline can be a real pain, but a little patience here will prevent you from damaging the frame’s channel.
To get it out, find a corner and use the tip of a flathead screwdriver or an awl to carefully pry up one end. As soon as you have enough to grab, you can usually pull the rest out with your fingers or a pair of pliers. It should come out in one long strip.
Preparing the Frame Channel
After you've pulled out the old spline and mesh, don't just jump to installing the new screen. Take a minute to look at that empty channel in the frame. This is a step people often skip, and it's absolutely crucial for getting a tight, clean finish.
Over time, that groove collects a surprising amount of gunk—dirt, pollen, and all sorts of debris. If you don't clean it out, the new spline won't sit properly, which can lead to a loose screen or make the installation much harder than it needs to be. A stiff brush or even the tip of your screwdriver is perfect for cleaning it out.
Focusing on these details is what makes for a durable, long-lasting repair. With demand for window replacements always changing, having the right window screen repair tools is key for both pros and DIYers. To learn more about these market trends, you can check out resources like Window + Door Magazine. By making sure that frame channel is spotless, you're setting yourself up for success with the new materials.
Installing New Screen Mesh for a Wrinkle-Free Finish
This is where the magic happens. All that prep work is about to pay off, and with the right technique, you'll get a screen that’s as tight as a drum—no frustrating sags or wrinkles. The key isn't brute force; it's about finessing the tension.
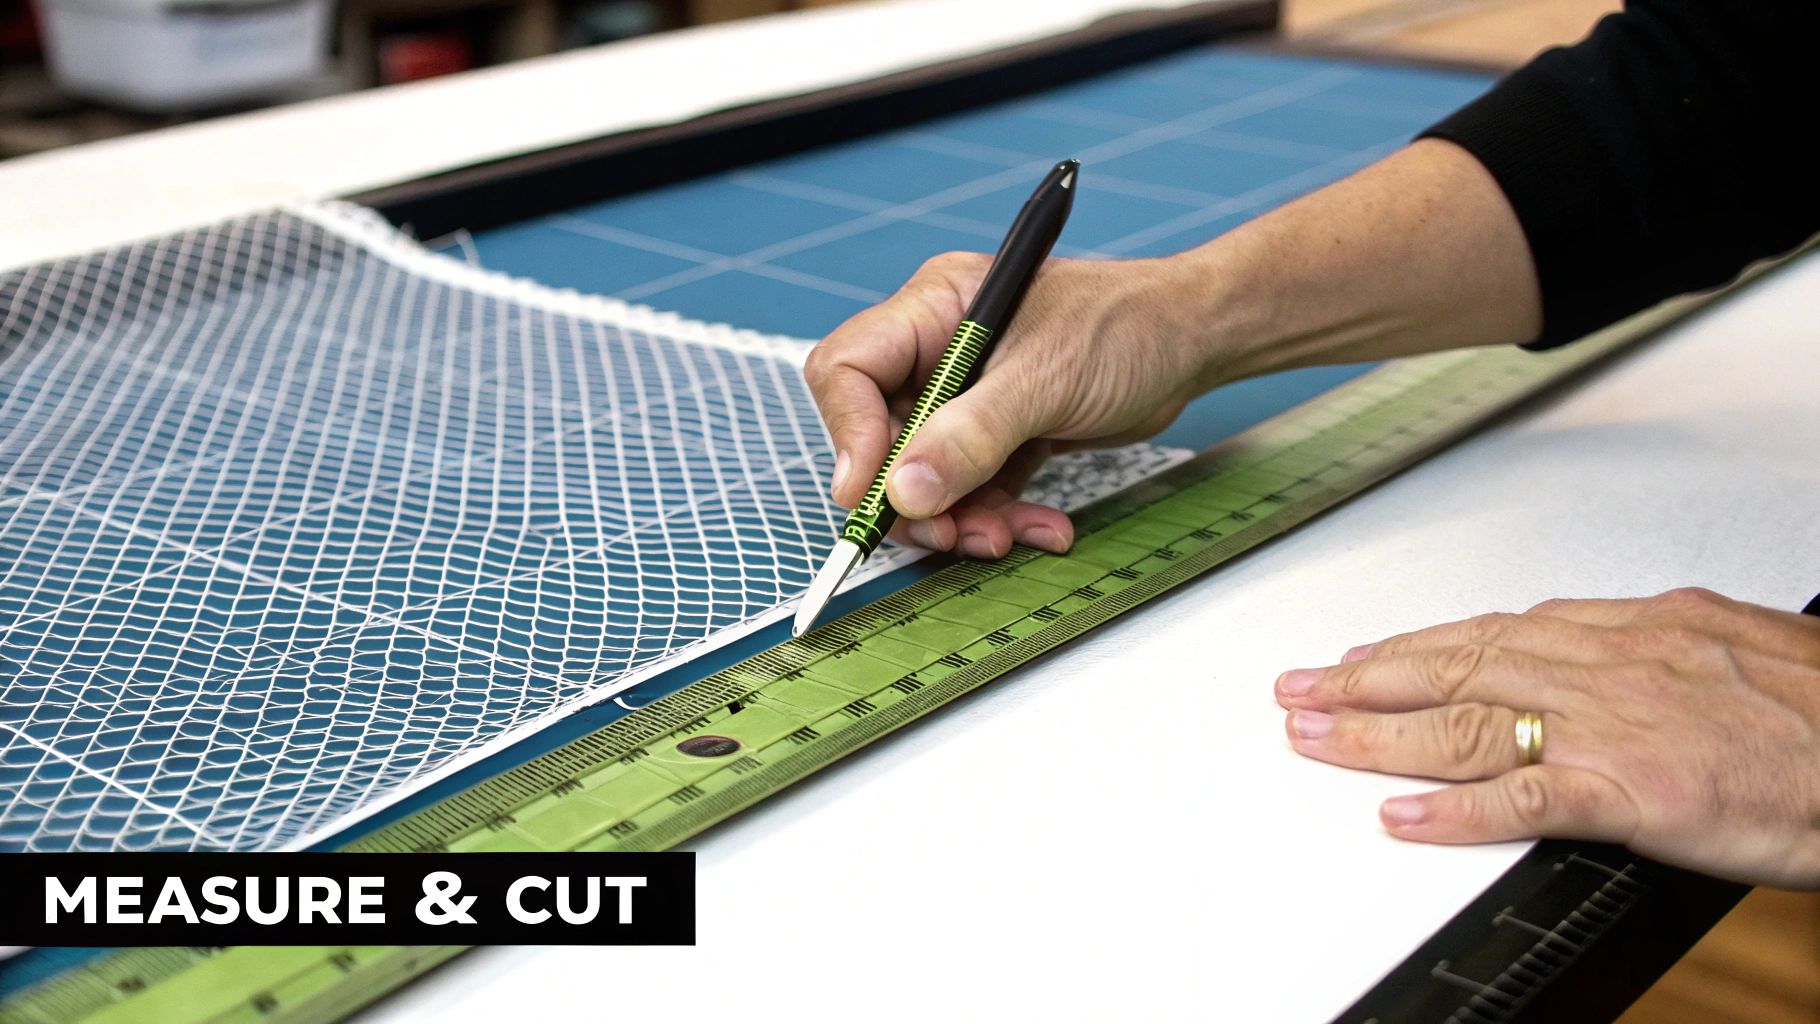
First things first, unroll your new screen mesh and lay it completely over the frame. You'll want it to hang over the spline channel on all four sides. I always aim for at least a 1-inch overhang all the way around. Resist the urge to trim it to size just yet; that extra material is your best friend for pulling the screen taut.
Once the mesh is draped evenly, grab your spring clamps and secure one of the shorter sides. Think of the clamps as an extra set of hands, holding everything in place so you can focus on the next step.
Creating the Initial Tension
With one side clamped down, move to the opposite side of the frame. Gently pull the screen mesh. You’re not trying to bend the frame here, just pull enough to take out the slack. When it feels snug, clamp that side down, too.
What you're aiming for is a very slight "bow" in the frame's long sides. This pre-tensioning is the secret sauce for preventing wrinkles when you start rolling in the spline.
As this guide shows, a clean frame and proper mesh alignment are the foundation for everything that follows. Get this right, and the rest is much easier.
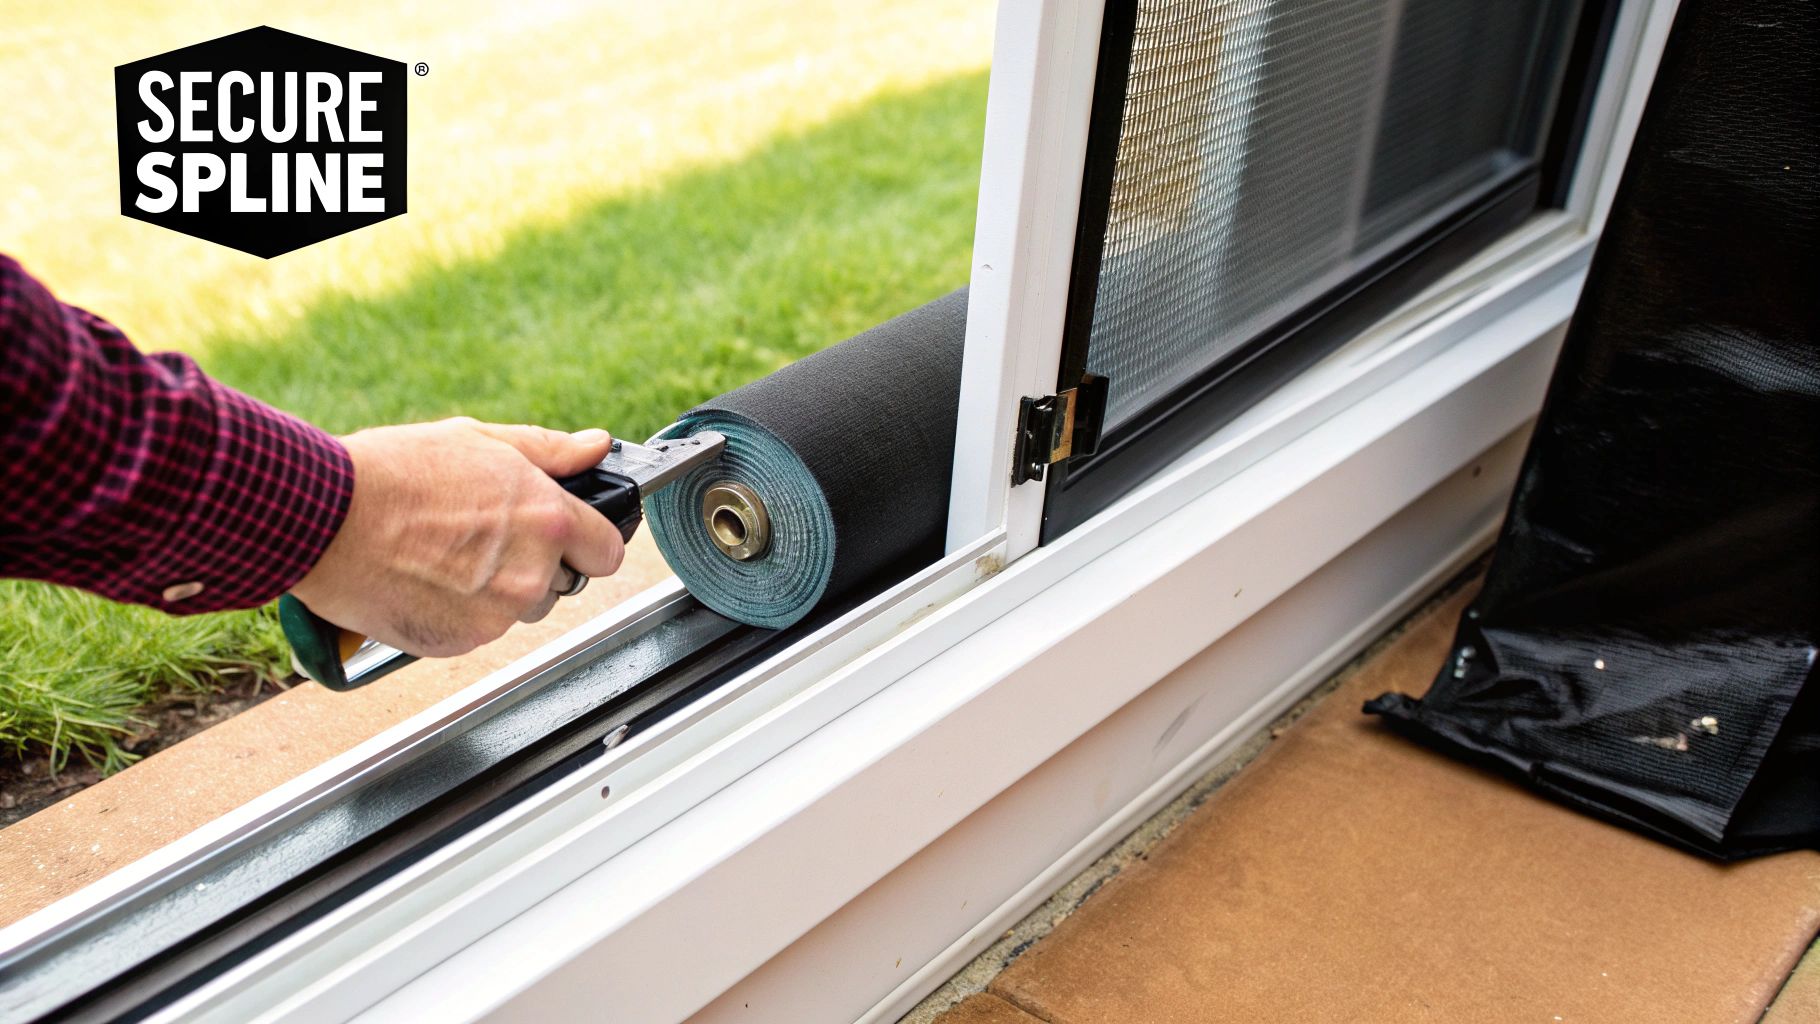
Rolling in the Spline
Now you’re ready to lock it all in. This is where your spline roller, the most critical of your window screen repair tools, comes into play. Start at one corner on a short side of the frame.
- First Pass: Use the convex (rounded) wheel of the roller to gently press the screen fabric into the channel. You're not trying to seat it fully, just create a guide for the spline.
- Second Pass: Lay your new spline over the crease you just made. Now, switch to the concave (grooved) wheel. Push the spline firmly down into the channel, rolling right over the mesh. You’ll feel a satisfying click as it locks in.
Pro Tip: Take your time on this first side. A straight, tight anchor here sets you up for success on the other three. Most wrinkles I see happen because this first line was rushed.
Once that first side is completely splined, you can remove the clamps from the opposite side. Pull the mesh taut again, and repeat the process: create a crease with the convex wheel, then seat the spline with the concave wheel.
Do the same for the last two sides, always pulling the mesh gently taut away from the side you're working on. This maintains that light, even tension across the entire surface. If you want a closer look at the technique, our complete visual guide on how to install screens is a great resource.
Trimming for a Professional Look
With all four sides splined in, the screen should be perfectly tight. It's time for the final, finishing touch. Grab your utility knife and make sure it has a fresh, sharp blade—a dull one will just snag the mesh.
Angle the blade slightly, pointing it away from your new spline. Carefully run the blade along the outside edge of the spline, using the frame's channel to guide your cut.
Why the angle? It’s a simple trick to prevent you from accidentally nicking the spline or slicing into your brand-new screen. Go slow, be deliberate, and the clean cut will give your repair that flawless, professional look.
Getting a Tight Finish With the Spline Roller
Of all the window screen repair tools, the spline roller is the one that really separates a sloppy DIY job from a professional one. It seems like a simple little gadget, but knowing how to use it is the secret to getting that satisfyingly tight, drum-like finish without any wrinkles or tears.
Your spline roller actually has two different wheels, and each has a specific job.
- The convex wheel is the one that bulges outward. You'll use this one first. Its job is to gently push the screen mesh into the frame’s channel, creating a nice little groove for the spline to follow.
- The concave wheel is the one with the groove in it. This wheel is designed to fit perfectly over the spline, using even pressure to seat it all the way down into the channel on top of the mesh.
The Right Way to Roll
You'll want to start in a corner on one of the shorter sides of the frame. Just lay the end of your new spline over the channel, leaving an inch or two of a tail hanging off.
First, use that convex wheel. Hold the screen fabric taut with one hand and roll the wheel along the first few inches of the channel. This pre-creases the mesh and makes the next step much easier.
Now, switch to the concave wheel. Position it over the spline and roll it forward with firm, steady pressure. You’ll feel a satisfying little pop as the spline snaps securely into place.
Keep following this two-step process—crease with the convex, seat with the concave—all the way down the first side. Getting this anchor side perfectly straight and tight is the single most important part of the job.
I can't stress this enough: go slowly on the first side. Almost every messed-up screen I've ever had to fix, whether it was wrinkled or had a bowed frame, started because someone rushed that first side. A straight, even start makes the other three sides a breeze.
Handling Corners and Getting the Pressure Right
Corners look intimidating, but they’re not so bad. As you get to a corner, roll the spline as close as you can. Then, grab a flathead screwdriver or even use the corner of the spline roller tool itself to push the spline down deep into the corner. And whatever you do, never cut the spline at the corners. It needs to be one continuous piece all the way around.
As for pressure, it’s all about feel. You need to be firm enough to fully seat the spline, but not so aggressive that you tear the screen or stretch it out of shape. Let the tool do the heavy lifting—a good roller will glide smoothly with just consistent downward force from you.
As you move on to the other three sides, always pull the mesh gently taut, away from the side you're working on. This keeps the tension right and stops wrinkles from appearing behind your roller.
It's a valuable skill to have. The market for glass repair services, which includes screen work, is a booming multi-billion dollar industry. This demand is fueled by new construction and homeowners opting for specialized products. You can dig into the numbers and understand more about this industry's growth on Archive Market Research.
Once you get the hang of it, the spline roller will be your best friend for achieving a flawless, professional-looking repair every time.
Beyond the Basics: Pro Tips and Common Repair Pitfalls
Alright, so you've got the basic steps down. Now, let's talk about the details that separate a decent repair from a truly professional-looking job. This is where experience comes in, but you can get a head start by understanding a few common pitfalls and material nuances that can dramatically affect how you use your window screen repair tools.
Your choice of screen mesh, for example, is about more than just matching the color. Standard fiberglass mesh is a great all-rounder, but it’s not a one-size-fits-all solution.
Do you have cats or dogs that treat your screens like a jungle gym? Then investing in a pet-resistant screen is a no-brainer. This stuff is significantly thicker and tougher, which means you'll need to put a bit more muscle behind your spline roller to get it seated properly. Solar screens, which are designed to block UV rays, are another great upgrade but are noticeably stiffer and less forgiving to work with.
Avoiding the Dreaded Bowed Frame
This is the big one. Almost everyone does it at least once. You pull the screen super tight, thinking a taut finish is the goal, only to find the frame's sides have bowed inward like a banana. Now it won't fit back in the window. Frustrating, right?
The key is to work with gentle and consistent tension, not brute force. Think "smooth," not "drum-tight." I always recommend starting on one of the shorter sides first. If you see the frame start to curve even slightly, stop what you're doing. Pull the spline back out, let the frame straighten, and try again with less pull on the mesh.
A little-known secret from the pros: let the spline roller do most of the work for you. Don't yank on the screen with your free hand. A light, guiding tension is all you need—the pressure of the roller seating the spline is what creates that perfect, final tautness.
Common Screen Repair Mistakes and Solutions
Even after dozens of repairs, it's easy to make a small mistake that leads to a big headache. I've put together this quick troubleshooting table to help you spot and solve the most frequent issues before they derail your project.
| Common Mistake | Why It Happens | How to Fix or Avoid It |
|---|---|---|
| Wrinkles or Puckering | The tension was uneven, or you splined adjacent sides instead of opposite ones. | Always work on opposite sides (top, then bottom; left, then right). If a wrinkle appears, just pull out the spline for that section and gently re-roll it. |
| Bowed Frame | You pulled the screen mesh too tight while rolling the spline in. | Use a gentle touch! Let the tool provide the tension. If it bows, remove the spline from the last side and reinstall it with less pulling. |
| Torn Mesh Near Frame | Usually caused by a dull utility knife when trimming, or forcing the spline roller too hard. | Always start with a fresh, sharp blade for a clean cut. When rolling, let the tool’s weight do the work instead of trying to force it. |
Getting these techniques right will have you fixing screens like a pro in no time. Once you feel confident, you can apply these same skills to bigger jobs. If a patio door is also on your to-do list, check out our guide on how to fix a sliding screen door, which builds on these very same principles.
Common Questions (and Expert Answers) for Window Screen Repair
Even a seemingly straightforward project like fixing a window screen can leave you scratching your head. That’s completely normal. Let's walk through some of the questions I hear all the time from people tackling this for the first time. Getting these answers right can save you a lot of frustration.
How Do I Pick the Right Spline Size?
This is probably the number one question, and for good reason—it’s where most DIY repairs go wrong. The absolute best way to get it right is to cut a small piece of the old spline and take it with you to the hardware store. You can match the diameter perfectly.
What if the old spline is completely missing or disintegrated? Your next best bet is to eyeball it by matching the new spline to the width of the channel in the screen frame.
Here's a pro tip: If you're stuck between two sizes, go with the one that's slightly larger. A bigger spline can be compressed into the channel for a super snug fit, but a spline that's too small won't hold the screen taut and might just pop right back out.
Do I Need Special Tools for Pet or Solar Screens?
I get this one a lot, especially as specialty screens become more popular. The good news is your basic toolset—the spline roller and utility knife—will still do the job. The difference isn't in the tools, but in the technique.
- Pet-Resistant Screens: This stuff is tough and thick. You’ll need to put some real muscle behind the spline roller, applying steady, firm pressure to get it seated deep in the channel.
- Solar Screens: This material is much stiffer and doesn't have a lot of give. The key here is patience. Work slowly and keep consistent tension across the screen to prevent any ugly creases from forming.
Working with these materials isn't necessarily harder, but it does require more elbow grease and a careful hand to achieve that smooth, professional look.
Should I Repair the Screen or Just Replace the Whole Frame?
Knowing when to call it quits on a repair and just start fresh is crucial. If your frame is badly bent, warped, or the corners are cracked and falling apart, replacing the mesh is just a temporary fix. A damaged frame will never hold the screen properly and likely won’t even fit back in the window correctly.
In these situations, your best bet is to invest in a new, pre-built screen or buy an adjustable screen frame kit. Yes, it costs more than a roll of mesh, but it saves you from the headache of a repair that was bound to fail anyway. A solid, straight frame is the only real foundation for a repair that lasts.
Whether you're tackling a simple rescreen or considering new sliders or sun screens, having an expert in your corner can make all the difference. Sparkle Tech Screen Service provides quick quotes and can often get your job done with same-week service. Head over to our site at https://sparkletechscreenservice.com to see how we can help.


