


Before you even think about buying new materials, the first and most crucial step in any patio door screen repair is figuring out exactly what's wrong. Is it a simple tear in the mesh? Has the rubber spline that holds it all together given up? Or is the door itself sticking, grinding, and fighting you every time you try to open it?
Getting the diagnosis right from the get-go saves you time, money, and a whole lot of frustration.
Diagnosing Your Patio Door Screen Problems
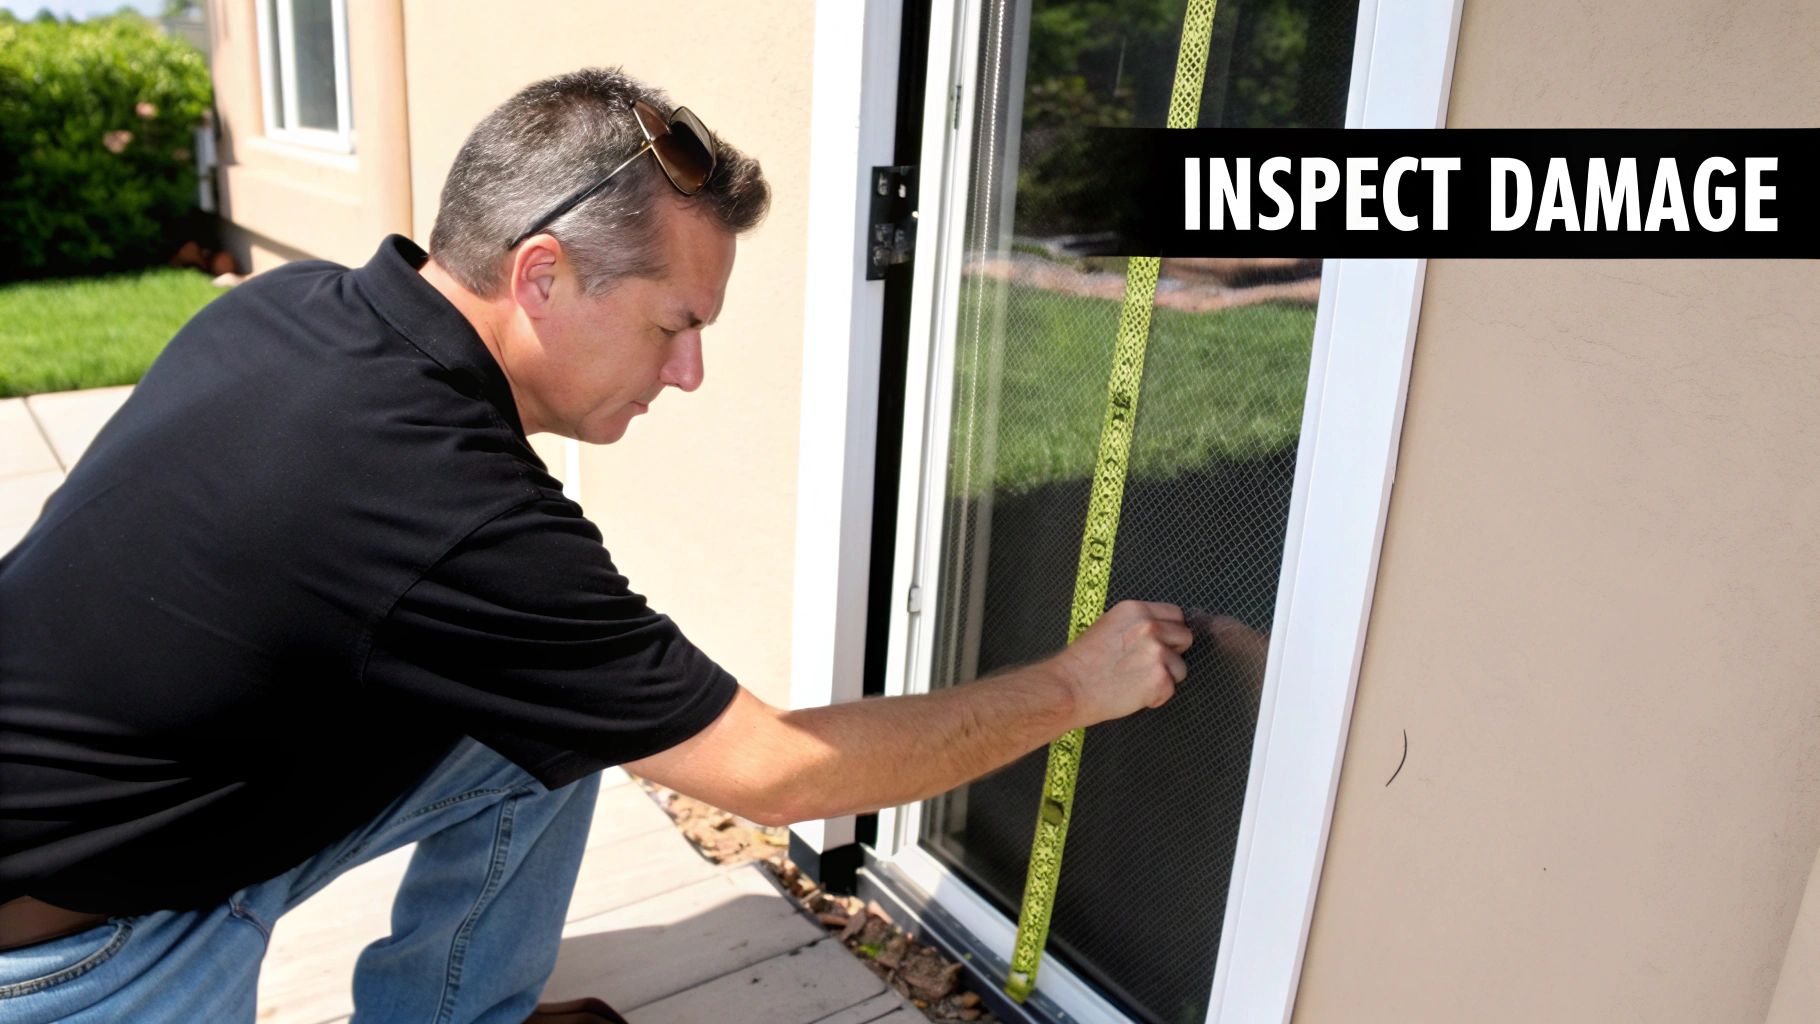
It’s time to play detective. A screen door that wobbles and makes a racket might have perfectly good mesh, while a door that glides like a dream could be hiding a tiny rip that’s letting in every mosquito in the neighborhood. A few minutes of careful inspection now will prevent multiple trips to the hardware store later.
And if you’re dealing with this, you’re not alone. Screen repair is a huge part of the global door and window repair industry, a market valued at a whopping USD 0.6 billion in 2023 and projected to climb to USD 1 billion by 2032. With over 70% of new homes in North America featuring sliding glass doors and their screens, it's a maintenance task most homeowners eventually face. You can see more on these trends in the door and window repair service market report.
Common Signs of Screen Damage
Start by giving the screen a good once-over, both visually and by touch. You’re looking for these common giveaways:
- Tears, Rips, and Holes: These are the easy ones to spot. Look for anything from tiny punctures—often from pet claws—to bigger rips caused by an accident or harsh weather.
- Sagging or Loose Mesh: A healthy screen should be tight and flat like a drum. If yours looks wavy or has a noticeable droop, the spline holding it in the frame has probably shrunk, cracked, or popped out.
- Brittle or Faded Material: After years in the sun, older fiberglass mesh can get incredibly brittle. If it looks faded and cracks at the slightest touch, it’s lived a full life and needs replacing.
- Bent or Damaged Frames: A bent aluminum frame is bad news. It won't let the door sit properly in its track, creating gaps for bugs and making it impossible to get the screen tension right.
Inspecting Mechanical Components
What if the screen mesh looks perfectly fine? Then your problem is almost certainly mechanical.
Give the door a gentle slide back and forth. Does it glide smoothly, or does it grind, stick, or jump off the track? A gritty, scraping sound is often just dirt and debris packed into the bottom track—an easy fix with a vacuum and a stiff brush. But if the door wobbles or feels tilted, the rollers at the top or bottom are likely worn out, broken, or just out of alignment.
Key Takeaway: Remember, the problem isn't always the screen itself. A patio screen door is a complete system. You have the mesh and spline, but you also have the frame and rollers. A proper diagnosis means checking both parts of the system.
Assembling Your Screen Repair Toolkit
Before you even think about starting your patio door screen repair, let's talk about tools. Honestly, having the right gear is what separates a frustrating afternoon of wrestling with a screen from a quick, satisfying fix. Nothing’s worse than getting halfway through a project only to realize you need to make another trip to the hardware store.
The specific tools you’ll need really depend on the job. A tiny patch requires a lot less than a full-on replacement. But getting everything organized first will make the entire process go smoothly.
Choosing Your Screen Material
First things first, you have to decide on the mesh. This choice makes a huge difference in how long your repair lasts and how it looks. They’re definitely not all the same.
- Standard Fiberglass Mesh: This is what you see on most homes. It's affordable, flexible, and pretty forgiving to work with. It won't crease or dent easily, and the visibility is great. A solid, all-around option.
- Aluminum Screen: If you want something a bit tougher, aluminum is a good step up. It's more rigid than fiberglass, which means it stays nice and taut, but be aware that it can dent or crease if you're not careful.
- Pet-Resistant Screen: An absolute game-changer if you have cats or dogs. This stuff is a heavy-duty polyester mesh that’s about seven times stronger than the standard material. It’s built to withstand claws and paws without shredding.
- Solar Screen: Live in a sunny spot? A solar screen can be a great investment. It’s a much denser mesh designed to block UV rays, which helps keep your home cooler and protects your floors and furniture from fading. The trade-off is slightly reduced visibility.
For a more detailed look at the tools for every type of job, check out our comprehensive guide on essential window screen repair tools. It has a full checklist to make sure you're prepared.
Essential Toolkit for Patio Screen Repair
Having the right tools is non-negotiable for a professional-looking finish. Here’s a quick rundown of the gear I recommend having on hand before you start.
| Item | Purpose | Pro Tip |
|---|---|---|
| New Screen Mesh | The replacement material for your frame. | Buy a roll that’s a few inches wider and taller than your frame to give yourself room for error. |
| Spline Roller | Pushes the spline into the frame's channel. | This is the one tool you absolutely cannot skip. It makes the job 10x easier. |
| Replacement Spline | The rubber cord that holds the mesh in place. | Match the diameter of your old spline exactly. Even a millimeter off can cause problems. |
| Utility Knife | For trimming excess mesh and spline. | A sharp, fresh blade is key for clean cuts. A dull blade will snag and ruin the mesh. |
| Flat-Head Screwdriver | Prying out the old, stubborn spline. | A smaller one works best for getting into the tight channel without damaging the frame. |
| Tape Measure | To accurately measure your screen frame. | Measure twice, cut once! This old saying is especially true for screen material. |
| Clamps | To hold the screen frame steady while you work. | Spring clamps are cheap and perfect for keeping everything in place on your work surface. |
With these items ready to go, you'll be well-equipped to handle just about any patio screen repair that comes your way.
Getting the Spline and Tools Right
Let's talk about spline for a second. It’s that little rubber cord that locks the screen mesh into the frame channel, and getting the size right is absolutely critical. If your spline is too thin, the screen will be loose and pop out. If it’s too thick, you’ll fight to get it in and might even damage the frame.
Pro Tip: The easiest way to get the perfect match is to cut a small piece of your old spline and take it with you to the hardware store. They usually have a sizing guide right there on the shelf you can use to find its twin. No guesswork needed.
Finally, please don’t try to do this without a spline roller. This little tool costs just a few bucks and is worth its weight in gold. One end has a rounded (convex) wheel to press the mesh into the groove, and the other has a grooved (concave) wheel to push the spline in on top of it. Trust me, using a screwdriver instead is a recipe for a saggy, uneven screen. Grab a spline roller, a sharp utility knife, and a small flat-head screwdriver, and you’ll have everything you need.
Tackling a Full Screen Replacement Like a Pro
When a tear is just too big for a patch or the old mesh has become brittle and sun-baked, it’s time for a full re-mesh. This is the ultimate fix for your patio door screen, bringing it back to life and looking brand new. It takes some patience and a bit of elbow grease, but trust me, the satisfaction of a perfectly taut, new screen is worth it.
First things first, you need a good spot to work. Pop the sliding screen door out of its track—you can usually do this by lifting it up and then swinging the bottom out towards you. Lay it down on a flat, sturdy surface. A pair of sawhorses is ideal, but a large workbench works great too. You can do it on the ground, but your back won't thank you for it later.
Getting Rid of the Old Screen
With the frame laid out, it's time to dismantle the old setup. Look for the end of the rubber spline—that cord tucked into the groove of the frame holding the screen in place. Use a small flat-head screwdriver or an awl to carefully pry up one end. Once you get it started, the rest should pull out pretty easily.
With the spline gone, the old mesh just lifts right off. Before you get too excited, take a minute to clean out the spline channel. A stiff brush is perfect for getting rid of any dirt, grime, or little bits of the old spline that might have broken off. A clean channel is crucial for making sure the new spline sits flush.
It's no surprise that patio doors get a lot of attention. In fact, sliding doors account for about 60% of all residential screen repair jobs we see. It’s a common issue everywhere, especially in places like Europe, which had the highest patio door sales in 2022. There, energy efficiency standards actually encourage keeping screens in good shape for natural ventilation. If you're curious, you can dig into more stats on the global screen door repair services market.
Installing the New Mesh and Spline
Now for the fun part. Roll out your new screen mesh, laying it completely over the frame. Make sure you leave at least a couple of inches of extra material hanging over all four sides. It’s important not to pull it taut yet; just let it rest loosely on top.
This little diagram shows the key tools you're about to use: the mesh itself, the spline roller, and a sharp utility knife for the finishing touch.
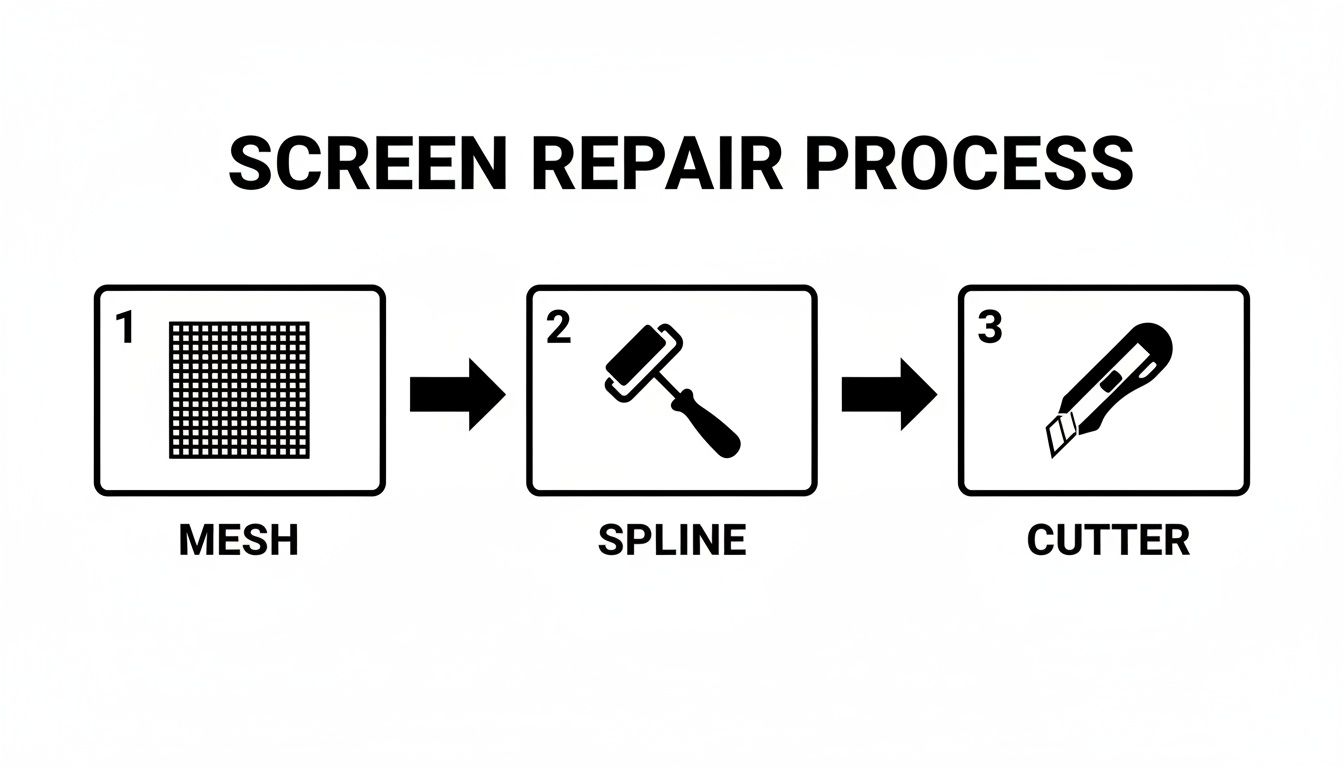
It’s a simple progression, with each tool playing a specific role in getting the job done right.
Pick up your spline roller. Start with the convex (the rounded wheel) and gently press the screen into the channel along one of the shorter sides. This pre-forms the mesh and gives you a nice, clean groove to work with.
With the mesh creased, lay the new spline on top and switch to the concave (the grooved wheel) on your roller. This is what you’ll use to push the spline firmly down into the channel, locking the screen in place. Work your way down one side, then move to the opposite side to keep the tension even.
My Favorite Trick for a Drum-Tight Finish: When you get to the second long side, place a small block of wood under the middle of the frame to create a slight bow. As you install the spline, you're building in extra tension. Once you're done and remove the block, the frame will flatten out and pull the screen perfectly tight. No more sagging.
After all four sides are splined in, the only thing left is to trim the excess mesh. Grab a sharp utility knife and run the blade right along the outer edge of the spline. This will give you a clean, factory-perfect edge.
All that’s left is to pop your door back in its track and enjoy the bug-free breeze
Solving Common Sliding and Sticking Issues
Sometimes the screen mesh is perfect, but the door itself is the real headache. If you’re fighting with a screen door that grinds, sticks, or constantly jumps off its track, you've got a mechanical problem. It’s one of the most common issues we see, and it can turn a beautiful patio entrance into a daily frustration.
The good news is that you probably don’t need a whole new door. More often than not, the fix is pretty simple. The two biggest culprits are almost always a dirty track or worn-out rollers. Getting these sorted out can make a stubborn door glide like it’s brand new again.
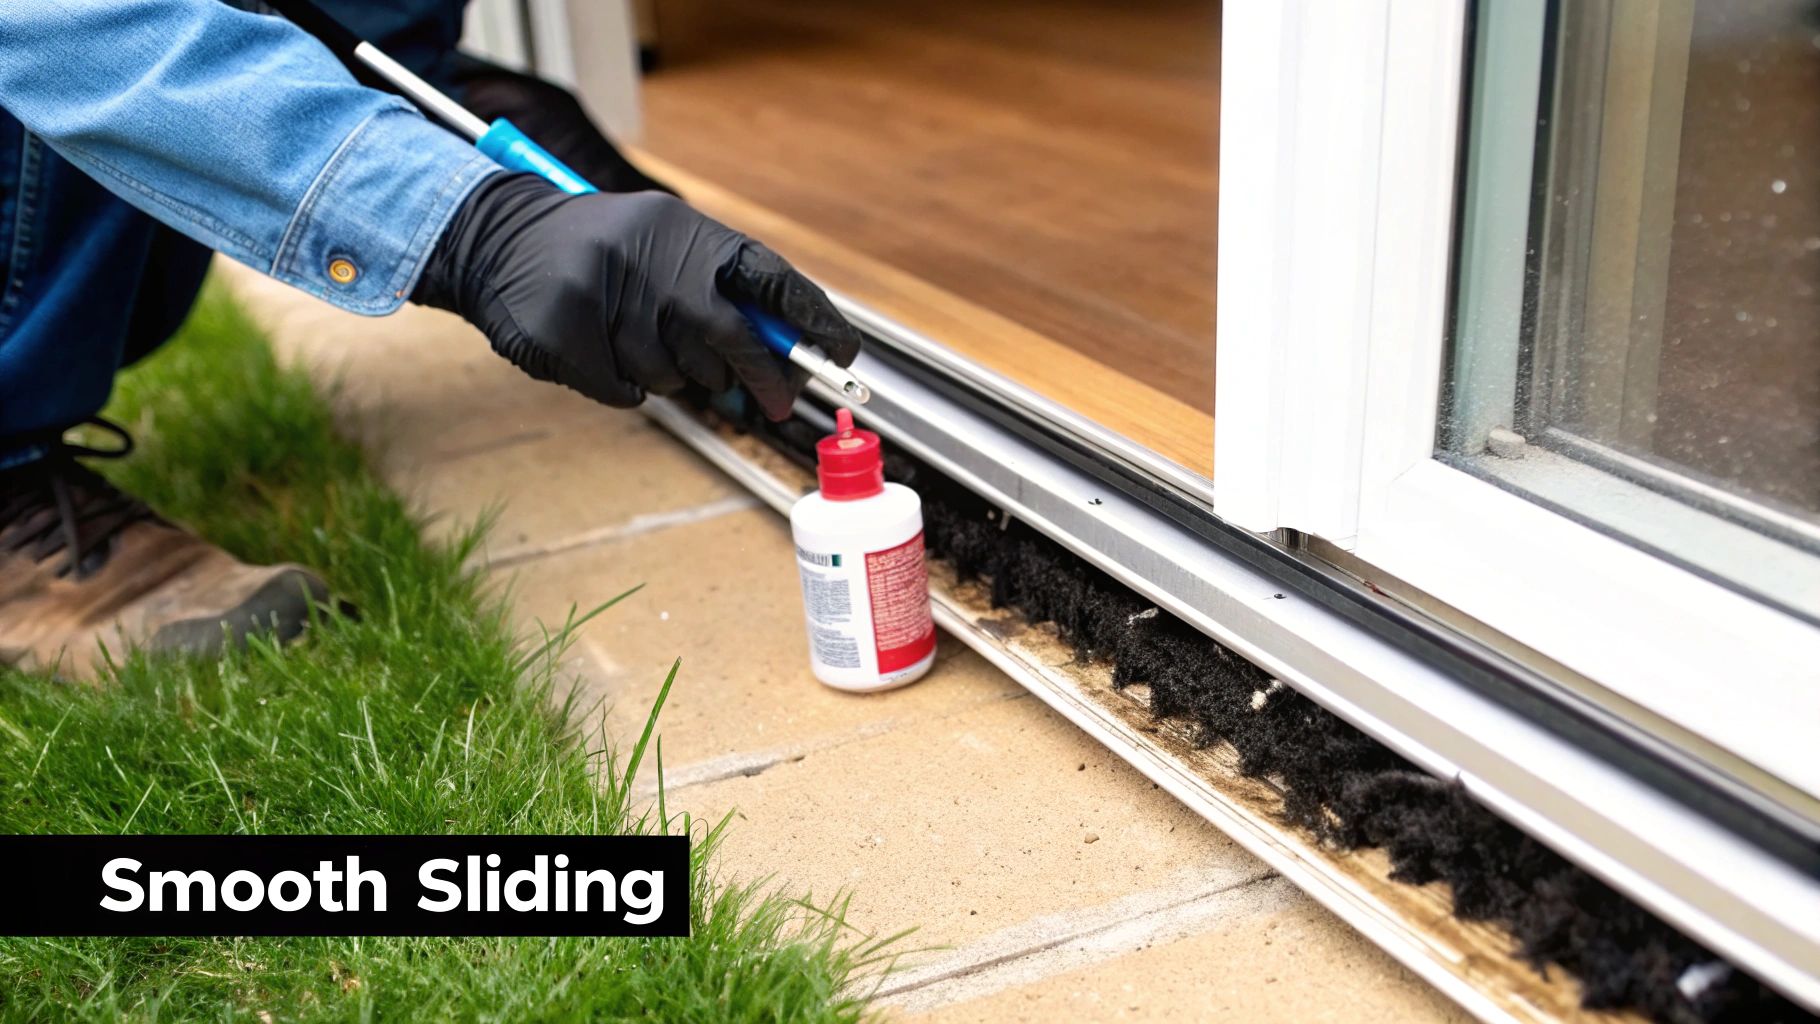
Start With a Deep Track Cleaning
Before you touch a single screw, get that track clean. Seriously. Over the years, the bottom track collects an incredible amount of dirt, dust, pet hair, and leaves. All that gunk builds up and creates friction, causing that awful scraping sound and making the door hard to move.
Here's a simple process that works every time:
- Vacuum it out: Grab your vacuum and a crevice tool. Go over the track a few times to suck up all the loose debris jammed in the channel.
- Scrub the grime: Mix a little mild dish soap in some warm water. Use a stiff brush—an old toothbrush is perfect for this—to scrub away any caked-on gunk.
- Wipe and dry: Use a clean rag to wipe out the suds and dirt, then make sure the track is completely dry.
Once it's clean and dry, give the track a quick spray with a silicone-based lubricant. Stay away from oil-based products like WD-40; they’re notorious for attracting even more dirt, which just gums up the works all over again. A quality silicone spray provides a slick, clean surface for the rollers.
Inspecting and Adjusting the Rollers
With a sparkling clean track, test the door. If it still feels stiff or wobbly, it’s time to look at the rollers. Most sliding screen doors have small, adjustable wheels at the bottom corners, and sometimes at the top, too.
These little rollers carry the entire weight of the door. After thousands of trips back and forth, they can wear down, crack, or just get out of whack. Look for small holes on the bottom edge of the door frame. By inserting a Phillips head screwdriver, you can turn the adjustment screws to raise or lower each corner.
Pro Tip: The goal is a level door that slides easily without scraping the top or bottom of the frame. Make small, quarter-turn adjustments on each side, checking your work as you go. Big, drastic turns usually make things worse.
If adjusting the screws doesn't fix it, or if you can physically see a wheel that’s flattened, cracked, or completely seized up, it needs to be replaced. Swapping out worn rollers is a core part of any real patio door slider repair and makes a world of difference. It’s often this small fix that restores that smooth, effortless glide your door used to have.
Should You DIY This Repair or Hire a Pro?
Figuring out whether to tackle a patio door screen repair yourself or to call in a professional is a common dilemma. It really boils down to the classic trade-off: your time and patience versus your money. A successful weekend project feels great, but a botched repair can turn into a major headache that you have to stare at every day.
Let's be realistic about what each path involves.
For the small stuff, going the DIY route makes a ton of sense. A tiny puncture from a pet's claw or a small tear near the edge? An adhesive patch kit will have that sorted in less than five minutes. It’s cheap, it’s fast, and it doesn't require any real skill or special tools.
But the moment the damage is more significant, the equation changes. Replacing the entire screen mesh is a very doable project for a handy homeowner, but it’s not a simple slap-it-on-and-go job. You'll need a good, flat workspace, a bit of patience, and the right tools. Seriously, don't even think about trying it without a proper spline roller—you'll end up with a saggy, wrinkled mess that looks worse than the original tear.
When to Pick Up the Phone
Sometimes, calling a professional service like Sparkle Tech isn't just about convenience; it’s the smart play. Certain problems go beyond just replacing the mesh, and that's where experience really counts.
Here are a few tell-tale signs that a pro is your best bet:
- Bent or Warped Frames: If the aluminum frame itself is bent, even slightly, you’ll never get the screen tension right. A professional can often straighten the frame or, if needed, replace it to ensure a perfect, tight fit.
- Weird or Oversized Doors: Got a custom-sized sliding door? Finding the right materials and getting the dimensions perfect can be a real pain for a DIYer. We have access to a much wider range of screen types and can cut everything to the exact size on-site.
- Mechanical Failures: Is the door constantly derailing, or are the rollers shot? If the screen door screeches, sticks, or jumps its track, the problem is mechanical. An expert can diagnose the issue, find the right replacement parts, and get the door gliding smoothly again.
The Financial Side of Things
When you look at the numbers, a professional patio door screen repair is one of the most cost-effective home repairs you can make. Based on 2025 data, the average job runs about $65. Simple patches can cost as little as $7, while more involved work with mechanical adjustments might go up to $200.
Compare that to the cost of a full patio door replacement, which can easily top $1,000, and you can see why a repair is such a great value. You can find more details on screen door repair costs on Angi.com.
DIY vs. Professional Screen Repair Comparison
Deciding whether to tackle the job yourself or call us can be tough. This table breaks down the key considerations to help you make the right choice for your situation.
| Factor | DIY Repair | Professional Service (Sparkle Tech) |
|---|---|---|
| Cost | Lower material cost, but you may need to buy tools. | Higher upfront cost, but includes all labor, materials, and expertise. |
| Time | Can take several hours, especially for first-timers. | Typically done in under an hour. We handle everything from start to finish. |
| Tools Required | You'll need to buy or borrow tools like a spline roller, utility knife, etc. | We arrive with every professional tool and part needed for the job. |
| Skill Level | Best for small patches. Full re-meshing requires patience and precision. | No skill required on your part. Guaranteed professional results. |
| Quality of Finish | Results can vary. Wrinkles, sags, and loose splines are common. | A perfect, drum-tight finish that looks clean and lasts for years. |
| Convenience | Requires a trip to the hardware store and setting aside an afternoon. | A quick phone call is all it takes. We come to you and get it done fast. |
In the end, it’s about what you value most. A professional ensures the job is done right the first time, giving you a tight, durable, and clean finish that looks fantastic. We handle the measuring, the cutting, and the tricky installation, saving you the time and potential frustration.
If your repair looks like more than a simple patch, or if you've got tired window screens that also need attention, getting a professional quote is a no-brainer. Feel free to check out our other window screen repair services to see all the ways we can help you enjoy the breeze without the bugs.
Sparkle Tech Screen Service: Your Local Pros
So, you've looked at the project, considered the tools, and thought about the time it'll take. If you've decided that a DIY repair isn't in the cards, we're here to help. Taking on a patio door screen repair can be satisfying, but sometimes you just need the job done right—quickly, professionally, and without a trip to the hardware store.
That’s where Sparkle Tech Screen Service comes in. Our technicians live and breathe this stuff.
We handle everything from a simple re-mesh using top-tier materials to the trickier jobs, like replacing worn-out rollers or straightening a bent frame. We'll get your door sliding smoothly and looking sharp again. Going with a pro means you're guaranteed a tight, perfect screen that will keep bugs out and look great for years.
Think of it this way: when you call us, you're not just getting a fixed screen. You're buying back your weekend and getting the peace of mind that comes with a job done right the first time.
We pride ourselves on being reliable and efficient. For any home service business, clear and prompt communication is everything. In fact, there's a fantastic guide on optimizing customer communication for home services that really breaks down why it's so important.
Ready for a flawless fix? Give Sparkle Tech Screen Service a call today.
Got Questions? We’ve Got Answers.
Even the best guides can leave you with a few lingering questions. Let's tackle some of the most common ones we hear from homeowners about patio door screen repairs.
How Tight Should a New Screen Be?
Think of it like a drum. A freshly installed screen should be perfectly taut with zero sag. If you’ve just finished a DIY re-screening and see ripples or waves, it’s a classic sign that the tension wasn't even when you rolled in the spline.
A professionally installed screen will stay flat and tight for years, though a minuscule amount of give might happen over a long time. It should never be noticeable.
What's the Best Screen Material for My House?
This really comes down to where you live and who you live with. There’s no single "best" option, but there's definitely a best option for you.
- Fiberglass: This is the industry standard for a reason. It's affordable, durable, and offers great visibility.
- Pet-Resistant Screen: If you have dogs or cats, this is non-negotiable. It’s built to withstand claws and playful paws, saving you from constant repairs.
- Solar Screen: A lifesaver in sunny climates. This material is designed to block a significant amount of UV rays, which helps keep your home cooler and can even lower your energy bills.
Can I Just Patch a Tear, or Do I Need to Replace the Whole Thing?
You can absolutely patch small holes! For tiny punctures or tears under three inches, a simple adhesive screen patch kit works wonders. It's a quick, easy fix that will keep the bugs out.
A Quick Word of Advice: Patching is a great stop-gap for minor damage. But for larger tears or if the screen mesh itself is old and brittle, replacing the whole screen is the only real long-term solution. It’s about restoring the screen’s strength and looks, not just plugging a hole.
Why Does My Sliding Screen Door Keep Jumping the Track?
This is one of the most frustrating screen door problems, and 99% of the time, it's a mechanical issue with the rollers. Those little wheels at the bottom of the door carry all the weight, and over years of use, they can get worn down, flattened, or even crack.
Before you do anything else, grab a flashlight and look at the rollers. Also, check the track itself for built-up gunk and debris. A thorough cleaning and a close inspection of the rollers will almost always point you to the source of the problem.
Tired of battling a stubborn screen door? For a professional, long-lasting patio door screen repair that saves you the headache, trust the experts. Sparkle Tech Screen Service delivers quick quotes and perfect installations, so you can enjoy those bug-free breezes. Get Your Free Estimate Today!


