


Replacing a screen on your porch is a totally doable DIY project. The basic idea is to pull out the old spline and mesh, cut a new screen to fit, and lock it in with fresh spline using a special little tool. It’s the kind of job you can knock out in an afternoon, and it makes a huge difference in how your porch looks and feels.
Choosing Your Materials and Planning Your Project
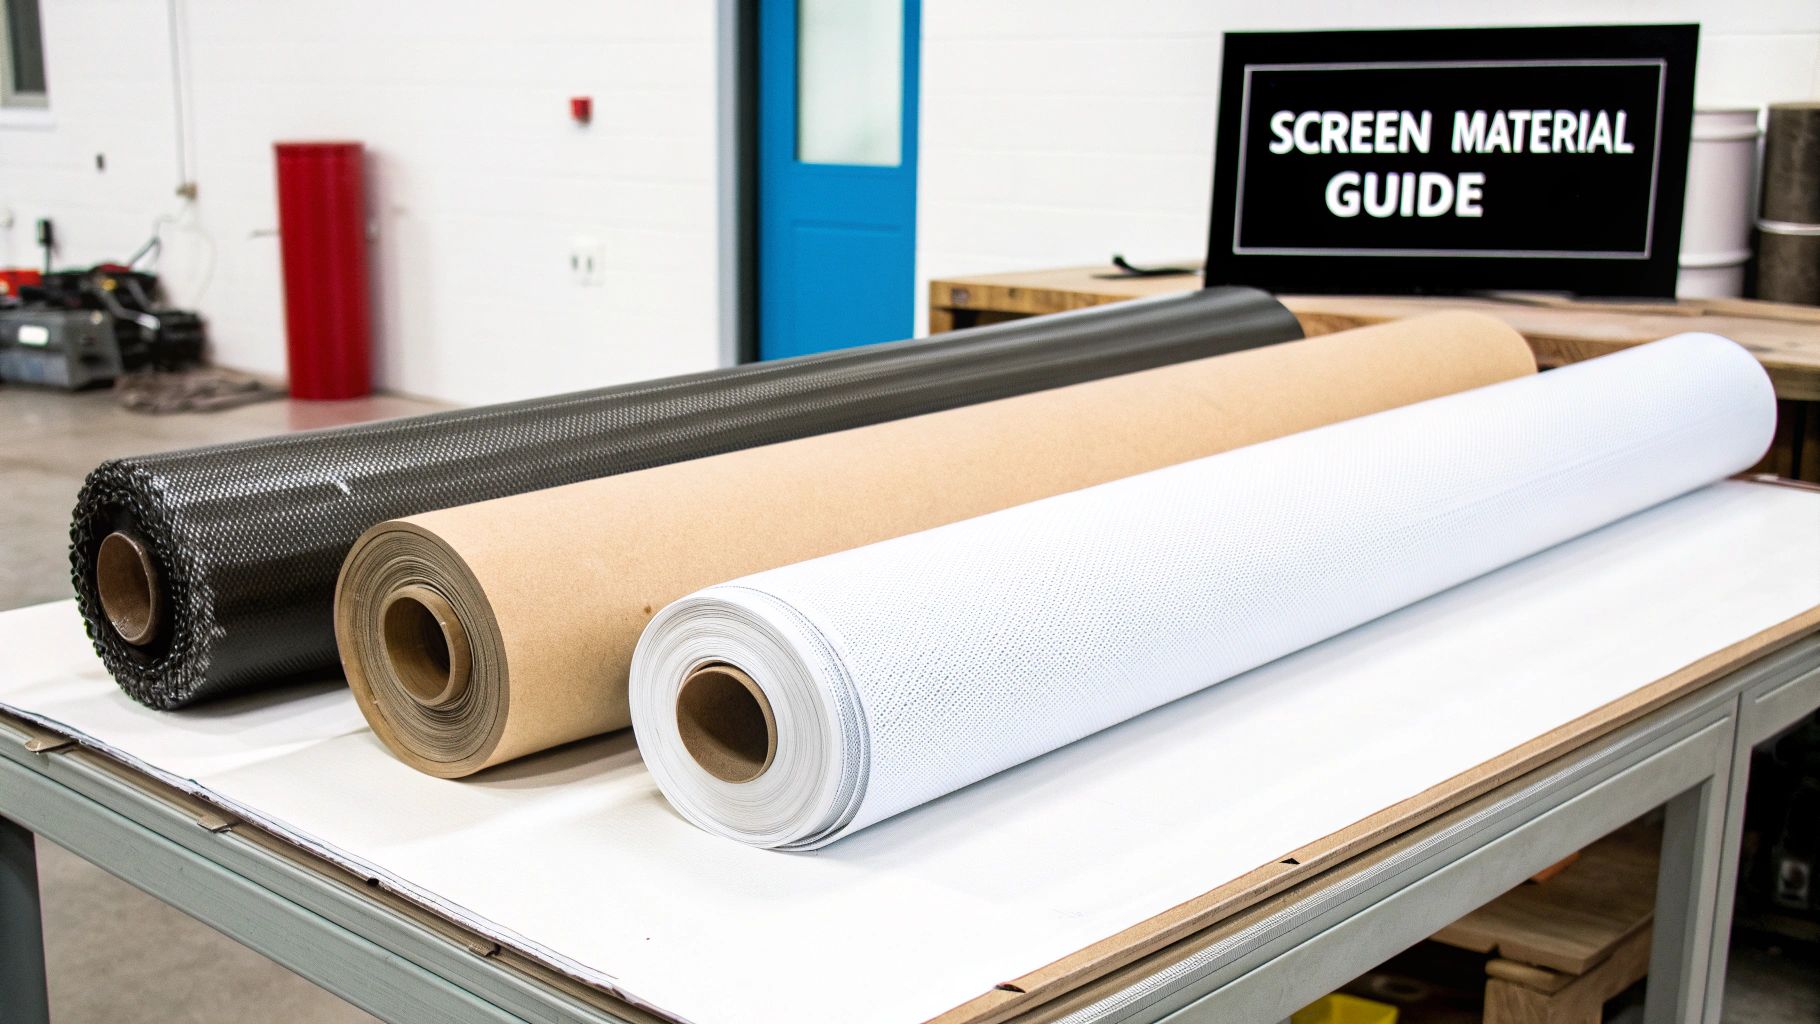
Before you start yanking out that old, torn screen, let's talk prep. This isn't just about grabbing a roll of mesh; it’s about picking the right material for your climate, your family (pets included!), and your wallet. A little bit of planning now will save you a world of frustration later on.
Selecting the Right Screen Material
The type of screen you choose affects everything from how long it lasts to how well you can see through it. There are a few go-to options, and each one has its own set of pros and cons.
- Fiberglass: This is what you’ll find in most homes. It's popular for a reason—it’s affordable, flexible, and doesn't dent or unravel easily. A solid, all-around choice.
- Aluminum: A step up in durability from fiberglass, aluminum gives you a super crisp, clear view and won't sag over the years. Just be aware that it can get dented if something hits it hard.
- Pet-Resistant Screen: If you’ve got furry friends, this stuff is a game-changer. It’s a heavy-duty polyester mesh that's about seven times stronger than standard fiberglass, built to stand up to claws and paws.
- Solar Screen: Live somewhere with intense sun? This screen is designed to block a good chunk of the sun's heat and UV rays. It'll keep your porch cooler and stop your outdoor furniture from fading.
Choosing the right screen is a huge part of this project. Don't just go for the cheapest option—think about what you really need it to do. To get a better sense of what's out there, you can explore our full guide to the best screen for porches.
Deciding can be tough, so here’s a quick comparison to help you weigh your options.
Comparing Porch Screen Materials
| Material | Average Cost (per sq. ft.) | Durability | Key Feature |
|---|---|---|---|
| Fiberglass | $0.50 – $0.75 | Good | Most popular & budget-friendly |
| Aluminum | $0.60 – $0.90 | Very Good | Excellent visibility, won't sag |
| Pet-Resistant | $1.25 – $1.75 | Excellent | Resists tears from claws |
| Solar Screen | $1.50 – $2.00 | Very Good | Blocks heat and UV rays |
This table gives you a ballpark idea, but always check prices at your local hardware store before you finalize your budget.
Budgeting for Your Project
The final cost for rescreening your porch can really swing one way or the other. The materials themselves are usually pretty reasonable, but the total bill depends on how big your porch is and which mesh you pick. Getting it done professionally can cost anywhere from $810 to $5,200, which is exactly why so many people decide to tackle it themselves to save on that labor cost.
For a wider perspective on mapping out costs and timelines, this resource for planning any home renovation project is fantastic. The principles apply just as well to a weekend screen job as they do to a major remodel.
Getting Started: Clearing the Way for Your New Screen
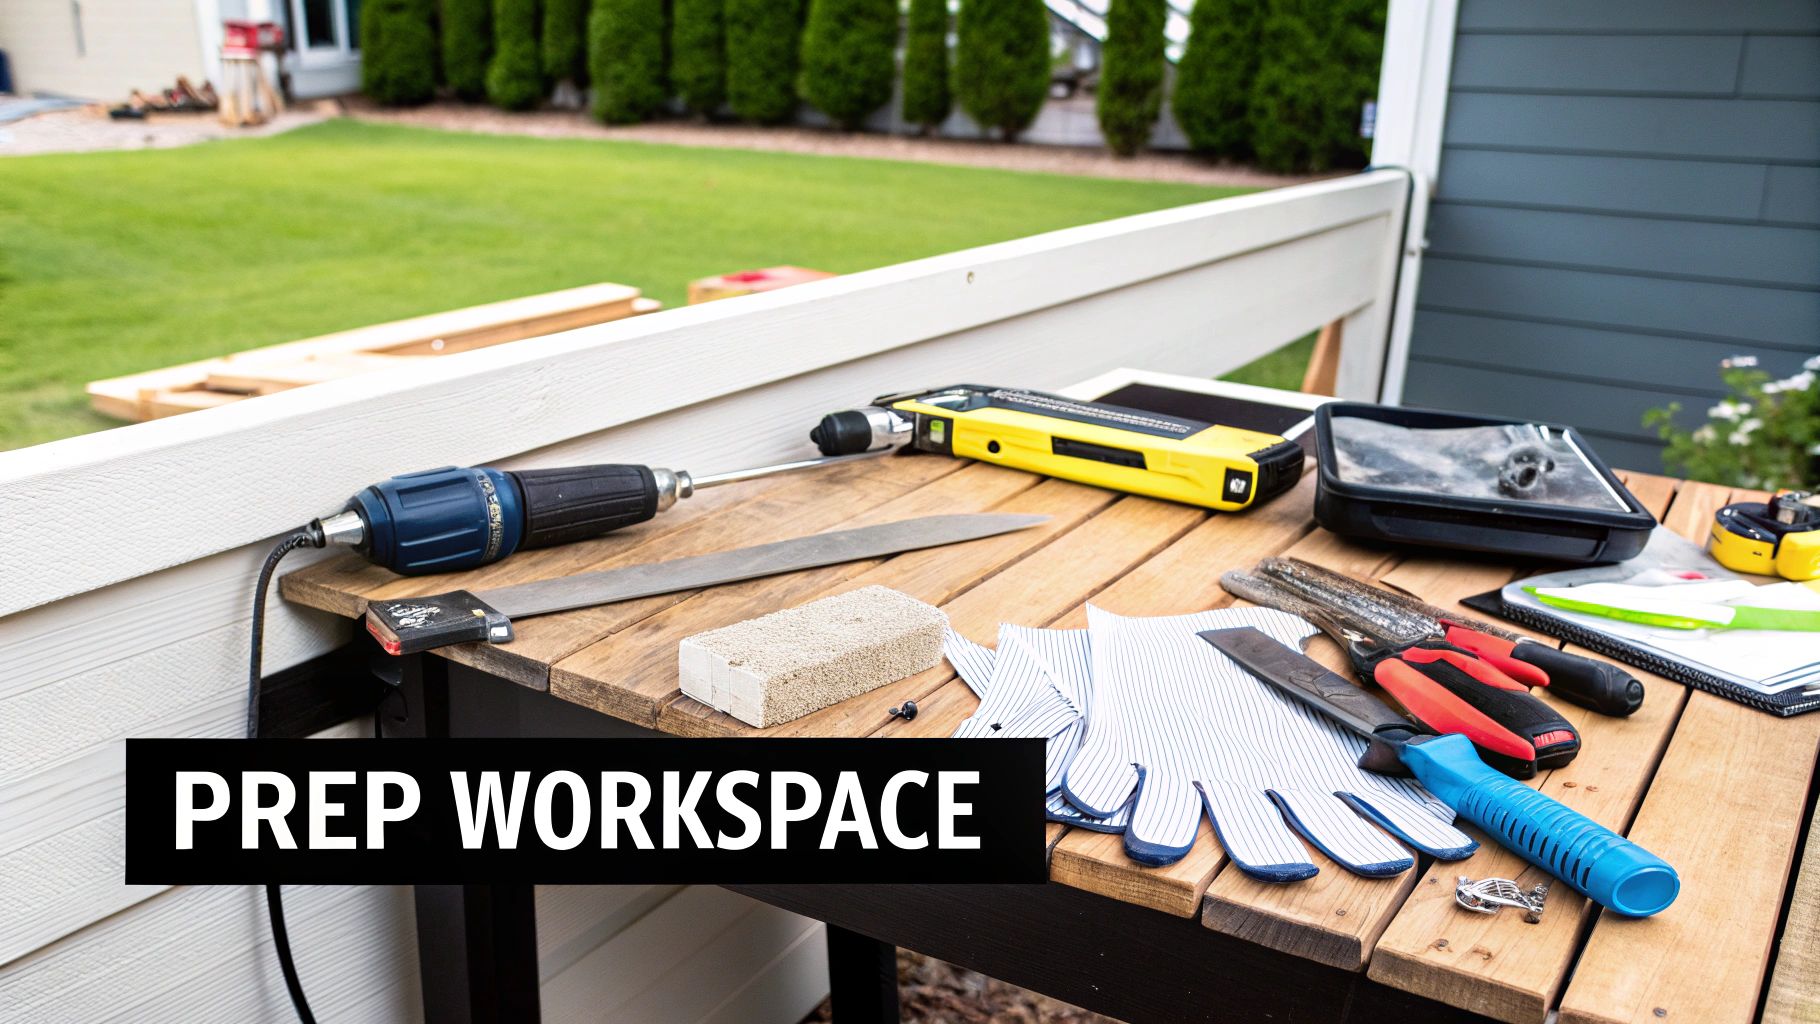
The secret to a crisp, professional-looking screen installation isn't just in the new material—it’s in the prep work. Before you unroll that new screen, let’s focus on creating a good workspace and getting rid of the old, worn-out mesh. Think of this as laying the foundation; a little extra care here makes a huge difference in the final look.
First things first, let's get your tools together. You don’t need an entire workshop, but having the right essentials nearby will save you a ton of frustration and trips back and forth to the garage.
- Utility Knife or a Small Screwdriver: A flathead screwdriver is my go-to for prying up the end of the old spline. An awl works great, too.
- Pliers: Once you've got an end lifted, a good pair of needle-nose pliers will help you pull the rest out cleanly.
- Spline Roller: You won't need this until installation, but it's good practice to have it in your kit from the start.
- Stiff-Bristled Brush: An old toothbrush is perfect for this. A small wire brush also does the trick for cleaning out the frame's channel.
If you're curious about the best gear for the job, we've got a rundown of our favorite window screen repair tools that are just as useful for porch projects.
Taking Out the Old Screen and Spline
With your tools in hand, you're ready to tackle the removal. Pick a corner—any corner will do—and use the tip of your screwdriver to gently pry up the end of the spline. That's the rubbery cord that locks the screen into the frame's groove.
Once you have a small piece sticking out, grab it firmly with your pliers and pull. With a little luck, the old spline will come out in one long, satisfying strip. It's almost like unzipping a jacket.
Pro Tip: After years of baking in the sun, old spline can become brittle and snap into a dozen little pieces. If it's giving you trouble, try gently warming it with a hairdryer on a low setting. The heat makes it more pliable and much less likely to break apart.
After the spline is gone, the old screen mesh will come right out. The last—and most important—step is to thoroughly clean out that empty channel. Use your stiff brush to get rid of any caked-on dirt, dust, or bits of old spline. A clean groove is non-negotiable for getting the new spline to seat properly for that tight, seamless finish.
How to Measure and Cut Your New Screen Perfectly
Getting your measurements right is probably the most critical part of replacing a porch screen. If you're off, even by a little, you'll either waste material or end up with a saggy, unprofessional-looking job. The good news is, there's a simple trick to nail it every time.
My rule of thumb is to always give myself some wiggle room. Measure the height and width of the frame opening, and then add at least two inches of extra screen to each of those measurements. So, if your frame is 36 inches wide, you'll actually cut the screen to be 40 inches wide. This overlap is your best friend.
That extra material isn't just for show. It gives you something to grip while you're pulling the screen tight later on, and it provides a crucial margin for error. Nothing is worse than getting to the end and realizing your screen is a half-inch too short.
Getting a Clean, Straight Cut
Once you've got your numbers, find a big, flat spot to work—a clean garage floor, a driveway, or a large patio table is perfect. Unroll the screen and make sure it's lying completely flat. To get that professional-quality cut, you absolutely need a long straightedge. A yardstick works, but a 4-foot level is even better.
Here’s how to get it done right:
- Lay it out: Smooth out any wrinkles or bumps in the screen mesh before you do anything else.
- Mark your line: Use a chalk line or a silver marker (it shows up well on dark screens) to mark your cut lines, remembering to include that extra overlap.
- Cut with confidence: Line up your straightedge, press down on it firmly with one hand, and use a sharp utility knife to make a single, decisive cut.
A common mistake is letting the screen bunch up or shift while you're cutting. Pinning the straightedge down securely is the secret to a perfectly straight edge, not a wavy mess.
While we're talking about big porch panels here, the same basic principles apply to smaller projects. For a deeper dive into measuring different types of frames, take a look at our guide on how to measure window screen size.
Getting That Wrinkle-Free Finish: Installing the New Screen
Alright, your frame is clean and your new screen is cut to size. This is the moment of truth. Getting the screen installed correctly is what separates a professional-looking job from a saggy, wrinkled mess. The secret? It's all about achieving even, consistent tension across the entire panel.
First, lay your new piece of screen mesh over the frame. Make sure the extra material you cut hangs evenly over all four sides. Don't pull it tight yet—just let it rest flat. Getting this initial setup right is the first step toward a perfect finish.
Anchoring the First Side
Let's get started. Pick a top corner, it doesn't matter which one. Grab your spline roller and use its wheel to gently press the screen into the groove for about two or three inches. Now, take the end of your new spline and push it firmly into that same corner, locking the screen down.
Once that corner is anchored, switch to the concave wheel on your spline roller. Slowly and deliberately, push the spline into the channel all the way across the top edge. Let the tool do the heavy lifting; your job is to apply firm, steady pressure to seat the spline snugly.
This infographic lays out the prep work perfectly. It's all about getting the measurements right before you even think about installation.
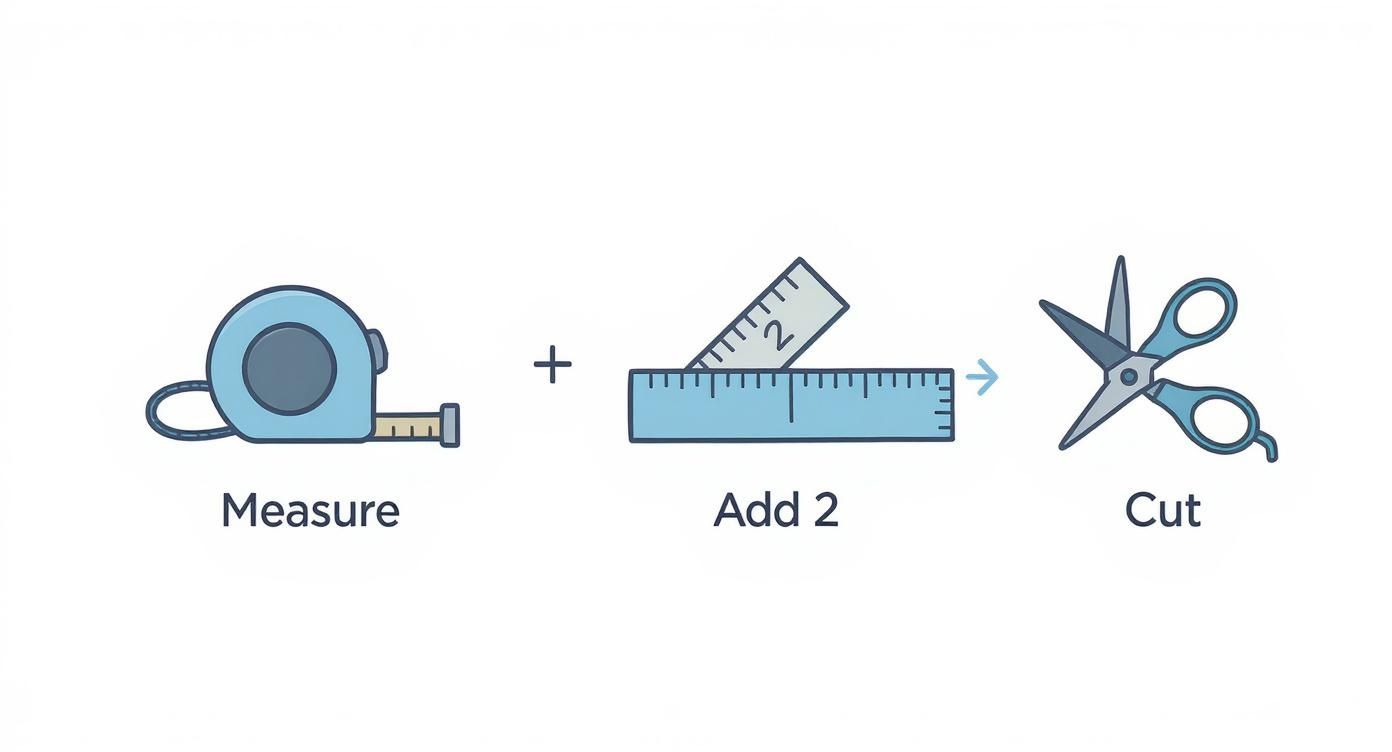
Following these three simple rules—measure, add your overlap, then cut—is the foundation of the whole project. It saves you from wasting material and ensures you have enough screen to grip and pull taut later on.
The Secret to Even Tension
With the top edge done, move directly to the bottom edge. Do not move to a side next to the one you just finished. This is a common rookie mistake. By working on parallel sides first (top and bottom), you create vertical tension that prevents the frame itself from bowing or warping.
Gently pull the screen taut from the bottom—just enough to take out any slack. You're not trying to stretch it into a trampoline, just get it smooth. Once it's smooth, repeat the process with your spline roller, setting the spline all the way across the bottom groove.
A Pro Tip From Experience: How much tension is enough? The screen should feel taut and look flat, but not be stretched so tight that it strains the frame or threatens to tear. Think "smooth," not "drum-tight."
Finally, you can tackle the last two sides. As you roll the spline in, use your free hand to gently pull the screen outward, away from the center of the frame. This keeps everything smooth as you lock it in. After all four sides are splined, step back and admire your work—a perfectly flat, wrinkle-free screen.
Finishing Touches and Common Pitfalls to Avoid
With your new screen pulled tight and locked in, you're in the home stretch. Now it's time for the final detail that really makes the job look professional: trimming the excess mesh. This is what gives your porch that clean, finished appearance.
Grab a sharp utility knife—and I mean sharp. A dull blade will snag and pull the mesh, ruining your hard work. Angle the blade away from your freshly installed screen and press it right into the outside edge of the spline groove. The frame itself will guide your cut, making it easy to get a perfectly straight line without any risk of slicing into the new screen.
Sidestepping the Usual Mistakes
I've seen a few screen jobs go wrong over the years, and it's almost always due to a few common, avoidable errors. Keep these in mind, and you'll sidestep any trouble.
- Picking the Wrong Spline Size: This is a big one. If the spline is too thin, your screen will sag or even pop right out with the first strong gust of wind. The spline should be snug; if it pushes in with almost no effort, you need to go up a size.
- Getting Too Aggressive: It can be tempting to just muscle the spline into place, but don't. Too much pressure with the spline roller, especially around the corners, is a surefire way to tear the mesh. Let the tool do the heavy lifting with firm, steady pressure.
- Skipping the Prep Work: Don't forget to clean out the spline grooves before you start. Any old bits of spline, dirt, or debris left in that channel will prevent the new spline from seating properly, leading to a weak installation.
Learning how to replace a screen on your porch is a fantastic skill to have. But, as with any home project, sometimes you see why the pros are in business. The global market for door and window repair services reached a staggering $26.69 billion in 2024. That's a lot of homeowners who want a guaranteed perfect fit to keep pests out for good. If you're curious about the scale of this industry, you can learn more about screen door repair services on datainsightsmarket.com.
Got Questions About Your Porch Screen Project? We’ve Got Answers
Even with the best instructions, you're going to run into little snags once you start the actual work. Learning how to replace a porch screen often means solving a few real-world puzzles that don't always make it into the guides.
Let's tackle some of the most common questions that pop up mid-project.
Flat Spline or Round Spline?
This one trips people up all the time, but the solution is straightforward: use whatever the frame had originally. Your porch's screen channels are milled for one specific shape.
If you try to force a round spline into a channel meant for a flat one, you’ll get a weak, loose fit that’s bound to pop out. The best way to avoid this is to snip off a small piece of the old spline and take it with you to the hardware store. Match both the shape and the diameter exactly.
Key Takeaway: Don't guess on your spline. Matching the original is the only way to get a secure, long-lasting fit that keeps your screen taut and bug-free.
What's the Best Way to Handle Corners?
Corners seem tricky, but a simple technique makes all the difference. Forget about trying to cut the spline at a perfect 45-degree angle—that's a recipe for frustration.
Instead, before you even touch the spline, use the convex (the rounded) wheel of your spline tool to gently press the screen mesh deep into the corner. This creates a perfect little pocket for the spline to sit in. Now, when you roll the spline toward the corner, you can just push it straight in and let it bend naturally into place. Easy.
This kind of hands-on home improvement is more popular than ever. In fact, the global market for window and door frames was valued at $105 billion in 2024 and is projected to hit $148.8 billion by 2034. That surge shows just how much homeowners are investing in upkeep and upgrades, including essential jobs like porch screen repair. If you're curious, you can discover more insights about the window and door market on gminsights.com.
Of course, if you'd rather leave it to the pros for a flawless finish, Sparkle Tech Screen Service offers same-week service and quick quotes. Give us a call at 800-370-3998 or visit us online at https://sparkletechscreenservice.com to get started.


