


Getting the right measurement for a new window screen is the crucial step that separates a perfect, bug-proof fit from a frustrating and costly mistake. It all comes down to a simple process: carefully pop the old screen out, lay it on a flat surface, and measure its width and height.
You'll want to measure from the outside edge to the outside edge of the screen's frame. For the kind of precision the pros use, always measure down to the nearest 1/16th of an inch.
Why Getting It Right Matters So Much
A poorly measured screen isn't just a cosmetic issue—it's a total failure of its main job. Get the numbers wrong, and you’re basically creating problems that screens are supposed to solve. I'm going to walk you through the exact method we use to nail the fit every single time.
Think about it: a screen that’s too small will rattle with every gust of wind and, worse, leave gaps for every mosquito and fly to waltz right in. On the other hand, a screen that's even a tiny bit too big just won't go in. Period. That means wasted time, wasted money, and a trip back to the hardware store.
The Pro's Secret: The Triple-Check Method
Here's a tip, especially for older homes. For both the width and the height, take three separate measurements—one at the top, one in the middle, and one at the bottom. Houses settle and shift over the years, and a window frame that looks square to the naked eye often isn't.
By taking three measurements for both width and height and then using the smallest of those numbers for your final dimensions, you guarantee the new screen will slide into place, even if the window frame is a little warped. This little trick saves a ton of installation headaches.
This "measure thrice, cut once" philosophy is a golden rule in home improvement. It’s just as critical for other window treatments. For instance, you can see the same logic in this guide on how to measure for Roman blinds for a perfect fit. The principle is identical: accuracy is everything.
Stick to these simple steps, and your new screens won't just look sharp—they'll do their job perfectly, keeping your home comfortable and pest-free.
Getting Your Tools Together for a Perfect Fit
Before you can get that perfect window screen measurement, you need to have the right gear handy. Trust me, a little prep work goes a long way in making the job quicker, easier, and a whole lot more accurate. It's the difference between a smooth project and a frustrating one.
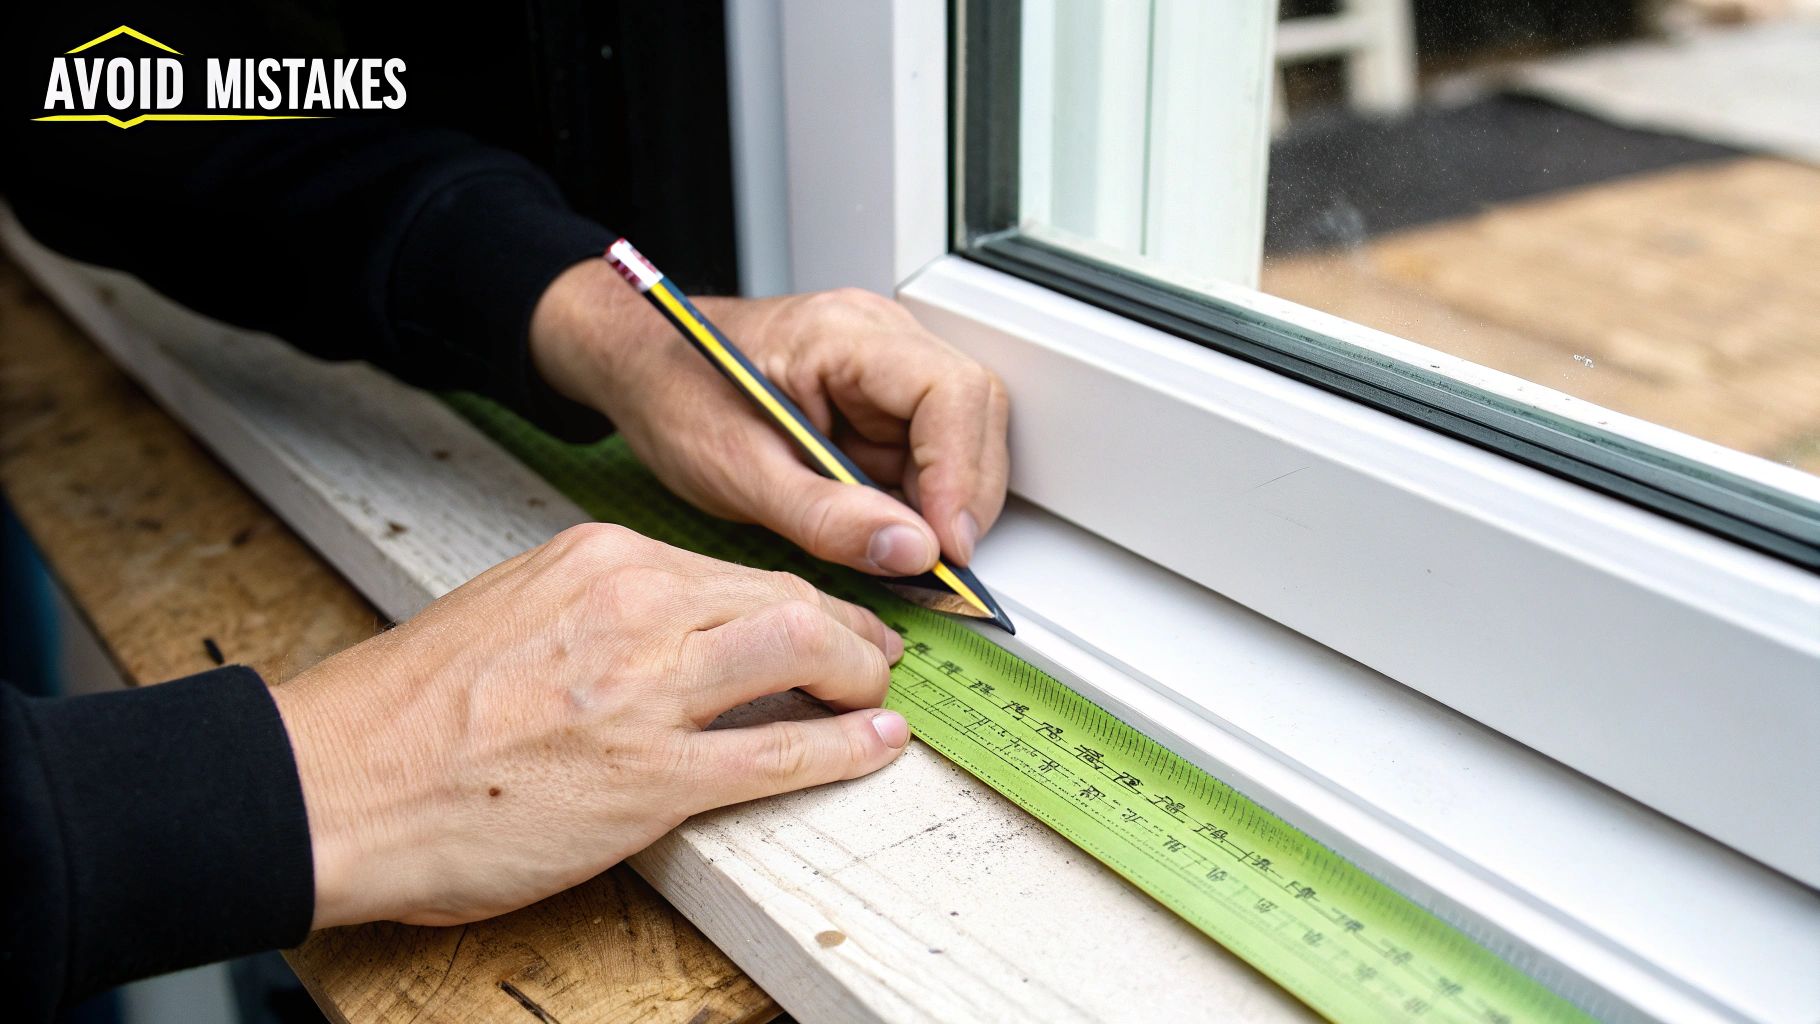
First things first, forget that flimsy sewing tape. It’s prone to sagging, which can easily throw off your numbers. For this job, you absolutely need a rigid, metal tape measure to get those straight, precise lines. This is, without a doubt, the most crucial tool you'll use.
Your Measurement Toolkit
You don't need a lot, just a few key items. Here's what I always have on hand:
- Metal Tape Measure: This is for getting those precise width, height, and frame thickness readings. You'll want to measure down to the nearest 1/16th of an inch.
- Notepad & Pen (or your phone): Don't try to remember the numbers. Write down each dimension the second you take it.
- Small Flathead Screwdriver: Often a lifesaver for prying out an old, stubborn screen without scratching or denting the window frame.
For a deeper dive into what the pros use, you can check out our full guide on essential window screen repair tools.
Here’s a pro tip: if you're working on an older home, the window frames have likely settled over the years and probably aren't perfectly square anymore. A small level can be a surprisingly handy tool to have.
A quick check with a level can tell you if the frame is skewed before you even start measuring. This explains why taking three measurements for both width and height (top, middle, and bottom) and using the smallest one is the secret to a screen that fits every time.
With this simple kit, you're all set to get a flawless measurement.
Measuring an Existing Screen Frame with Confidence
If you still have the old screen, you're in luck. This is by far the most straightforward way to get a perfect replacement. The old frame is your exact template.
First, gently pop the old screen out of the window. Find a good, flat surface to work on—the garage floor, a workbench, or even a large dining table will do just fine. Lay the screen down so it's completely flat.
Nailing the Width and Height
Grab a quality metal tape measure for this part. To get the width, measure from the absolute outside edge on the left to the absolute outside edge on the right.
Now, here's a pro tip: don't just measure once. Over the years, frames can get slightly bent or warped, and window openings can settle. To account for this, take three separate width measurements—one near the top of the screen, one across the middle, and one near the bottom.
Write down all three, but the one you’ll use is the smallest of the three measurements. Be precise and measure down to the nearest 1/16th of an inch. This little trick ensures your new screen will slide into place smoothly without having to force it.
Follow the exact same process for the height. Measure from the outside top edge to the outside bottom edge in three different spots, and again, use the smallest number.
This quick visual guide breaks down the key measurement points.
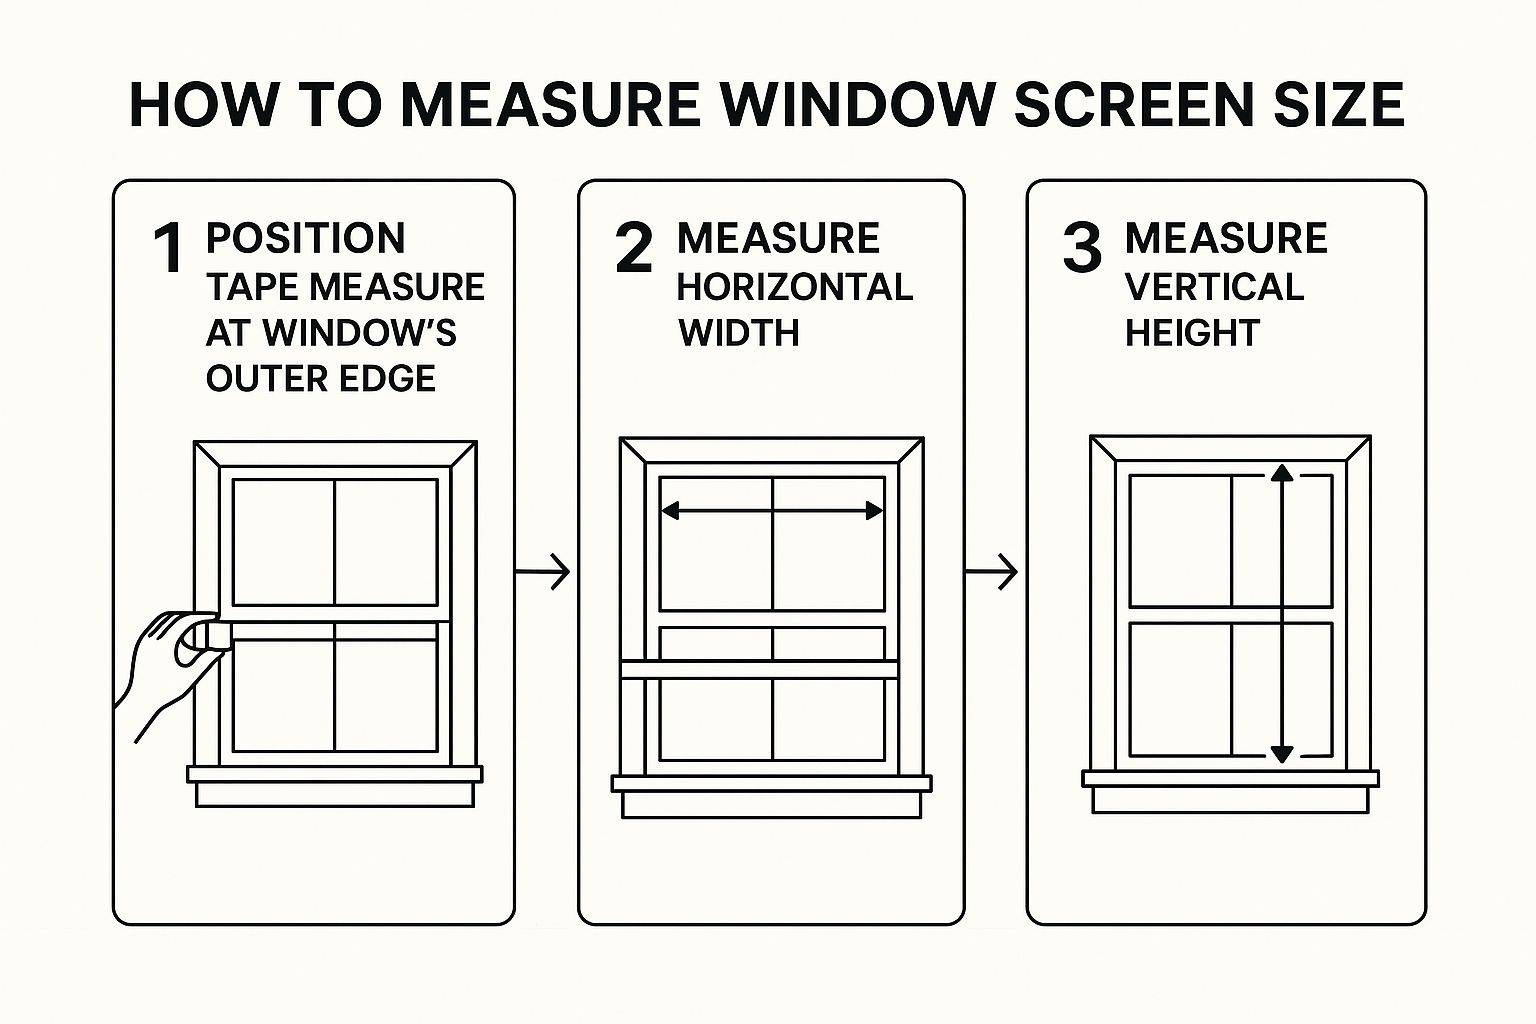
As you can see, it's all about measuring from the outermost edges of the frame to get those crucial width and height dimensions.
The Overlooked Dimension: Frame Thickness
This next step is one that people forget all the time, but it’s just as important: the thickness of the frame (sometimes called the depth).
Getting this wrong means your new screen will either be too thin and rattle around in the window channel, or it'll be too thick and you won't be able to install it at all. Simply hold your tape measure against the side of the frame to get this number.
Most residential window screens use one of a few standard sizes:
- 5/16 inch: The most common thickness you'll see in standard aluminum windows.
- 3/8 inch: A bit beefier, often found on larger screens or vinyl windows.
- 7/16 inch: Typically reserved for heavy-duty applications or very large porch screens.
Matching this depth is absolutely critical for a snug, professional fit. For a deeper dive into how these frames differ, check out our guide on the types of window screen frames.
Standard Window Screen Frame Dimensions
To help you out, here's a quick reference table for the most common frame sizes we see in North American homes. It’s not an exhaustive list, but it covers the vast majority of what you'll encounter.
| Common Size (Width x Height) | Typical Frame Thickness (Depth) | Best For Window Type |
|---|---|---|
| 30" x 36" | 5/16" | Standard single or double-hung windows |
| 24" x 48" | 5/16" | Tall, narrow windows (casement or slider) |
| 36" x 48" | 3/8" | Larger picture windows or oversized sliders |
| 48" x 60" | 7/16" | Heavy-duty or custom large-scale openings |
Keep in mind that these are just common examples. Your measurements are what truly matter, so always trust your tape measure over a chart.
When you're measuring, always focus on the screen frame itself—never the window opening. A small error in width, height, or especially depth can make a new screen completely useless. It might wobble, fall out, or simply not fit at all. For more expert advice on this, the folks at Window Hardware Direct have a great guide.
What to Do When You Have No Screen to Measure
It's a situation I see all the time: a homeowner needs a new screen, but the old one is either completely gone or so twisted and mangled it's useless as a template. If that's you, don't sweat it. You don't need the old screen to get a perfect fit. The secret is in the window frame itself.
You're looking for the screen channel—a small groove running along the outside of the window frame where the screen is meant to sit. If you run your finger along the inside edge of the exterior frame, you'll feel it. This channel is now your blueprint for getting a precise measurement.
Finding Your Channel-to-Channel Dimensions
Grab your metal tape measure and press the end firmly into the deepest part of the screen channel on the left side. Now, stretch the tape straight across to the deepest point of the channel on the right side. That's your width.
Do the same thing for the height, measuring from the inside of the top channel all the way down to the inside of the bottom one. Just as you would with an existing screen, I always recommend taking three quick measurements for both the width and height (top, middle, and bottom). Stick with the smallest of the three numbers to ensure you won't have any trouble with a tight fit.
Here’s the most critical part of this method: After you have your final width and height, you need to subtract 1/8 of an inch from both measurements. This isn't a mistake; it's a deliberate step that gives you just enough wiggle room to pop the new screen in and out without a fight.
Inspecting for Hardware Placement
Before you step away from the window, take a moment to peer into the screen channel. You're on a bit of a treasure hunt for clues about the original hardware. These little details make all the difference.
- Look for small rectangular slots. These are dead giveaways for where leaf springs (those flat, tense metal strips) are supposed to go. Make a note if you see them on the top or side of the channel.
- Keep an eye out for small round holes. These typically show you where pull tabs or plunger bolts were located, which are the mechanisms that help you install and remove the screen.
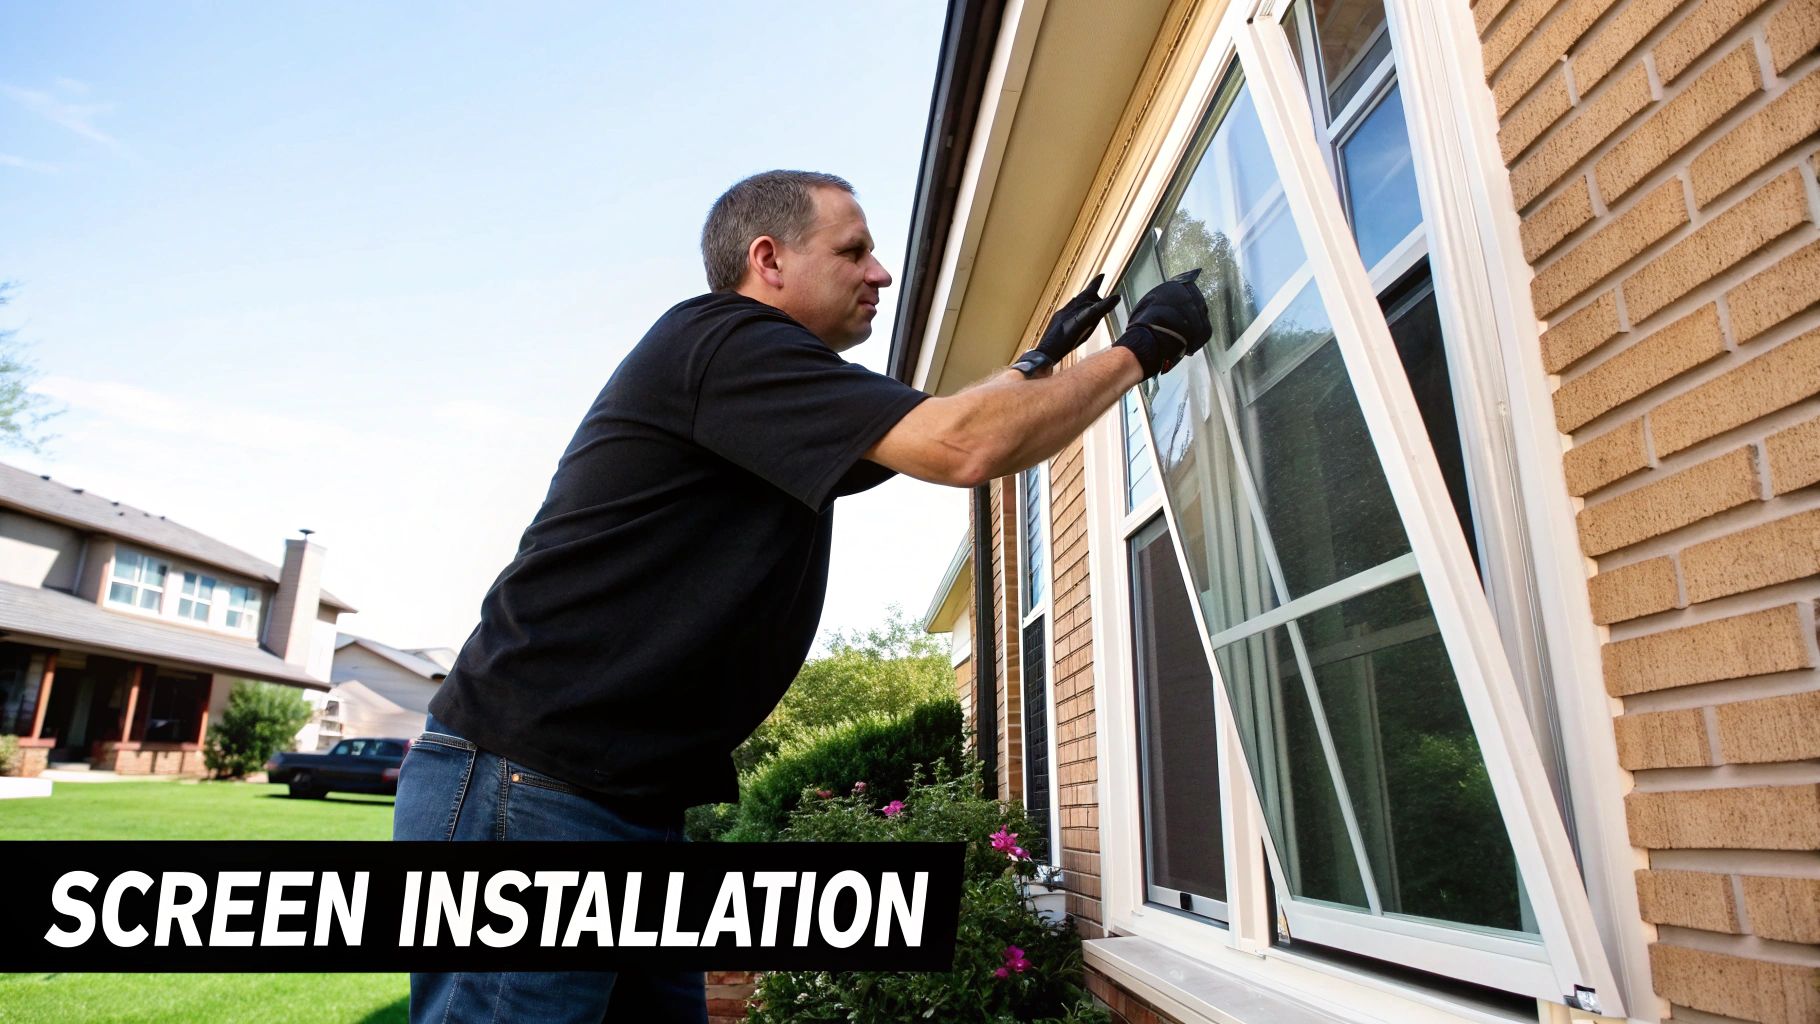
Knowing where this hardware belongs is just as important as the dimensions. It ensures the new screen you order will operate smoothly in your window frame. Once you have these measurements and details sorted, you’ll be ready for a simple installation. For a walkthrough of that process, check out our guide on how to install screens. A little prep work here makes all the difference for a screen that fits and functions perfectly.
Common Measurement Mistakes and How to Avoid Them
Even a tiny slip-up when you measure your window screens can cause a major headache down the road. These mistakes are frustrating, but they’re actually pretty easy to dodge once you know what to look for. The number one pitfall I see is people measuring the wrong part of the window.
It’s an honest mistake. Many homeowners measure the visible glass or the entire window opening from edge to edge. But your screen doesn't fit into the opening; it slides into a very specific channel or track built into the window frame. This single misunderstanding is the source of most ill-fitting replacement screens.
Another common oversight is forgetting about the frame's thickness or depth. This is a make-or-break dimension. It determines whether the screen will even slide into the channel, let alone fit snugly.
Precision Is Everything
It’s tempting to round your measurements to the nearest inch or half-inch. Don’t do it. This will almost guarantee a poor fit.
For window screens, precision down to 1/16th of an inch is the industry standard for a reason. That's the level of accuracy you need for a screen that pops in perfectly and keeps the bugs out.
This isn't a new concept. In the US, standard window screens have long been sized by the frame's width and height, not a diagonal. The actual mesh is always a bit smaller than the frame itself, and it’s the frame depth—usually 5/16, 3/8, or 7/16 inches—that dictates how it sits in the window channel.
What to Do with Damaged Frames
So, what happens if your old frame is bent or warped? A common impulse is to just measure it anyway and hope for the best. Unfortunately, a distorted frame will only give you a distorted measurement. You'll end up with a brand-new screen that doesn't fit, either.
When your existing frame is compromised, you have to treat it as if there's no screen at all. Go back to basics and measure the window's screen channel directly. This is the only way to get an accurate dimension for your new screen.
Taking the time to measure correctly is a fundamental skill for any DIYer. You can find some great general measurement guidelines for home projects that can help prevent these kinds of simple mistakes. A little extra care upfront saves a lot of trouble later.
Common Questions About Getting Your Window Screen Sizing Just Right
Even with the best instructions, a few tricky situations always seem to pop up when measuring for new screens. Every house has its own little quirks, and getting these last details nailed down is the difference between a perfect fit and a frustrating trip back to the hardware store. Let's tackle some of the most common questions I hear from homeowners.
A big one is what to do when your existing screen frame is bent or damaged. The temptation is to try and measure the old, warped frame, but don't do it! You'll just end up with a new screen that's the wrong size. In this situation, you need to measure the window's screen channel itself, just as if the old screen wasn't there at all.
Are All Window Screen Frames the Same Thickness?
Not a chance, and this is a detail you can't afford to get wrong. Most residential window screen frames come in three standard thicknesses: 5/16", 3/8", or 7/16".
Choosing the right thickness is what ensures the screen pops securely into your window's channel. A frame that’s too thin will be loose and rattle in the wind, while one that's too thick simply won't go in, no matter how hard you push.
Should I Measure In Inches or Centimeters?
Always, always use inches. Here in North America, the entire window and screen industry works in inches, and we get specific—down to the nearest 1/16th of an inch. If you send in measurements in centimeters, you’re almost guaranteed to get back a screen that doesn't fit.
What if My Window Frame Isn't Perfectly Square?
This is probably the most common issue people run into, especially in older homes that have settled over the years. The fix is simple: always use the smallest measurement you take. If you measure the width at the top, middle, and bottom, just use the shortest of those three numbers. A screen that's a tiny bit too small can usually be secured just fine, but a screen that's even a fraction of an inch too big is impossible to install. It's a simple rule that can save you a huge headache.
When you want a perfect fit without any of the guesswork, it's best to call in the pros. For fast, professional screen repair and replacement, get in touch with Sparkle Tech Screen Service for a quick quote. We'll get your custom screens done right, often with same-week service. You can find us at https://sparkletechscreenservice.com.


