


A torn door screen usually gets ignored until the exact moment you need it. That’s when the mosquito starts circling the lamp, the patio slider won’t glide right, or the late afternoon sun starts cooking the room behind the glass.
In Phoenix, a small rip doesn’t stay small for long. Heat dries mesh out, aluminum frames warp, corners loosen up, and a screen that looked “good enough for now” turns into a loose, noisy, bug-leaking mess. Door window screen replacement is one of those jobs that looks simple from a distance and punishes sloppy work up close.
The good news is that it’s very fixable if you use the right mesh, the right spline, and the right tension. The better news is that once you understand how screens behave in a hot climate, you can avoid most of the mistakes that make homeowners redo the job.
Why That Torn Screen Is Worth Fixing Now
At 6 p.m. in Phoenix, the patio door gets opened for a little airflow, and that small tear you meant to deal with last month starts doing real work for the wrong side. Gnats find it fast. Mosquitoes do too. If the mesh has gone loose from heat and sun, the whole panel can start slapping, dragging, or pulling out of the frame.
That is why I tell homeowners not to judge a screen by the size of the rip. In our climate, the problem is usually bigger than the tear itself. The mesh may be sun-brittle. The spline may have shrunk and hardened. The frame may already be slightly bowed from years of west-facing heat.
A damaged screen also changes how the opening gets used. People stop opening the door in the evening because bugs get in. They keep the glass shut and run the AC harder. On sliders, a sagging screen can rub the track and make the whole door feel rougher than it should.
The sun side matters too. On a west-facing patio door, worn-out mesh stops doing much to cut glare or soften late-day heat. If that opening gets hammered by afternoon sun, replacing the screen is a chance to fix comfort, not just patch a hole. Homeowners deciding between different window screen mesh types for sun, bugs, and durability usually get a better result when they treat this as a performance choice instead of a simple repair.
Here is when I would stop waiting and fix it:
- The tear is growing at the corner or along the spline line: That usually means the mesh has lost strength and the frame is flexing.
- The screen sounds loose in the wind: A rattling screen often turns into a pulled corner or a full blowout during monsoon season.
- The frame no longer sits square: Heat-warped door screens rarely improve on their own.
- You avoid opening the door at all: At that point, the screen has already stopped serving its purpose.
A clean, tight screen makes the door usable again. Air moves through. Bugs stay out. The opening looks maintained, and the screen panel stops fighting the track and frame every time it moves.
Fixing it now usually means a straightforward rescreen or panel adjustment. Waiting often turns it into a frame repair, new corners, roller work, or a full replacement. In Phoenix, heat punishes delays.
Choosing Your Screen Mesh and Project Materials
A Phoenix screen that faces afternoon sun has a different job than one on a shaded north wall. Material choice decides how long the repair stays tight, how much heat it blocks, and whether the frame can handle the tension without twisting.

Fiberglass vs aluminum vs solar vs pet mesh
Homeowners often walk into the store asking for standard screen, then grab fiberglass because it is cheap and easy to find. That choice works fine for a shaded window or a low-use opening. On a sun-beaten patio door in Phoenix, it is often the wrong material.
Fiberglass is the easiest mesh to install. It stretches enough to be forgiving, which helps on older aluminum frames that are not perfectly square. The trade-off is shorter life in harsh sun and less resistance to pets, kids, and everyday bumps.
Aluminum mesh stays straighter and has a cleaner, crisp look. It also shows every mistake. One bad crease usually stays there, and on a sliding screen door that gets pushed or racked in the track, that stiffness can work against you.
Solar mesh is the material many homeowners wish they had chosen the first time. It cuts glare, reduces heat coming through the opening, and generally holds up better on west-facing doors than light bug screen. The trade-off is a darker view and a heavier feel during installation. If the frame is already weak or heat-warped, that extra weight matters.
Pet mesh solves a different problem. It stands up to claws and pressure far better than standard fiberglass, but it is thicker and takes more force to roll into the groove. On a flimsy frame, pet mesh can pull corners out of square if you rush the install.
If you want a side-by-side overview before buying, this guide to types of window screen mesh for sun, bugs, and durability gives a useful breakdown.
Match the mesh to the opening, not the label
The right pick depends on sun exposure, traffic, and frame condition.
| Screen type | Where it works best | Trade-off |
|---|---|---|
| Fiberglass | Shaded doors and basic bug control | Wears faster in strong sun and under rough use |
| Aluminum | Openings where a straighter, firmer screen is preferred | Creases easily and is less forgiving to install |
| Solar screen | West-facing sliders, patios, and hot sun exposures | Darker outward view and more load on weak frames |
| Pet screen | Homes with dogs, cats, or frequent screen contact | Harder to tension and tougher on light frames |
I tell Phoenix homeowners to start with the opening itself. A back patio slider that gets hammered by late-day sun usually benefits more from solar mesh than from a standard bug screen. A laundry room door under a covered patio may do perfectly well with fiberglass. Material choice should solve the underlying problem at that opening.
Spline matters more than the mesh brand
Spline is the cord that locks the screen into the frame groove. If the size is off, the screen will loosen, corners will lift, or the frame will bow while you are trying to seat it.
Do not assume the old spline size is still correct. Heat hardens vinyl. Old spline also flattens over time, so matching it by eye can leave the new screen too loose.
Use these checks instead:
- Old spline comes out with almost no resistance: The original size may be too small now, or the groove may be worn.
- New spline has to be forced hard into every side: The spline may be oversized, or the frame groove may be packed with old debris.
- Corners rise after you finish rolling: The frame may be warped, the spline may be too large, or the mesh tension is uneven.
- The mesh looks tight on one side and wavy on the other: Stop and recheck spline fit before blaming the mesh.
For Phoenix jobs, I usually recommend replacing spline instead of reusing it. Fresh spline is cheap. Reusing sun-baked material is one of the most common shortcuts that turns a simple rescreen into a redo.
Basic tool checklist
You do not need specialty shop equipment, but the wrong tool makes this job harder fast.
- Spline roller: A combo roller with convex and concave ends covers most screen jobs.
- Flathead screwdriver or pick: Use it to lift old spline carefully without gouging the groove.
- Utility knife with a fresh blade: A dull blade snags mesh and leaves ugly edges.
- Tape measure: Measure the frame and buy enough mesh for proper overlap.
- New mesh and new spline: Buy both before taking the old screen apart.
- Flat work surface: A table, bench, or supported sheet of plywood helps keep the frame from twisting during install.
One last materials check matters in Phoenix. If the frame already shows heat warp, do not jump straight to heavy pet or solar mesh just because it sounds tougher. A stronger screen in a weak frame can make the frame fail sooner. In that case, standard fiberglass may be the better temporary choice, or the smarter move may be frame repair or full replacement instead of rescreening.
Your Complete Step-by-Step Rescreening Process
A screen can look fine on the table and still fail the minute it goes back into a Phoenix opening. Heat exposes sloppy tension, weak corners, and frames that already lost their shape. The goal is not just a tight screen today. It is a screen that still sits flat after months of sun.

Remove the screen and inspect the frame first
Set the screen on a flat surface before you pull anything apart. In Phoenix, a lot of rescreen jobs fail because the mesh gets blamed when the underlying problem is a heat-twisted frame.
Check the frame for:
- Warping along the long sides
- Damaged corners
- Bent spline groove
- Loose frame joints
- Roller or track wear on sliding units
ReconRoof’s replacement guide notes typical spline groove depth ranges on aluminum frames, but the bigger issue in the field is whether the frame still holds shape under tension. If the frame rocks on a flat table, bows through the middle, or has corners that refuse to sit square, fresh mesh will not solve it.
I see this a lot on older patio screen doors. Homeowners buy heavier mesh to make the repair last longer, then the added pull makes a weak frame twist even more.
Pull the old spline and clean the groove
Start in one corner with a flathead screwdriver or pick. Lift the old spline carefully and pull it out in one run if possible. Then remove the old mesh.
Clean the groove before the new mesh goes down. Dust, brittle spline fragments, and grit keep the spline from seating evenly, and Arizona dust builds up fast in those channels.
If you need to assemble a basic setup first, this guide to window screen repair tools covers the hand tools that get used on rescreen jobs.
Cut the mesh with enough overlap
Lay the new mesh over the frame and leave enough extra material on every side to hold and tension comfortably while you roll. Too little overlap makes the mesh hard to control. Too much gets in your way and folds into the groove.
For standard bug screen, the material is usually easy to manage. Solar mesh is less forgiving. It is stiffer, it shows tension mistakes faster, and it puts more load on older frames. That trade-off matters in Phoenix. Solar screen helps with heat and glare, but it is not always the right pick for a frame that already shows sun fatigue.
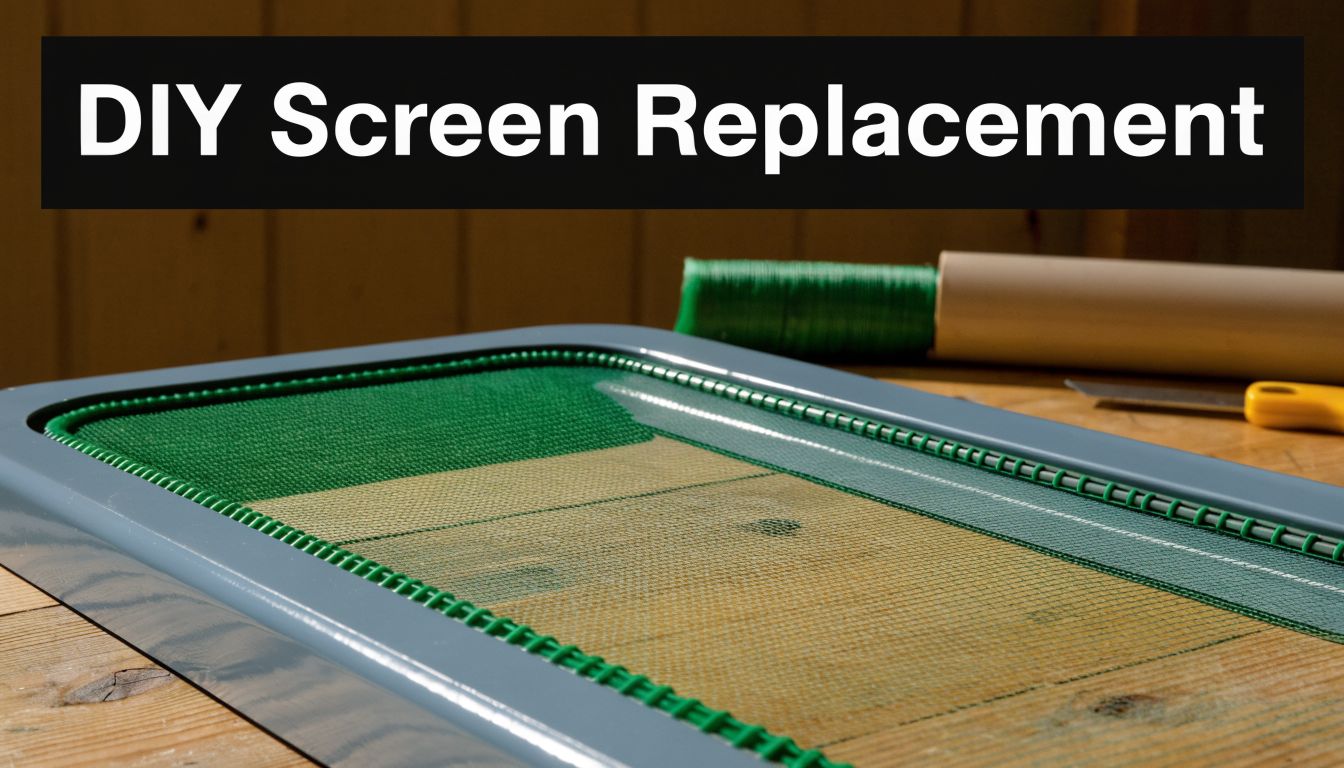
Start at the top and control tension
Press the mesh lightly into the top groove first, then begin seating spline. Work in a consistent sequence. Top, bottom, then sides usually gives the best control on door and window screens.
Use steady pressure. Do not crank the mesh tight like upholstery.
The common DIY mistake is over-pulling one side and trying to fix it with force on the next side. That usually creates ripples, corner puckers, or a bowed frame. If the first run looks off, pull that spline back out and reset it right away. Early corrections are fast. Late corrections usually mean starting over.
A smaller window screen often goes smoothly on the first try. A full door panel is less forgiving because every little shift gets amplified across the longer frame.
A visual helps here if you haven’t rolled spline before.
Handle long frames and corners carefully
Long door frames need more control than small window screens. On anything tall or wide, keep the frame flat and supported so it does not twist while you work. If the spline wants to bunch on a long run, cutting it into shorter sections can make the install easier to manage.
Corners deserve extra patience. Seat the main runs first, then tuck the corners neatly with a small screwdriver or similar tool. Keep the tool angle shallow so you do not cut or fray the fresh mesh.
Trimming matters too. Use a fresh blade and angle it outward from the spline groove. Inward cuts are one of the fastest ways to ruin a new install, especially on darker solar mesh where every mistake shows.
Measure fit before calling it done
Reinstall the screen and test the fit before you call the job finished. A screen that looks clean on the bench can still bind in the track, leave edge gaps, or bow once it is upright.
Use this field check:
- Hold the frame upright and look for bowing.
- Set it in the opening without forcing it.
- Watch the corners for lift or twist.
- Slide it gently if it’s a screen door panel.
- Check edge gaps in daylight.
If the screen drags, pops a corner, or sits loose in one side of the opening, stop there and correct it. Phoenix heat will make a minor fit problem show up faster.
For oversized doors, warped frames, or jobs where the frame itself is the weak point, Sparkle Tech Screen Service handles rescreening, sliders, and same-week service in the Phoenix area. That can be the better call when a DIY rescreen would only buy a short-term fix.
Troubleshooting Common Problems and Quick Fixes

You finish the rescreen, stand the frame up, and the panel suddenly shows a wave across the middle or a corner starts to curl. In Phoenix, that usually means the install tension is uneven, or the frame already had some heat distortion before the new mesh went in.
Ripples, loose mesh, and corners that won’t sit
Ripples rarely mean the whole job is ruined. They usually point to one side of the spline being seated harder than the opposite side, or a frame that shifted while you worked.
If the wrinkle runs side to side, pull the spline from that edge and one adjacent corner, then reset it with lighter, even pressure. If the pucker stays in one corner, check the frame for twist on a flat surface before you blame the mesh. I see this a lot on older patio screens that have spent years baking against stucco walls and reflected glass.
Large door panels are less forgiving than small window screens. Solar mesh makes that even more obvious because it is stiffer and shows tension mistakes faster. Painter’s tape on the frame can help hold position while you reroll, but tape will not correct a bent frame.
Fix visible tension problems right away. Afternoon heat will make a small wrinkle look worse by the end of the week.
Patch it or replace it
Homeowners patch too many screens in Arizona. A patch works for a small puncture in otherwise healthy insect mesh, especially in a low-visibility spot. It is a short-term repair, not a reset button.
Replace the whole mesh if you see any of these:
- A long tear near the edge
- Brittle strands that snap when touched
- More than one damaged area
- Solar screen fabric with a patch that will stand out or weaken shading
- Spline pull-out that started because the mesh shrank or the frame warped
Solar screen is where patching makes the least sense. Once that darker mesh is cut, faded, or stretched, the repair usually shows from both inside and outside. On a front-facing window or patio slider, full replacement is usually the cleaner and cheaper decision compared with stacking temporary fixes. If you are weighing that decision against labor charges, this breakdown of the cost of window screen replacement helps set expectations.
If the problem is really the door and not the mesh, start with this guide on how to fix a sliding screen door. Bad rollers, a bent track, or a loose frame can make a good rescreen look bad fast.
Knife mistakes and frame mistakes
Fresh installs get ruined at the trimming stage all the time. The blade needs to ride outside the spline, not dive toward the groove. One inward cut can nick the new mesh, and that small slice often turns into the next tear once the screen is back in service.
Frame condition matters just as much. If the spline keeps lifting in the same area, the groove may be worn, dirty, or heat-spread. If the screen feels tight on the bench but loose in the opening, the frame may be bowed enough that new mesh cannot pull it back into shape.
At that point, stop rerolling. Clean the groove, inspect the corners, and check the frame diagonals. If the frame is out of square or softened from years of sun, replacing mesh alone will only buy you a little time.
DIY vs Hiring a Pro The Real Cost and Effort
A torn door screen looks like a quick Saturday fix until the frame comes out twisted, the new mesh goes in crooked, and the corners refuse to sit flat again. In Phoenix, heat changes this math. Sun-baked frames get soft, grooves spread, and materials that behave fine in a garage tutorial can fight you hard on a 110-degree afternoon.

DIY still makes sense on the right job. If the screen is small, the frame is square, and you are using standard bug mesh, a careful homeowner can usually get a solid result. The savings are best when you already have a spline roller, fresh spline, a flat work surface, and enough patience to redo a panel if the first pass comes out wavy.
The numbers change fast on larger doors. A patio slider with solar screen is a different animal from a bathroom window screen. Solar mesh costs more, rolls stiffer, and puts more stress on old aluminum. If the frame has any heat warp, new mesh can make the fit problem more obvious instead of fixing it.
If you want a separate consumer-friendly breakdown of the cost of window screen replacement, that resource is useful for comparing labor, materials, and where DIY still makes financial sense.
When DIY makes sense
DIY is usually a reasonable call when the job stays simple.
- Single standard-size screen
- Frame sits flat and stays square
- Basic fiberglass bug mesh
- You already own the tools, or will use them again
- You have time to work slowly, indoors if possible
That last point matters more in Arizona than many guides admit. Mesh and spline are easier to control when the frame is cool. Working outside in direct sun often leads to overtensioned corners, rushed trimming, and a screen that looks tight for a day and loose a week later.
When hiring a pro is the smarter move
Door screens are where homeowners lose money trying to save it.
Call a pro when you’re dealing with:
| Situation | Why pro service often wins |
|---|---|
| Large patio or slider doors | Even tension is harder to hold across long spans |
| Warped aluminum frames | Mesh replacement does not correct a bent or softened frame |
| Solar, pet, or heavier specialty mesh | Thicker materials are less forgiving and easier to overwork |
| Several screens at once | One service call can cost less than repeated store runs and trial-and-error |
| Fast turnaround matters | A pro usually finishes in one trip with the right spline and mesh on hand |
I tell Phoenix homeowners to make the decision based on frame condition first, not just labor price. If the frame is straight and the mesh is basic, DIY is fine. If the frame is sun-cooked, oversized, or paired with solar mesh, paying for skilled labor often costs less than buying materials twice.
A pro also earns their keep when the opening is visible from the street or used every day. On a front door or main patio slider, bad tension, ripples, and corner pullout are hard to ignore. Getting it done correctly once is often the cheaper option in both time and materials.
Advanced Screen Care and Specialty Upgrades
The best screen repair work isn’t just about replacing mesh. It’s about choosing a setup that lasts longer in the opening you have.
Clean, inspect, and stop small problems early
Dust and sun are hard on screens in Arizona. Gentle cleaning with mild soap, water, and a soft brush helps keep mesh open and visible. During cleaning, check corners, spline lift, brittle strands, and bent frame sections.
If one screen has failed, inspect the others while you’re already in screen-repair mode. On many homes, one damaged door screen is a sign that the rest are aging the same way.
Upgrade for the way the opening gets used
Large patio doors, horse stalls, screened enclosures, and pet-heavy households all deserve different materials.
For pet-heavy applications, a supplier overview like this one on durable insect pet mesh is useful for understanding why heavier mesh behaves differently from standard bug screen. The install feel is different, and so is the wear pattern over time.
In high-sun climates like Arizona, DIY screen door replacements fail 25% more often within two years because of spline tension problems in heat-warped frames, and there’s a 35% higher satisfaction rate with mobile professional service for doors over 36×80 inches, according to Metro Screenworks’ guidance on replacement questions. That lines up with what shows up in the field. Bigger doors punish small errors.
Know when the frame is the real problem
New mesh won’t fix bent tracks, spread corners, or a frame that no longer sits square. If the door drags after a clean rescreen, or the mesh keeps loosening no matter how carefully it’s installed, stop blaming the material.
At that point, the repair usually needs frame work, a rebuilt slider, or a full replacement panel.
If your door window screen replacement has turned into a warped-frame problem, a stubborn slider, or a patio screen job you’d rather not redo, contact Sparkle Tech Screen Service for quick quotes, same-week service, and same-day pickup options for bug screens, solar screens, sliders, patios, and specialty screen repairs across the Phoenix area.


