


That scraping sound usually starts this project.
Your sliding screen door drags, hops the track, or sticks right when you want a little fresh air. You try a quick lift, it barely moves, and suddenly a simple cleanup job turns into a wrestling match with thin aluminum and a track you really don’t want to bend.
Most patio sliders are common, standardized pieces of hardware, which is why removal is often easier than people expect. Sliding screen doors are the most common type for patios, with installation costs averaging $175, and standard doors are typically a uniform half-inch thick that fit into 5/8-inch channels, which is part of what makes removal fairly consistent across many models, according to Angi’s screen door cost guide. That same source notes that professional repairs average $150, so avoiding damage during removal matters.
A lot of homeowners get hung up in the same place. They assume a stuck door needs more force. Usually it needs less force and better setup. The doors that come out cleanly are the ones where the rollers are understood first, not fought first.
In Phoenix, this comes up all the time with dusty tracks, heat-stressed rollers, and mesh that’s been baking in the sun. The good news is that most standard aluminum sliders and many heavy-duty models follow the same basic logic. Retract the rollers, create clearance, keep the frame square, and remove the panel in a controlled motion.
Practical rule: If the door feels locked in place, stop pulling. Sliding screen door removal should feel controlled, not violent.
Your Guide to Hassle-Free Screen Door Removal
A frustrating slider usually gives warnings before it fails. It rattles at one corner. The latch stops lining up. The bottom rail starts rubbing. Then one day the screen won’t move without a shove, and now you’re standing there wondering if the whole thing has to come apart.
That’s the point where many people make the expensive mistake. They grab the frame at one side, yank outward, and twist the door just enough to bend it. Thin screen door frames don’t forgive that kind of force.
Why removal is usually simpler than it looks
Most sliding screens are built around a basic track-and-roller setup. The door sits in a top channel and rides on rollers below. Once those rollers are lowered enough, the panel can usually lift into the upper channel and come out without much drama.
The important part is knowing that removal is less about strength and more about clearance. If the wheels still press hard into the lower rail, the door won’t rise enough to clear the track lip.
Here’s what tends to work well:
- Working from the inside: You get better footing and better control of the bottom edge.
- Checking the lower corners first: That’s where the adjustment system usually lives.
- Keeping the frame straight: Even light doors can flex if one corner comes out before the other.
What doesn’t work is forcing a stuck panel, prying randomly at the track, or assuming every door lifts out the same way without checking the rollers.
What homeowners often miss
The common advice is “just lift it up and pull the bottom out.” That’s only half the job. The missing half is diagnosis. If the roller tension is too high, that simple lift-out method feels impossible.
The other overlooked piece is what happens after the door is out. Leaning it bare against a hot garage wall, leaving the rollers dirty, or storing it where dust settles into the wheel assemblies often creates the next problem before reinstallation even begins.
A smooth removal starts before the door moves. Inspect first, adjust second, extract last.
Assembling Your Tools and Inspecting the Door
A short prep step saves a lot of grief. Before you touch the frame, gather the basics and inspect the hardware. Most sliding screen door removal jobs don’t need a full toolbox.

What to put next to you before you start
For most doors, you only need a few hand tools:
- Phillips screwdriver: Common for bottom roller adjustment screws.
- Flathead screwdriver: Useful for access covers, light prying, or debris removal.
- Putty knife or butter knife: Helpful for lifting under the lower frame without gouging it.
- Vacuum or small brush: Good for clearing dirt from the track before the lift.
- Work gloves: They help with grip and protect your hands around worn mesh or sharp frame edges.
If you want a more complete look at basic gear used for screen work, this roundup of window screen repair tools is useful for seeing what belongs in a simple maintenance kit.
Find the roller adjustment points first
Look at the lower corners of the screen door frame. On many sliders, the roller adjustment screws sit near the bottom, either on the side edge or facing downward near the wheel assembly. Older doors can vary. Some hide the screw in a recessed hole. Others place it on the end cap.
Don’t assume both sides match perfectly at first glance. Dirt, paint, or oxidation can hide one screw better than the other.
Use this quick inspection checklist before removal:
| Area to inspect | What you’re looking for | Why it matters |
|---|---|---|
| Bottom corners | Adjustment screws | They control roller height |
| Bottom track | Sand, pet hair, compacted dirt | Debris can make a movable door feel stuck |
| Frame edges | Bowing, dents, twist | Bent frames don’t lift cleanly |
| Rollers | Wobble, drag, seized movement | Damaged wheels change the removal approach |
Check the track before blaming the door
A lot of sliders feel jammed because the track is filthy. Phoenix homes especially collect dust fast, and once grit packs into the lower channel, the wheels stop rolling and start scraping.
If the track is visibly packed, vacuum it now. You’re not trying to make it spotless yet. You’re clearing enough debris that you can read the hardware and avoid grinding dirt into the wheels during removal.
If the screw heads are buried under dirt, the door hasn’t been the problem alone. The track has been working against it too.
Also look at the track shape. If the lower rail is bent upward or pinched inward, the issue may be physical deformation rather than simple adjustment. That’s an important distinction because straightening metal and removing a panel safely are two different tasks.
The Core Removal Process Step by Step
Once the door is inspected and the adjustment screws are identified, the job becomes mechanical. The cleanest removals follow a sequence. Lift for clearance, pull the bottom out at the correct angle, then remove the panel fully.

According to this professional extraction overview, the standard method works in three phases. First, lift with about 5 to 15 pounds of upward force to create clearance. Next, pull the bottom outward at roughly a 15 to 20 degree angle. Then lift the door completely away. That source also notes that proper technique can keep removal time under 5 minutes and reduce damage risk compared with improper technique.
Lower the rollers before the first lift
Start with the adjustment screws at the bottom corners. Turn them gradually to retract the wheels enough that the door can rise into the top channel. Don’t crank one side all the way down and leave the other untouched. Work evenly from side to side.
You’re trying to create slack, not collapse the door into the frame.
If the door still slides a little, move it to a position where you can stand comfortably and hold both vertical sides. Many people prefer the panel about halfway open because there’s room to grip it without fighting the jamb.
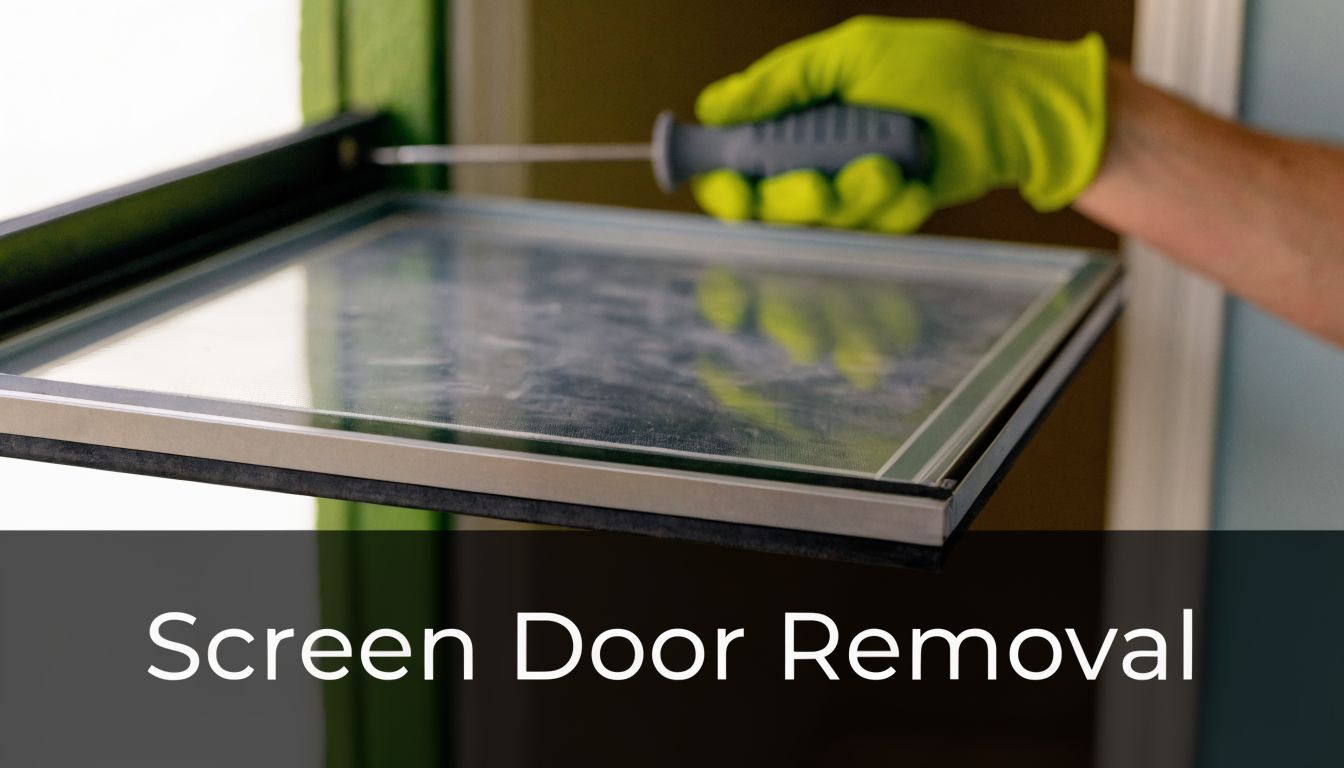
Lift straight up first
Place your hands on both sides of the frame. If the lower rail needs help clearing the track, slide a putty knife or butter knife under the bottom frame and lift gently.
The first motion is vertical. Not diagonal. Not outward.
This is the point where people often bend the frame by combining motions too early. Lift into the upper channel until you feel the bottom edge free up enough to move.
Pull the bottom toward you at a shallow angle
Once the door has enough vertical clearance, pull the bottom edge toward you at a shallow angle. Keep the angle modest and controlled. If the rollers were adjusted properly, the bottom should disengage without a hard jerk.
The frame should stay square while you do this. If one side comes out and the other side hangs up, stop and reset. A racked screen door is much harder to reinstall and more likely to rub afterward.
For visual learners, this short demonstration helps show the hand positioning and body movement involved:
Finish by clearing the top channel
After the bottom is free, continue supporting the panel and lift it enough to release the top from the upper track. Then carry it away carefully with the frame upright.
Don’t drop the door flat onto concrete. Set it down gently on a protected surface.
Here’s the shortest version of the sequence:
- Adjust first: Retract the lower wheels enough to create slack.
- Lift second: Raise the panel into the top channel.
- Pull third: Bring the lower edge out toward you.
- Remove last: Clear the top and carry the panel away evenly.
Keep upward pressure on the door until the bottom is fully free. Letting the panel drop mid-move is how lower corners get tweaked.
What a good removal feels like
A proper sliding screen door removal feels surprisingly uneventful. The panel doesn’t explode out of the track. It doesn’t require wrestling. It usually comes free with deliberate hand placement and steady pressure.
If you find yourself bracing your foot against the threshold or twisting the frame to “make it go,” the setup is wrong. Go back to the rollers before you go forward with force.
Troubleshooting a Stubborn or Stuck Screen Door
The worst advice for a stuck screen door is “lift harder.” That’s how frames get bent and rollers get torn up inside the bottom rail.
Most difficult removals aren’t caused by catastrophic damage. They’re caused by roller tension that hasn’t been released enough. According to this roller tension breakdown, roughly 60 to 70% of difficult sliding screen door removals come from improper wheel tension, not structural damage. That same source notes that loosening the adjustment screws creates the 0.25 to 0.5 inches of clearance needed for the door to lift without binding, and recommends annual tension checks because seasonal expansion can affect fit.

If your door won’t cooperate, it helps to understand the hardware better. This guide on sliding screen door adjustment is useful if you need a closer look at where those screws are and how they affect ride height.
The roller tension mistake
The adjustment screws control wheel height. If the wheels sit too low into the track, the door presses tightly against the rail and won’t lift enough to come out.
That means the problem often isn’t that the door is too damaged to remove. It’s that the wheels are still loaded against the bottom track.
A few signs point to tension as the core issue:
- The door moves a little but won’t lift: That usually means the wheels are still engaged too low.
- One corner rises and the other sticks: One roller may be set tighter than the other.
- The frame flexes before the door clears: You’re pulling against tension instead of releasing it.
Common stuck-door scenarios
Some doors don’t respond right away even when you know what you’re doing. These are the failures that show up in the field most often.
| Problem | What it usually means | Better response |
|---|---|---|
| Screw won’t turn | Paint, corrosion, or debris in the head | Clean the recess and use the correct bit with firm pressure |
| Door won’t lift after adjustment | Roller still loaded or internal damage | Back off both sides evenly and test again |
| Bottom edge grinds during movement | Track packed with grit | Clean the channel before trying again |
| One side releases, one side jams | Uneven roller height or bent frame | Re-level adjustments and inspect the rail |
What to do when the screws fight you
Painted-over screw heads are common. So are stripped slots and compacted dirt in the recess. Before you decide the door is impossible, clean the screw head with a pick, small flathead, or stiff brush so the screwdriver seats fully.
If the screw turns but nothing changes, the internal roller assembly may be damaged or seized. That’s when the door can feel “mysteriously” locked in place even though the hardware appears adjustable.
Don’t keep spinning a stripped adjustment screw and hope for movement. If the wheel assembly isn’t responding, the problem is inside the frame.
Pet hair, dust, and corrosion can also immobilize the wheel. In that condition, the adjustment system may no longer move the roller in a useful way. Continued force usually damages the frame before it solves the jam.
When the problem isn’t tension
Sometimes the lower track is bent, the corner is distorted, or the roller housing has failed internally. In those cases, the door may need a controlled partial lift with very careful support, or a technician may need to disassemble hardware rather than rely on normal extraction.
That’s the dividing line. If the door resists after proper tension adjustment and cleanup, more force usually stops being the answer.
After Removal Care Reinstallation and Maintenance
Once the panel is off, don’t lean it in direct sun and forget about it. That’s where a lot of otherwise good removals go bad.
In Arizona conditions, storage matters. This post-removal maintenance guide notes that improper storage can lead to UV degradation and dust accumulation that causes jamming upon reinstallation, and that cleaning rollers and tracks while checking the mesh for brittleness can help prevent future service calls.
Clean the parts while everything is accessible
This is the easiest time to service the track and rollers because you can reach them.

Focus on these tasks:
- Vacuum the bottom channel: Remove loose dirt, sand, and hair.
- Wipe the upper channel: Dust up top can drop back into the rollers later.
- Inspect the wheels by hand: They should turn freely and sit square.
- Check the mesh closely: Brittle, faded, or torn screen material won’t improve by going back in.
For homeowners also dealing with the main patio door itself, this guide on adjusting patio doors gives useful context on alignment issues that sometimes get mistaken for screen problems.
Store the door so it stays straight
Keep the panel in a dry, protected area out of direct sun. Don’t leave it where dust storms can coat the rollers or where heat can keep baking the mesh and spline.
Best practice is simple:
- Store it upright with support across the frame
- Keep pressure off the mesh
- Avoid high-traffic corners where the frame can get bumped
- Don’t rest full weight on one lower corner
A screen can come out perfectly and still go back in poorly if the frame gets twisted during storage.
Reinstall in reverse order
Reinstallation is the same sequence in reverse. Set the top into the upper channel first. Lift the panel enough to place the bottom back onto the lower track. Then bring the rollers back into working contact with the adjustment screws.
Test the glide before final tightening. The door should move smoothly without scraping or jumping.
If the panel is too worn, damaged, or just done, replacement is often more sensible than forcing old hardware to behave. For sizing and fit considerations, this page on sliding screen door installation is a practical reference.
A clean track and a properly stored screen door usually reinstall easier than the day it came out.
When to Skip the DIY and Call a Professional
Some doors are good DIY candidates. Some aren’t. The trick is knowing the difference early enough to avoid turning a manageable repair into a bent-frame replacement.
The biggest red flag is failed hardware you can’t access cleanly. According to this stuck-door troubleshooting video, standard removal methods can fail because of hidden problems like seized adjustment screws or internal roller damage. That’s exactly where many basic guides stop being useful, and where professional diagnosis helps prevent frame damage.
Signs you should stop and hand it off
A pro is the smarter choice when you see any of these:
- The frame is visibly bent: A twisted screen won’t come out or go back in cleanly.
- The adjustment screws are stripped or seized: You can’t manage roller height reliably.
- A roller has failed inside the frame: The hardware may need repair before extraction.
- The track itself is damaged: Removal and track correction may need to happen together.
- The panel is large or awkward to control: One wrong move can kink a corner fast.
The cost of caution is usually lower than the cost of forced removal. Once a lower corner folds or the track gets gouged, the job changes.
Why this saves money in practice
Homeowners usually call after the second or third attempt, not the first. By then the screen is often more damaged than when they started. A stuck door with hidden roller damage can look like a simple lift-out job until the frame starts flexing.
That’s why experienced techs slow the process down. They check whether the door is tight because of adjustment, contamination, seized hardware, or structural damage. Those are different problems, and they need different responses.
If the door still won’t move after proper adjustment and careful lifting, stopping is the right call.
If your slider is stuck, bent, torn, or just overdue for a proper fix, Sparkle Tech Screen Service can help with screen repairs, rescreening, new sliders, and same-week service. Homeowners across the Phoenix area can text or call 623-233-0404 or call 800-370-3998 for a quick quote and practical help without the trial-and-error.


