


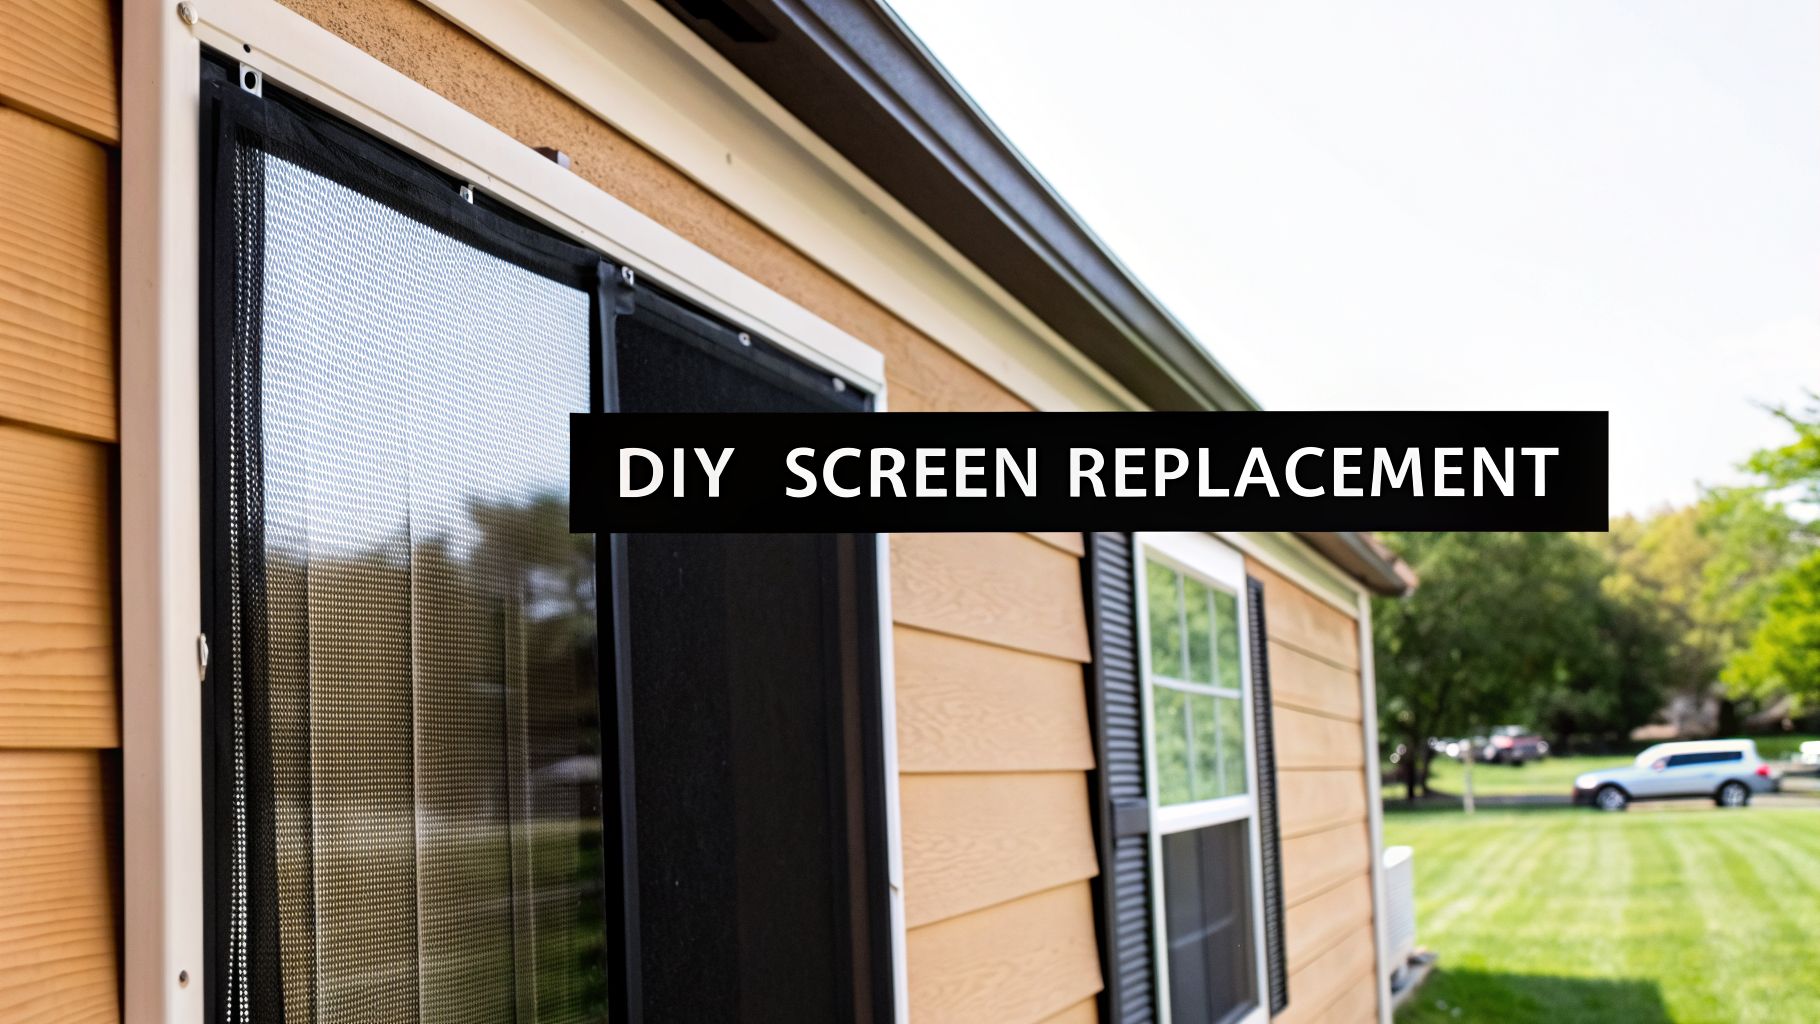

It’s a frustratingly common story. You head to the local big-box store, grab a standard window screen kit, and get home only to discover it doesn't even come close to fitting your mobile home's windows. Don't worry, you didn't buy the wrong thing—window screen replacement for mobile homes is just a different ballgame.
Why Mobile Home Window Screens Are Different

If you've ever tried to jam a standard screen into a manufactured home window, you know what I’m talking about. The frames, dimensions, and even the way they operate are often worlds apart from what you’d find in a site-built house. But knowing why they're different is the key to getting the job done right the first time.
The main reason for this mismatch comes down to how mobile homes are built. They’re assembled in a factory, where efficiency and unique engineering standards drive the design. This often results in windows with a few distinct quirks:
- Non-Standard Sizes: Forget easy, round numbers. You're far more likely to find odd measurements that simply don't exist in the off-the-shelf world.
- Shallower Frame Channels: The grooves that hold the screen frame are often much shallower than those in traditional windows, making it tough for standard frames to seat properly.
- Unique Frame Materials: While aluminum is common, the specific thickness and shape of the frame stock can be different, meaning standard corner pieces won't fit.
Identifying Your Window Type
The first step in any project is knowing what you're working with. The type of window you have dictates the kind of screen you'll need and how it gets installed. Manufactured homes usually have a few common window styles, and each has its own quirks.
To figure out what you're dealing with, here's a quick reference table. It covers the most common window types in mobile homes and points you toward the right solution.
Mobile Home Window Types and Their Screen Needs
| Window Type | Common Screen Challenge | Best Screen Solution |
|---|---|---|
| Jalousie | Glass slats crank outward, requiring the screen to be on the inside of the home. | An interior-mounted screen, often using tension springs or clips. |
| Awning / Casement | These also crank outward (from the bottom or side), so the screen can't be on the exterior. | Interior-mounted screens are a must to allow the window to open. |
| Vertical Slider | Panels slide up and down. Screens are on the outside but in shallow tracks. | A custom-built exterior screen is needed to ensure a tight, secure fit. |
| Horizontal Slider | Panels slide side-to-side. Similar to vertical sliders, they have shallow exterior tracks. | A properly measured, custom-built exterior screen is the only way to go. |
This table should help you quickly identify your window and understand the task ahead. The biggest surprise for most people is discovering their screens are supposed to be on the inside.
Let's break those down a bit further.
Jalousie Windows
These are the windows with multiple glass slats that open and close in unison, kind of like Venetian blinds. Because they open outward, the screens are almost always installed on the inside to protect the crank mechanism from the weather.
Awning and Casement Windows
Similar to jalousies, these windows crank open—awnings from the bottom and casements from the side. And just like them, the screens have to be on the interior to leave room for the window to swing open.
Key Takeaway: If your window has a crank, the screen almost certainly goes on the inside. This completely changes how you measure and install it, as it will likely use tension springs or clips to hold it in place instead of sitting in an exterior channel.
Vertical and Horizontal Sliders
These are a bit more familiar. The screens for sliding windows usually sit in an exterior track, much like in a traditional home. The problem, however, is that those non-standard sizes and shallow channels are still a major factor. Trying to force a pre-made screen here is a recipe for a loose, rattling fit that won’t do its job of keeping bugs out.
Understanding these differences is half the battle. It explains why your past attempts might not have worked out and equips you to tackle the project with a new plan. A successful window screen replacement for mobile homes is rarely about finding a universal product; it's about a custom approach tailored to your specific windows.
Choosing the Right Screen Material for Your Home

When you’re swapping out old screens in a mobile home, the material you pick is a much bigger deal than you might think. It’s not just about keeping bugs out; the right mesh dictates how long your screen will last, how clear your view is, and even how much you spend on cooling your home. Forget just picking between black and gray—let's figure out which material actually solves the problem you're trying to fix.
This isn't a decision you should make based on what's cheapest or easiest to find at the big-box store. Think of it as an investment in your comfort. Whether that means a cooler living room, a screen that won't rip the first time the dog jumps on it, or just better airflow, your choice here matters.
The Everyday Standard: Fiberglass Mesh
For most folks, standard fiberglass mesh is the go-to. It's affordable, it's flexible, and it’s pretty forgiving to install, which makes it a solid all-around choice for a lot of situations. If your main goal is simply to keep mosquitoes out of a window that doesn't see a lot of action, fiberglass works just fine.
But that flexibility can also be its downfall. Fiberglass can stretch out, tear easily, and get brittle after a few years of constant, direct sun—a huge issue for anyone living in states like Arizona. It’s a great budget pick, but best for windows that are a bit sheltered or aren't getting poked and prodded all the time.
When Durability Is a Must: Pet Screen
Got a dog that paws at the slider or a cat that thinks your screens are a personal climbing wall? If so, standard fiberglass won’t last you a week. This is exactly where pet-resistant screen, or pet screen, becomes a necessity, not just an upgrade.
This stuff is a total game-changer for pet owners. Made from a tough, vinyl-coated polyester, it’s about seven times stronger than the traditional fiberglass mesh. The weave is a little thicker, which can dim your view slightly, but that's a tiny price to pay to stop replacing screens over and over again.
Real-World Scenario: We had a customer in Surprise, AZ, who was on his third screen replacement for his patio door in under a year. His golden retriever would scratch it to be let inside. Once we switched him to a pet screen, the problem was solved for good. It saved him a ton of future frustration and money.
The Energy-Saving Powerhouse: Solar Screens
Mobile homes can heat up fast since they often have less insulation than traditional houses. This is where solar screens become one of the smartest upgrades you can make. These screens are engineered to block a huge chunk of the sun's heat and damaging UV rays before they ever touch your window glass.
This isn't just about feeling more comfortable; it's about real money back in your pocket. By cutting down the heat beating on your windows, your air conditioner doesn't have to run nearly as hard. That can lead to a very noticeable drop in your summer power bills, especially for those windows that get hammered by the direct afternoon sun.
Homeowners are catching on. The market for smart adaptive window solutions is set to hit USD 5.15 billion by 2026, with window coverings making up roughly 65% of the residential market. With most people replacing window treatments every 7 to 8 years and technologies like motorized shades cutting heat gain by up to 77%, the demand for effective screen solutions is undeniable.
Understanding Solar Screen Percentages
When you shop for solar screens, you'll see ratings like 80% or 90%. This number simply tells you the percentage of the sun's heat and glare the screen is designed to block.
- 80% Solar Screens: This is a fantastic middle-of-the-road option. It gives you great heat and glare reduction while still letting in plenty of natural light and maintaining a decent view outside. It’s perfect for windows that get morning sun or for rooms where you want to keep things bright.
- 90% Solar Screens: Think of this as your maximum-defense choice. It offers superior heat blocking and a lot more privacy, making it the best bet for west-facing windows that get absolutely blasted by the intense afternoon sun. The trade-off is a dimmer view and less natural light, so you'll want to use it strategically on your home's hottest spots.
You can dive deeper into how different percentages affect your home's temperature with our detailed solar screen installation guide. It's a must-read for anyone living in a hot climate.
Taking on Your Mobile Home Window Screen Replacement
Alright, now that you’ve got your materials, it’s time to get your hands dirty. Don't let the thought of replacing a window screen intimidate you. I've seen countless homeowners tackle this job themselves, and with a little patience and the right approach, you can absolutely get a professional-looking result.
The real key isn't about using brute force; it’s about being precise and knowing a few tricks of the trade. We’ll walk through how to handle those sometimes-fragile frames, get dead-on accurate measurements (even on wonky windows), and use a spline roller like a seasoned pro.
Getting the Old Screen and Spline Out
First things first, you have to get the old stuff out before you can put the new stuff in. Your initial task is to carefully remove that old, torn screen and the rubber spline holding it in the frame's channel.
For this, you'll want a small flathead screwdriver or an awl. Find a corner and gently pry up the end of the spline. Once you get a little bit of it loose, you can usually grab it with your fingers or a pair of pliers and pull the whole thing out. Take your time here—if the spline is old and sun-baked, it can get brittle and snap into pieces. Once the spline is out, the old mesh will pretty much fall right out of the frame.
Nailing the Measurements
Pay close attention here, because this is the most critical step. A bad measurement will leave you with a screen that’s either saggy and loose or so tight you can't even get it into the window. Mobile home windows are notorious for not being perfectly square, so just measuring one side and calling it a day is a recipe for frustration.
Here’s my method for getting it right every single time:
- Measure the Width: Grab your tape measure and check the width from the inside of the frame's channel to the other side. Do this at the top, in the middle, and at the bottom. Jot down the smallest of these three numbers.
- Measure the Height: Now, do the exact same thing for the height. Measure the inside channel on the left, the right, and in the center. Again, write down the smallest measurement.
- Account for Hardware: Now, subtract 1/8 of an inch from both your final width and height. This tiny adjustment creates the perfect amount of clearance for the corner hardware, ensuring the frame fits snugly without binding.
My Two Cents: Never, ever assume your windows are identical, even if they look like they are. Measure every single frame. I've seen factory variations in manufactured homes throw off a whole project. A quarter-inch difference is all it takes to make a new screen useless.
Building the New Screen Frame
With your precise measurements ready, it’s time to build the frame. You’ll need your screen frame stock (the long aluminum pieces), four corner connectors, and a hacksaw with a fine-toothed blade.
When cutting your frame pieces, you have to account for the space the corner connectors take up inside the frame. To do this, push two corner connectors together and measure their combined width. Subtract that number from your final frame dimensions. That's the length you need to cut your aluminum pieces.
For instance, if one corner connector is 3/4" wide, two of them together make 1.5". If your final frame measurement was 24", you'd cut your aluminum stock to 22.5" (24" – 1.5").
Once you’ve cut your four pieces—two for the width and two for the height—lay them out on a flat surface. Use a rubber mallet to gently tap the corner connectors into the ends of the frame stock, creating your rectangle. Give it a quick check to make sure it's square. If you want to get a better handle on the basics, reviewing general screen repair and replacement procedures can round out your knowledge.
Installing the New Mesh and Spline
This is the most satisfying part of the whole process. Lay your newly built frame on a large, flat work surface. Unroll your screen mesh over it, making sure you have an inch or two of overlap on all sides.
Now, grab your spline and your spline roller. This little gadget is non-negotiable—it's what separates a DIY-looking job from a professional one. Start in a corner and use the convex (rounded) wheel on the tool to gently press the mesh down into the frame’s channel.
Work your way down one of the long sides first. After the mesh is seated, switch to the concave (grooved) wheel and roll the spline right into the channel on top of the mesh. This is what locks it all in. Let the tool do the work; don’t try to pull the screen tight with your hands.
Here’s a pro tip to prevent the frame from bowing inward, which causes that dreaded screen sag:
- Create an Outward Bow: As you start installing the spline on the second long side, use your free hand to push outward on the middle of the frame rail. This creates a slight, temporary bow.
- Let It Snap Taut: When you finish splining that side and trim the excess, the frame will relax back into its straight shape, pulling the screen mesh perfectly taut as it does.
Finally, take a sharp utility knife and run it along the outside of the spline channel to trim off the excess mesh. Just be careful not to slip and cut your brand-new screen! Pop that beautiful new screen into your window, and you're all set.
Of course, if this sounds like more work than you bargained for, a professional custom screen installation is always an option for a guaranteed perfect fit without any of the hassle.
Understanding Mobile Home Screen Replacement Costs
Budgeting for a home improvement project can feel like a guessing game, but it doesn't have to be. When it comes to replacing your mobile home's window screens, knowing the costs involved—whether you do it yourself or hire a pro—is the first step toward a smart, confident decision. Let's break down the numbers so you know what to expect.
The total cost really boils down to one question: are you rolling up your sleeves for a DIY project, or are you calling in an expert? Each path has its own price tag, and the best choice depends on your budget, timeframe, and how comfortable you are with a hands-on project.
The Cost of a DIY Replacement
Going the DIY route is almost always the most budget-friendly option, since you're just paying for materials. Of course, those costs can add up, especially if you need to buy tools you don’t already own. Your main expenses will be the screen mesh itself, frame material, corner pieces, and spline.
Here’s a rough idea of what you might spend on materials for a single, average-sized window:
- Fiberglass Mesh: This is your most affordable option, typically running $0.40 to $0.60 per square foot.
- Pet or Solar Screen: Expect to pay more for these tougher, specialized materials—anywhere from $1.50 to over $3.00 per square foot.
- Frame Stock & Corners: You can usually find a complete frame kit for one window for $15 to $25.
- Spline & Spline Roller: A roll of spline is cheap at around $5-$8, but you'll also need a spline roller tool, which will set you back another $8-$12.
All in, you can expect a single DIY screen replacement to cost between $30 and $55, depending on the materials you choose.

As you can see, a successful DIY job really hangs on getting three things right: measuring accurately, building the frame carefully, and installing it properly.
The Price of Professional Service
Hiring a professional service like ours means you’re paying for expertise, convenience, and a guaranteed result. You don’t have to worry about mis-cuts, tracking down the right materials, or giving up your weekend. Professional services typically charge per window, and the price includes both materials and labor.
Pricing can vary based on the type of screen you want and how complex the job is. The good news is that the market has become pretty competitive. A standard fiberglass screen replacement now ranges from $40 to $100 per opening, including labor. For heavy-duty pet screens, you’re looking at $55 to $75 per opening, while solar mesh upgrades cost between $65 and $90. Keep in mind that custom-shaped windows can add 30% to 40% to that standard cost.
These services are a key part of the larger $6.7 billion window installation industry in the United States. The factors that influence the price, like materials and labor, are quite similar to what you'd find in a guide on RV window replacement cost.
Key Insight: When hiring a pro, volume is your friend. The more screens you have replaced at once, the lower the per-screen cost will be. From what we've seen, replacing 20 or more screens often brings the per-unit price down by 10% to 15%. If you have multiple torn or aging screens, bundling them into one service call is by far the most cost-effective approach.
Ultimately, the choice comes down to balancing your budget against the value of your time. For a single, simple repair, DIY can be a satisfying way to save a few bucks. But for a whole-home screen refresh or a more complicated installation, the efficiency and quality of a professional service often provide the best long-term value.
DIY or Hire a Pro? Making the Right Call for Your Window Screens

So, you've got the cost breakdown, but the big question is still on the table: should you roll up your sleeves and tackle this yourself, or is it time to call in a professional? There's no single right answer. Deciding between DIY and hiring a pro for your mobile home's window screens really boils down to your budget, your schedule, and the job's complexity.
A small, straightforward repair can be a really satisfying weekend project. But a whole-house replacement? That can turn into a headache fast. Let's walk through when each option makes the most sense.
When a DIY Project Is Your Best Bet
Going the DIY route is perfect if you're handy, enjoy learning new skills, and need to keep costs down. If you're looking at a manageable task and have the time to do it right, this is absolutely the way to go.
Consider tackling it yourself if:
- You only have a few screens. Replacing one or two standard rectangular screens is a great first-time project. It’s manageable.
- The materials are basic. Working with standard fiberglass or aluminum screen mesh is pretty forgiving. You won't need a lot of specialized gear.
- You have a free afternoon. Don't underestimate the time commitment. You'll need to measure precisely, make a trip to the hardware store, and then do the actual work. It can easily take up a good chunk of your Saturday.
If you’ve just got a couple of torn screens and a free weekend, a DIY repair can be a win-win, saving you money and giving you some serious bragging rights.
When to Call in the Experts
On the flip side, sometimes calling a professional is the smartest, not just the easiest, move. A pro brings efficiency, experience, and access to commercial-grade materials you won't find on the shelves at your local big-box store.
Expert Insight: The biggest advantage a professional brings is a guaranteed perfect fit, which is crucial for mobile homes. We constantly run into windows that aren't perfectly square or have unique frame depths. Without experience, getting a tight, bug-proof seal on those is nearly impossible.
Hiring a service is the clear choice when you’re facing:
- Lots of screens. If you need to replace every screen in your home, a professional crew can knock out the entire job in just a few hours—a project that might take you weeks of weekends.
- Awkward or large windows. Think arched windows, oversized sliders, or any custom shape. These require skill and specialized tools to get right.
- Specialty materials. Want heavy-duty solar screens or tough pet-resistant mesh? These materials need to be installed with just the right amount of tension to avoid warping the frame, something that takes practice.
- Your time is more valuable. Let’s be honest, your free time is precious. A professional handles everything from measuring and quoting to final installation, delivering flawless results without you lifting a finger.
If your project is more than just a simple fix or involves any tricky elements, exploring our professional screen repair and installation services can save you a ton of time and frustration. We'll make sure it’s done right the first time.
Common Questions About Mobile Home Screens
Even with a step-by-step guide, you’re bound to have a few more questions. That's completely normal. Manufactured homes have their own unique quirks, and when it comes to something like window screens, the little details really matter. Let's tackle some of the most common questions I hear from homeowners, so you can feel confident before you dive in.
Think of this as tying up the loose ends. We'll cover everything from how long your new screens will actually hold up to what you can realistically expect to save with solar screens.
How Long Will My New Screens Last?
This is a great question, and the honest answer is: it depends. The two biggest factors are the screen material you choose and your local climate. A screen in a mild, forgiving climate will naturally outlast one that’s getting baked by the intense Arizona sun day in and day out.
Here’s a realistic breakdown based on my experience:
- Standard Fiberglass: In a moderate climate, you can expect a solid 3 to 5 years from a basic fiberglass screen. But if you're in a hot, dry area with high UV exposure, don't be surprised if that lifespan drops to just 2 to 3 years before it gets brittle and starts to tear easily.
- Pet-Resistant Screen: Now this stuff is built tough. It’s a durable, vinyl-coated polyester designed to take a beating. It’s not uncommon for it to last 7 to 10 years, sometimes even longer. It's a fantastic investment if you have pets, kids, or just a high-traffic area. It holds up exceptionally well against both sun and physical abuse.
- Solar Screen: High-quality solar screens are engineered for longevity, especially in harsh conditions. Since their primary job is to fight UV degradation, they can easily last 10 to 15 years. All the while, they’re protecting your furniture and helping lower those energy bills.
A little bit of upkeep goes a long way. Gently cleaning your screens with simple soap and water once or twice a year can significantly extend the life of any material by preventing grime buildup that weakens the mesh.
Do Solar Screens Really Save Money on Utility Bills?
Yes, they absolutely do. The savings are real and measurable, particularly for mobile homes, which often have less insulation and can heat up like an oven in the summer. Solar screens are your first line of defense, blocking a huge chunk of solar heat before it even hits your window glass.
By stopping that heat transfer at the source, your air conditioner doesn't have to run constantly to keep your home comfortable. On those west-facing windows that get hammered by the afternoon sun, a 90% solar screen can drop the surface temperature of the glass by as much as 30 degrees. It's a massive difference.
Tangible Savings: It's common for homeowners to report saving 15-25% on their summer cooling costs after installing solar screens. For a typical mobile home in a hot climate, that can easily add up to hundreds of dollars each year. The screens often end up paying for themselves over time.
What Should I Expect When Getting a Professional Quote?
Getting a quote from a professional screen company should be a straightforward and transparent experience. When you reach out, a good company will just need a few key pieces of information to give you an accurate estimate right away.
To get the ball rolling, be ready with:
- The approximate number of screens you need.
- The type of material you have in mind (e.g., standard bug screen, solar screen).
- Your general location so they can factor in any travel.
Many services, including ours, can give you a quick quote over the phone or even via text with just that information. For more complicated jobs, a quick on-site visit might be necessary for precise measurements. The key takeaway is that a reputable company will always give you a clear, itemized quote with no hidden fees, so you know exactly what you’re paying for.
These aren't just niche concerns, either. People are realizing that quality screens are a key part of home maintenance and energy efficiency. Industry data shows 38% of consumers replace window treatments during home renovations. And with the outdoor living trend causing a 50% jump in exterior roller installations, effective screen solutions are more in demand than ever. If you're interested in the market trends, you can discover more insights about window treatment industry statistics.
If you'd rather have a guaranteed perfect fit without the hassle, Sparkle Tech Screen Service provides quick quotes and same-week service for all your screen needs. Let the experts handle it for you. Visit sparkletechscreenservice.com or text us today.


