


Before you even think about buying new screen mesh, you’ve got to play detective. A rip in the screen is easy to spot, but it’s often just a symptom of a bigger issue. I've seen it a hundred times: someone replaces the screen only to find the door is still a nightmare to open because the real problem was a bent frame or worn-out rollers.
Getting to the root cause first saves you from a second trip to the hardware store and a lot of frustration.
Figuring Out What's Wrong With Your Sliding Screen Door
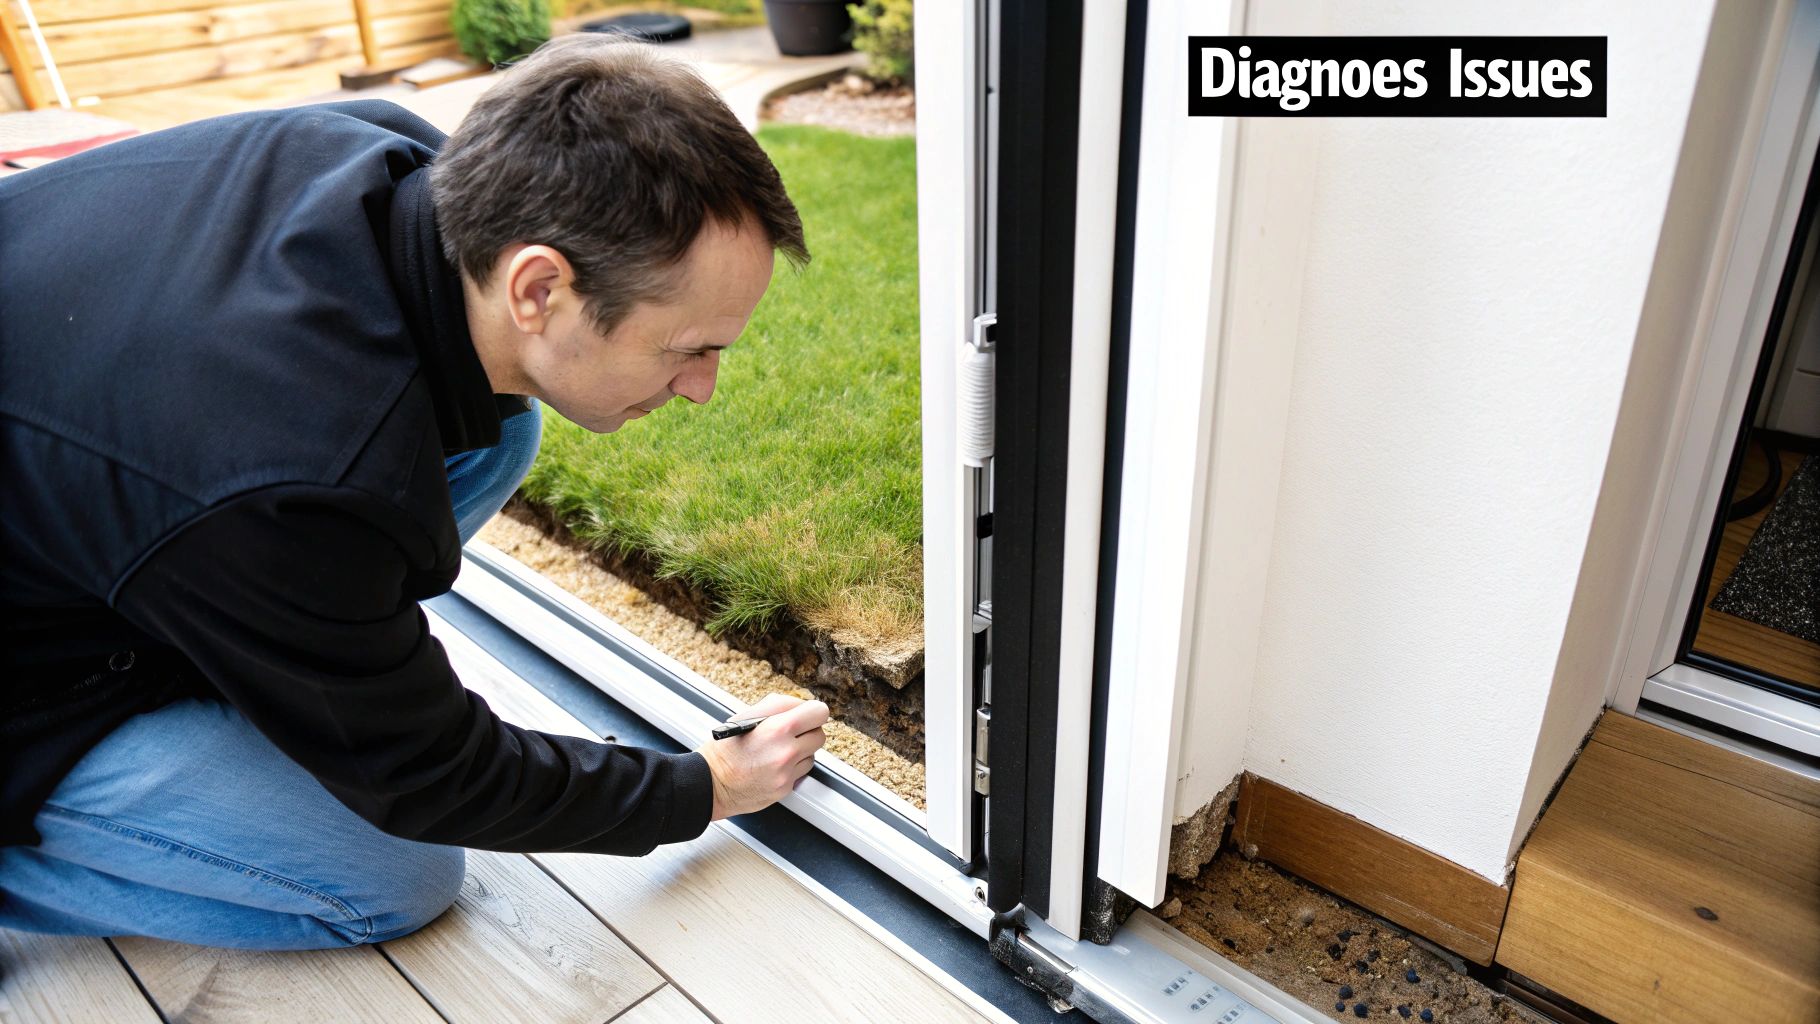
A good repair starts with a proper inspection, not just a quick glance. Homeowners naturally focus on the tear, but how the door feels and sounds tells the true story. Does it grind and shudder its way across the track? Does it feel like it's about to jump the rails? These are dead giveaways that you're dealing with more than just a mesh problem.
It's no surprise that these repairs are becoming more common. The whole market for door and window services is expected to grow at a 6% compound annual growth rate between 2025 and 2033 as people focus on maintaining their homes.
Your Initial Checklist
Start with a simple test. Slide the door back and forth slowly. Listen closely. Any scraping, grinding, or bumping sounds usually point straight to bad rollers or a track full of gunk.
Next, give the door a gentle wiggle while it's in the frame. If it feels loose and wobbly, the rollers probably need to be adjusted or are so worn down they need replacing.
Once you’ve tested the movement, get a closer look at the key components:
- The Frame: Eyeball the metal frame itself. Do you see any bends, dents, or cracks, especially where the corners meet? A warped frame will fight you every step of the way and make it impossible to stretch a new screen properly.
- The Rollers: These little wheels at the top and bottom are the usual suspects. Are they cracked, flat on one side, or just caked with grime? This is the number one reason a door gets stuck.
- The Track: Peek into the channel the door slides in. It’s amazing how a few small pebbles or a buildup of dirt can bring a heavy door to a screeching halt. Sometimes, a good cleaning is all it takes.
The most common mistake I see is people replacing the screen mesh without even looking at the rollers. They do all that work, and the door still sticks. You have to diagnose the whole system, not just the most obvious part.
If you're dealing with something more serious, like major frame damage or a door that just won't stay aligned, you might want to check out our in-depth guide on patio door slider repair.
Choosing the Right Tools and Materials
Walking into a hardware store for a sliding door screen repair without a clear plan is a recipe for a second trip. I've seen it countless times. The right gear is what separates a frustrating afternoon of wrestling with wrinkled mesh from a tight, professional-looking screen you can be proud of. It’s about more than just grabbing a utility knife and hoping for the best.
Success really boils down to two key pieces: the screen mesh itself and the rubber spline that holds it all together. And trust me, these are definitely not one-size-fits-all items. You need to match the screen material to your home's needs and the spline to your specific door frame.
This handy infographic lays out the whole process, from picking materials to gathering your tools.
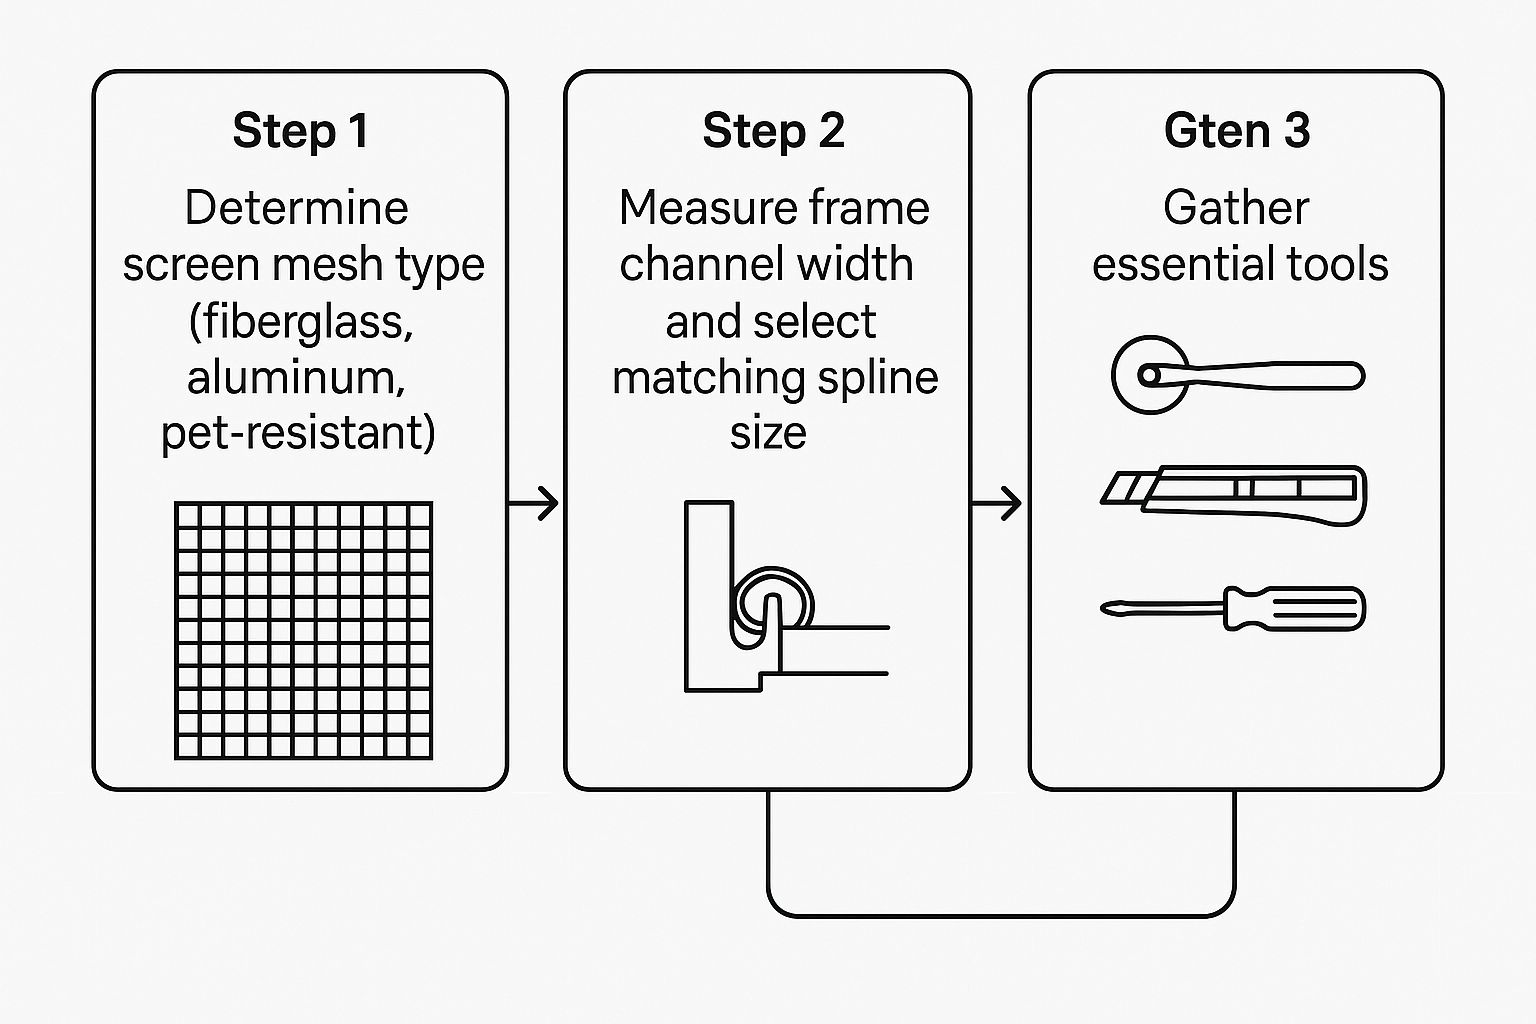
As you can see, figuring out your mesh and spline before you gather the tools is the best way to set yourself up for a smooth repair.
Selecting Your Screen Mesh
The type of mesh you pick directly affects how long your screen will last and how clear your view will be. For most homes, standard fiberglass mesh is the go-to. It's affordable, flexible, and very forgiving to work with, making it perfect for first-timers.
But if you have pets or active kids, you'll want to upgrade to a pet-resistant screen. This stuff is made from a tough, vinyl-coated polyester that’s about seven times stronger than standard fiberglass. It can take a beating from claws and flying toys without tearing.
For a really crisp, classic look and top-tier durability, aluminum screen is an excellent choice. The only catch? It's much less forgiving and will hold a crease forever if you accidentally bend it during installation, so you have to be careful.
The Most Crucial Detail: The Spline
Okay, let's talk about the spline. This little rubber cord is, without a doubt, the most critical part of getting a tight, professional finish. The number one mistake I see people make is buying the wrong size. It’s an easy error, but it ruins the whole job.
Pro Tip: Snip a small piece of your old spline and take it with you to the hardware store. Matching the diameter exactly is the single best way to ensure your new screen has the perfect tension and won't pop out of the frame channel.
If your old spline is missing or disintegrated, just use a tape measure to find the width of the channel in the door frame. Getting this tiny detail right is non-negotiable for a result that looks like it was done by a pro.
Your Screen Repair Toolkit and Shopping List
Before you get started, it's a good idea to lay everything out and make sure you have what you need. A well-prepared workspace prevents headaches later. Here’s a quick checklist to guide you at the hardware store and at home.
| Item Category | Specific Tool/Material | Pro Tip |
|---|---|---|
| Screening Materials | Roll of new screen mesh | Buy a roll that's a few inches wider and taller than your frame. |
| Spline | Match the diameter to your old spline or the frame channel precisely. | |
| Cutting Tools | Utility knife with a fresh blade | A sharp blade is crucial for clean cuts and preventing snags. |
| Scissors | Good for rough cuts and trimming excess spline. | |
| Installation Tools | Spline roller (concave/convex) | Don't try to substitute this tool; it's essential for a tight fit. |
| Flat-head screwdriver or awl | Perfect for prying out the old spline and tucking corners. | |
| Workspace Setup | Flat, stable work surface | A large table or two sawhorses work great. |
| Clamps (spring or C-clamps) | Use these to hold the frame steady while you work. |
Having these items ready to go will make the entire process much smoother. For a more exhaustive breakdown of what you might need, you can explore this guide to the complete window screen repair toolkit.
Replacing Your Screen Mesh Like a Pro
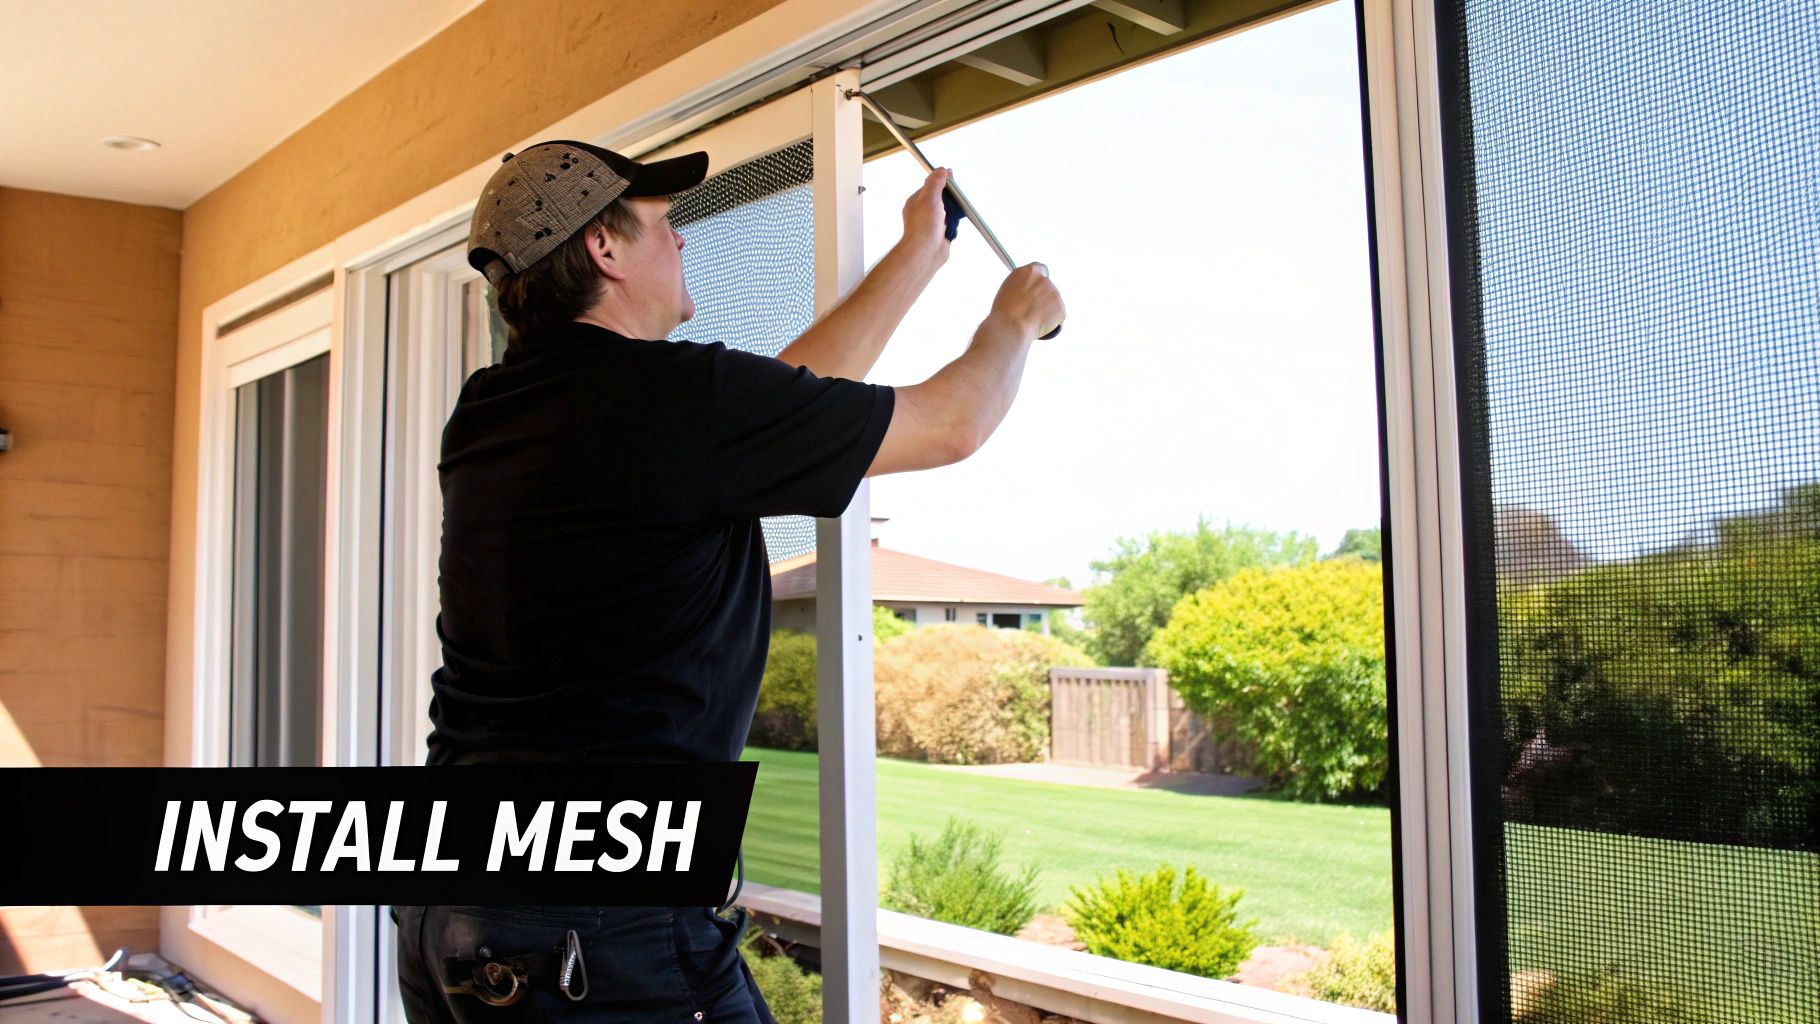
Alright, you've got your materials ready to go. Now comes the part where we actually fix the screen. The secret to a perfect, drum-tight finish is simply taking your time. If you rush this, you'll almost certainly end up with a saggy, wrinkled screen that'll drive you crazy every time you look at it.
First things first, get that door out of its track. Laying it flat is a non-negotiable for this job. Most sliding screen doors have little adjustment screws at the bottom corners that control the wheels. Turn those screws to retract the rollers, which should give you just enough slack to lift the door up and out of its frame without having to bend anything.
Tearing Out the Old Screen and Spline
Get the door set up on a couple of sawhorses or a big, sturdy table. The first order of business is to get that old rubber spline out. It's the cord that holds the mesh locked into the frame's channel. Look for an end, usually tucked into a corner, and use a small flat-head screwdriver or an awl to carefully pry it up.
Once you get it started, the old spline should pull out in one long piece. With that gone, the torn mesh just lifts right out. Easy enough.
Pro Tip: Don't skip cleaning the channel. Before you go any further, grab a small brush or a rag and wipe out all the dirt, dust, and little bits of old spline from the groove. A clean channel is your best friend for getting the new spline to seat properly.
This is also the perfect time to give the frame one last look-over for any cracks or damage you might have missed earlier.
Rolling In the New Screen Mesh
Time for the main event. Unroll your brand-new screen mesh so it completely covers the frame. You'll want at least a couple of inches of extra material hanging over all four sides. This overhang is what gives you the leverage to pull the screen taut as you work.
I always start on one of the shorter sides. Take the convex (the rounded wheel) side of your spline roller and gently press the mesh into the channel. This pre-creases the mesh and gives you a nice guide for the spline.
Now, grab your new spline. Starting at a corner, use the concave (the grooved wheel) side of the tool to press the spline down into the channel, right over the mesh. The key is to apply firm, steady pressure as you roll it along that first side. The technique is almost identical to what you’d do on a smaller window screen. If you want to see this process in more detail, this guide on how to replace window screen mesh has some great tips.
Once that first side is locked in, move to an adjacent long side. This is where the tension comes in. Pull the mesh firmly—but not so tight that you're bending the frame—as you roll in the second run of spline. Once you have two connected sides done, do the same for the remaining two, always pulling the screen gently toward the outside corner to keep everything smooth and wrinkle-free.
When all four sides are splined in, your new screen should be taut and look fantastic. The last step is just cleanup. Take a sharp utility knife, angle the blade slightly away from the new spline, and carefully trim off all the excess mesh for that clean, factory-finished look.
Troubleshooting Common Screen Door Problems

It’s a great feeling to install a brand-new screen, but that feeling fades fast if the door still fights you every time you try to use it. If your door still sticks, wobbles, or jumps the track after a repair, don’t get discouraged. These kinds of mechanical hiccups are incredibly common, and thankfully, the fixes are usually pretty simple.
The secret to a smooth-gliding door comes down to just two things working together: clean tracks and properly adjusted rollers. When one of these isn't right, the whole system grinds to a halt—often literally. Taking care of these core mechanics is the final, crucial step to getting your door back in perfect shape.
Start With The Tracks
Over the years, the channels your door slides in become a magnet for dirt, sand, pet hair, and all sorts of other gunk. This buildup creates friction, acting like a brake and causing the door to shudder and stick. Before you start taking things apart, give those tracks a really good cleaning.
- Vacuum First: Grab your vacuum and a crevice tool. Go over the top and bottom tracks thoroughly to suck out all the loose grit and debris.
- Scrub Out the Grime: For the stubborn, caked-on stuff, a stiff brush and a little soapy water work wonders. Get right in there and scrub the inside of the channel until it's clean.
- Wipe and Dry: Use a clean cloth to wipe the track completely dry. This prevents rust and stops new dirt from immediately sticking.
You’d be surprised how often a deep track cleaning is all it takes to fix a "sticking" door. It’s the easiest place to start and often solves the whole problem, so don't skip this step.
Adjusting or Replacing The Rollers
If the door still isn't cooperating after you've cleaned the tracks, the rollers are almost certainly the culprit. These little wheels, tucked into the top and bottom corners of the door frame, carry all the weight and take a lot of abuse over time.
Most sliding screen doors have small adjustment screws on the side of the frame, right near each roller. Turning these screws raises or lowers that corner of the door. If the door is scraping along the bottom track, turn the screws counter-clockwise to lift it up a bit. If the door feels loose and wobbly, turn them clockwise to lower it for a tighter, more secure fit.
Of course, sometimes an adjustment just won't cut it. If the rollers are cracked, have flat spots, or are completely seized up, they need to be replaced. This usually means taking the door off its track, unscrewing the old roller assembly, and popping in a new one. It's a straightforward job that makes a night-and-day difference in how smoothly your door operates.
DIY Repair vs. Hiring a Professional
https://www.youtube.com/embed/MI_IMj0YhPs
So, you're staring at a torn screen and wondering: should I fix this myself or just call someone? Honestly, it usually boils down to a classic trade-off between your money and your time. Figuring out which path is right for you depends on your budget, how comfortable you are with hands-on projects, and how fast you need that screen fixed.
For a lot of us, there's a real sense of accomplishment in fixing things around the house. It's not just about saving a few bucks; it's about learning a new skill. Once you get the hang of a project like this, you might find yourself ready to take on other DIY home maintenance projects you've been putting off.
Breaking Down the Costs
If you decide to go the DIY route for your sliding door screen, the good news is that the parts are pretty cheap. Your shopping list will include screen mesh, spline, and a spline roller. All in, you can expect to spend somewhere between $20 and $50. As long as you don't make any major mistakes, it's a very budget-friendly fix.
On the other hand, bringing in a professional service buys you their experience and saves you the effort. Naturally, that convenience comes with a bigger price tag. A pro might charge a small fee for something simple like cleaning the track, but a full screen replacement on a sliding panel will likely cost more.
Here's a general idea of what to expect for professional work:
- Typical Range: $25 to $300 for sliding screen maintenance or repairs.
- Example Project: A complete screen replacement could run you about $175.
The bottom line is this: DIY is cheaper if you have the patience and basic skills. A pro costs more but guarantees a fast, high-quality result without the hassle.
Wrapping Up: A Few Final Pointers
Just when you think you're done, a few last-minute questions always seem to surface. It's totally normal. Let's walk through some of the most common things people ask after tackling a sliding door screen repair, so you can put the finishing touches on your project with confidence.
My Pets Destroy Everything. What's the Best Screen for Them?
If you share your home with furry friends, don't even think about standard fiberglass mesh. You need to go straight for the pet-resistant screen. This stuff is a game-changer.
It’s a heavy-duty, vinyl-coated polyester that’s about seven times stronger than what comes standard on most doors. It’s specifically designed to hold up against claws, paws, and the occasional excited snout pushing against it. Investing in it now will save you from having to do this whole job over again next year.
Pro Tip: The secret to a drum-tight screen isn't brute force. After you've installed the spline on the first two sides, gently pull the screen fabric diagonally towards the opposite corner as you start rolling in the third side. This creates just enough tension to eliminate wrinkles without bending the frame.
Why Does My Screen Door Keep Derailing?
A screen door that constantly pops off its track is one of the most annoying home repair issues, but the fix is usually pretty straightforward. It almost always comes down to the rollers.
First, take a look at the rollers themselves and clean out the track. Years of dirt, pet hair, and grime can build up and cause them to jam. If you see any rollers that are cracked, flattened, or just plain worn out, it's time to replace them.
Next, find the adjustment screws, which are usually on the top or bottom edges of the door near the rollers. Tightening these screws raises the door slightly, seating it more securely in the track. You'd be surprised how often this simple adjustment is all it takes to get things gliding smoothly again.
If you've run into a snag or just want the peace of mind that comes with a professional job, the team at Sparkle Tech Screen Service is here to help. Get in touch for a quick quote and we can often get you scheduled for same-week service. Find out more at https://sparkletechscreenservice.com.


