


A successful screen doors installation starts way before you ever pick up a drill. The real secret is choosing the perfect door for your home and lifestyle in the first place. Get this part right, and you're setting yourself up for an easy installation and years of breezy, bug-free days. Get it wrong, and you're in for a lot of frustration with a door that never quite works the way you want it to.
Choosing the Right Screen Door for Your Home
Before you get lost in the details of installation, let’s talk about matching the door type to your day-to-day life. You'll generally find three main players on the market: hinged, sliding, and retractable screen doors. Each one is designed for a specific purpose, and your choice will have a big impact on both your home's look and how you use your space.
It’s no surprise that more and more homeowners are making this upgrade. The global market for screen door services was already valued at about USD 3.5 billion in 2024, and it's projected to jump to around USD 6.1 billion by 2033. This isn't just a trend; it shows how much people value the blend of fresh air, security, and energy savings that a good screen door brings. If you're curious, you can find more data on the screen door market growth.
Screen Door Type Comparison
Picking the right type of screen door can feel overwhelming, but it really comes down to how your entryway is used and what look you're going for. This table breaks down the essentials to help you see at a glance which option might be the best fit for you.
| Door Type | Best For | Pros | Cons |
|---|---|---|---|
| Hinged | Main entryways, high-traffic areas | Sturdy, traditional look, reliable operation | Requires clear space for the door to swing open |
| Sliding | Patios, balconies, areas with limited space | Space-saving, easy to operate | Tracks can collect dirt and require cleaning |
| Retractable | French doors, large openings, modern homes | Unobstructed views, discreet when not in use | More complex installation, higher initial cost |
Ultimately, the best choice marries function with aesthetics. A traditional hinged door is a workhorse for a busy front door, while a retractable screen keeps the focus on your beautiful French doors.
Matching Door Type to Your Entryway
Think for a minute about the door you're upgrading. Is it the main entrance that sees the whole family coming and going all day? Or is it a quiet patio door that just leads out to your garden? The answer will point you in the right direction.
-
Hinged Screen Doors: These are the classic, outward-swinging doors you probably grew up with. They’re tough and dependable, which makes them a fantastic choice for any primary entrance that gets a lot of action. Their timeless design also fits in beautifully with most home styles.
-
Sliding Screen Doors: If you have a sliding glass patio door, this is your go-to. They glide on a track, so they don’t need any extra room to swing open. This makes them perfect for smaller spaces like balconies or tight decks where every inch counts.
-
Retractable Screen Doors: This is the sleek, modern solution. These screens literally roll up into a slim, discreet housing when you’re not using them, disappearing from view. They are the ideal choice for French doors or any entryway where you want to maintain a completely open, unobstructed view.
For an elegant set of French doors, a retractable screen is often the best call. Traditional hinged screens can break up the visual appeal, but a retractable one preserves that architectural beauty by vanishing when you don't need it.
Comparing Frame Materials for Durability
The frame material is just as critical as the door style. It’s what determines how long your door will last, how much upkeep it will need, and its overall look.
-
Wood: Nothing beats the classic, high-end look of wood. You can paint or stain it to perfectly match your home's exterior. The trade-off? It demands regular maintenance to protect it from rot and warping, especially if it's exposed to rain and sun.
-
Vinyl: This is a great low-maintenance, budget-friendly option. Vinyl won't rot or rust, which is a huge plus. Just be aware that it can become brittle and crack over time, particularly in climates with dramatic temperature swings from summer to winter.
-
Aluminum: There’s a reason aluminum is the most popular choice. It’s light but surprisingly strong, and it’s highly resistant to rust and corrosion. It really hits the sweet spot between durability, low maintenance, and affordability, ensuring your screen doors installation is an investment that will last for years.
Get Your Tools and Prep the Doorway

Here’s a little secret from someone who's done this a hundred times: a smooth screen door installation is 90% preparation and only 10% perspiration. Nearly every frustrating issue—doors that stick, don't latch, or leave ugly gaps—stems from rushing this first stage.
Think of it like cooking a great meal. You wouldn’t just start tossing ingredients in a pan without doing your prep work first, right? The same logic applies here. Taking just 30 minutes to get your tools together and properly inspect your doorway will save you hours of headaches down the line.
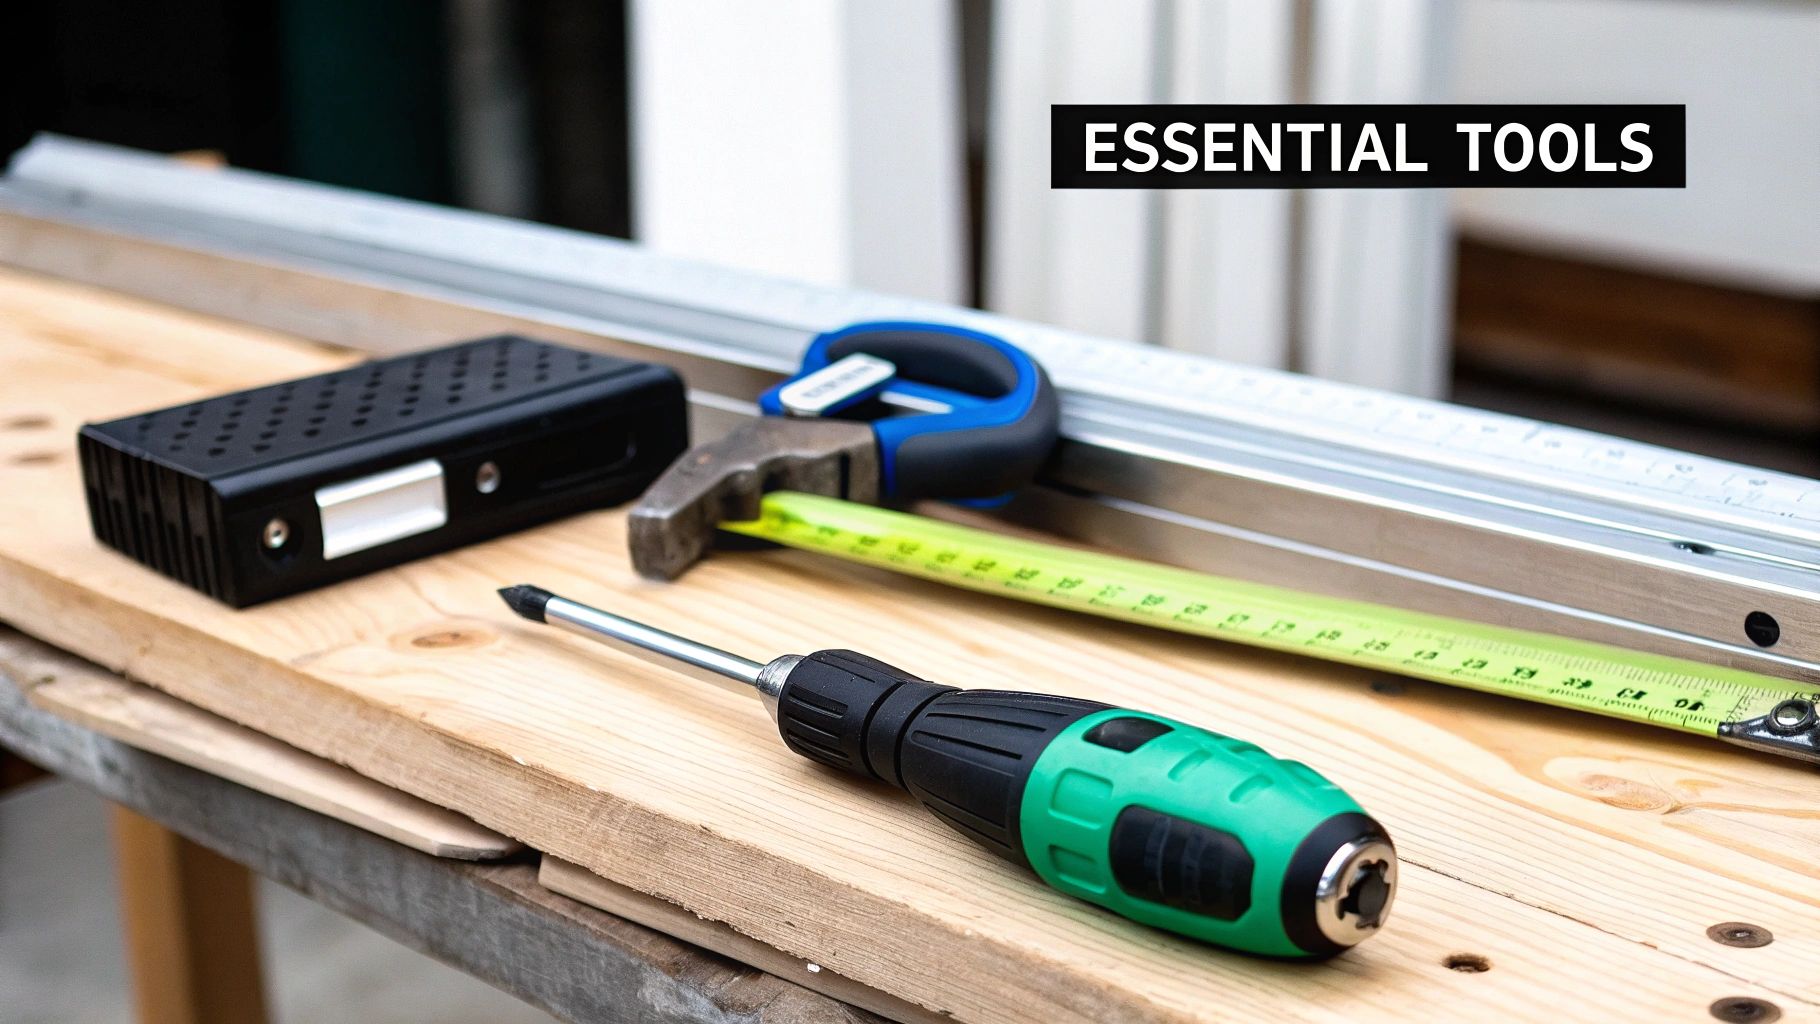
The Essential Tool Checklist
There's nothing worse than getting halfway through a project only to realize you're missing a crucial tool. While different screen door kits have their own quirks, this list covers the must-haves for just about any installation.
- Power Drill with Assorted Bits: This is non-negotiable. You’ll need it for driving every screw into the door frame.
- Tape Measure: Don't even think about eyeballing it. Precision is your best friend.
- Level (a 2-foot one is perfect): Absolutely essential for making sure your frame and door are perfectly plumb and level.
- Hacksaw: If you have an aluminum door or mounting rails, you'll likely need this to trim them for a custom fit.
- Utility Knife: Great for scoring cut lines or just getting the stubborn packaging open.
- Pencil: For marking your measurements and drill holes so there's no guesswork.
Pro Tip: A common mistake I see is people struggling with dull, worn-out drill bits. A fresh, sharp bit makes a huge difference. It drills a much cleaner hole and keeps you from stripping the screw heads—a real pain, especially when you're working with delicate aluminum frames.
Prepping the Door Frame for a Perfect Fit
Before you even think about unboxing your new screen door, give your existing door frame a thorough look-over. A clean, solid, and square frame is the foundation for a professional-looking job. Start by clearing the entire area of welcome mats, plants, or anything else that could get in your way.
Next, get hands-on. Run your hand along the wood of the door jamb and feel for any soft spots. That could be a sign of rot, which you'll need to repair before going any further. Also, look for old paint drips or lumpy caulking that would prevent the new frame from sitting flush. A simple putty knife will scrape those right off.
If you're dealing with a unique opening, you might find our guide on how to install various screens useful for more specific prep work.
Finally, it’s time to measure. And measure carefully. Get the width at the top, middle, and bottom of the opening, and write down the smallest of the three numbers. Then do the exact same thing for the height, measuring on both the left and right sides and using the shorter dimension. This simple step ensures your door will fit perfectly, even if your frame isn't perfectly square—which, trust me, is a very common issue in older and even newer homes.
Putting Up a Traditional Hinged Screen Door
There’s a reason the classic hinged screen door is still so popular. It’s a workhorse—sturdy, reliable, and just feels solid when you install it right. Getting that professional feel all comes down to one thing: making sure the frame is perfectly aligned from the get-go.
The secret to a door that swings smoothly without catching is starting with the hinge-side z-bar (that's the vertical piece of the frame where the hinges will go). It has to be perfectly plumb, meaning straight up and down. Never assume your door frame is square, especially in older houses. Grab your level and get this piece perfect; I promise the rest of the job will go ten times smoother.
Trimming and Fitting the Frame
Most screen door kits you buy off the shelf need a little tailoring to fit your opening. You'll measure your doorway and then, most likely, use a hacksaw to trim the aluminum z-bars to the right length. Pro tip: use a sharp, fresh blade. It makes all the difference in getting a clean cut instead of a chewed-up, jagged edge.
Before you even think about hanging the door, you need to get the frame set just right.
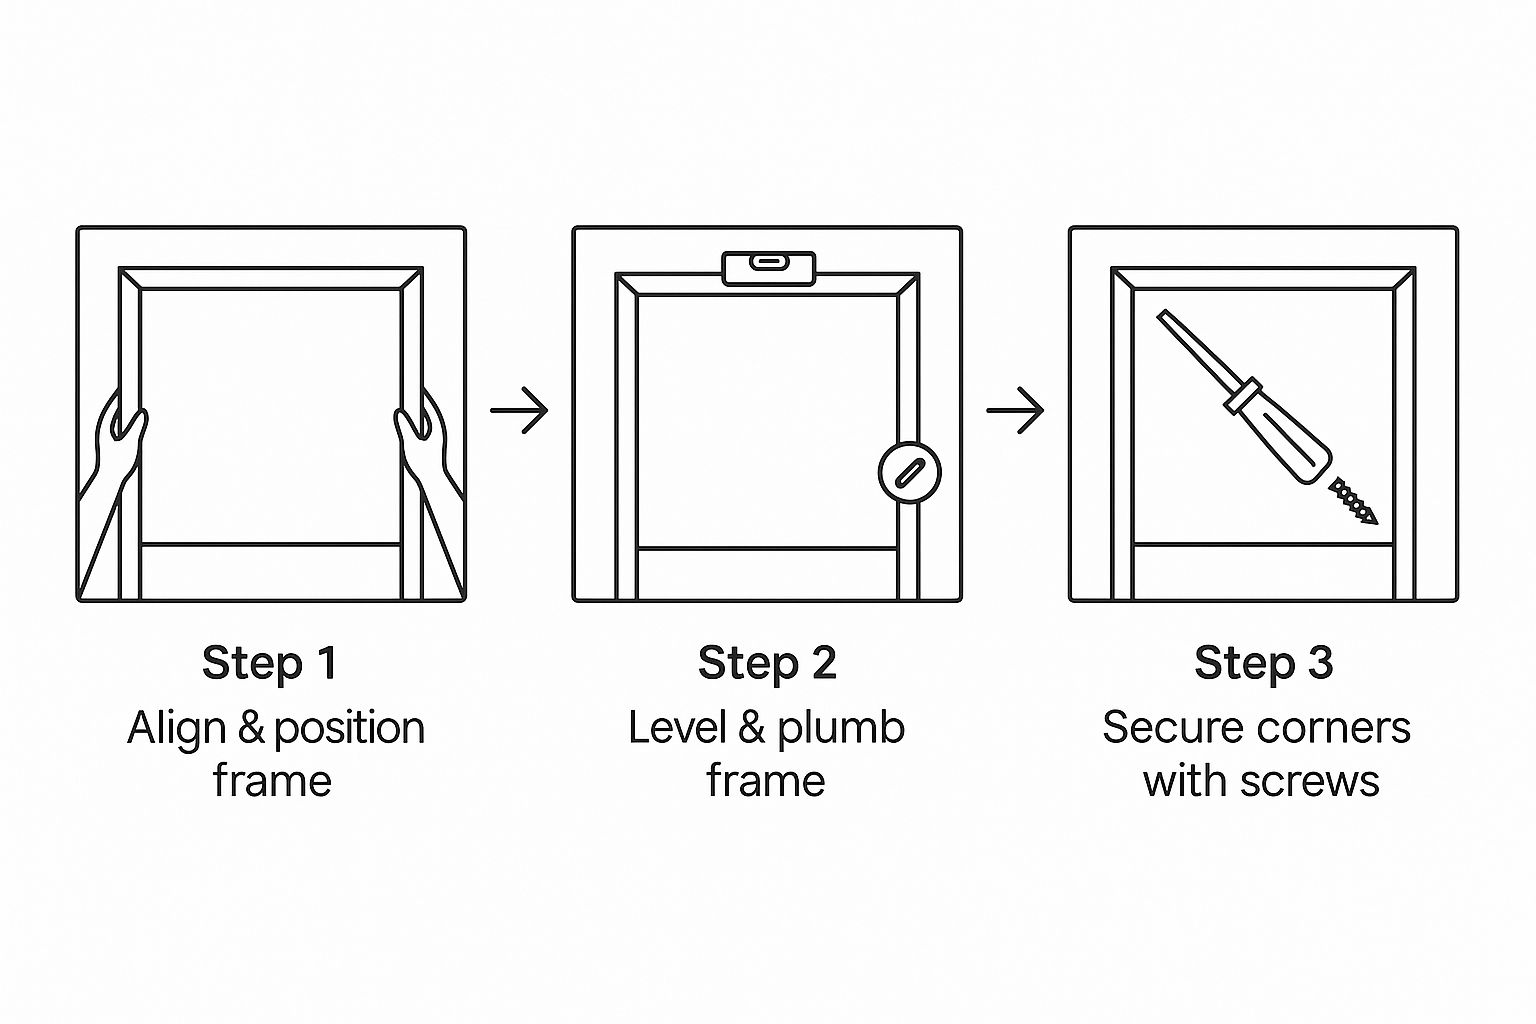
As you can see, getting a solid foundation for your door is just a matter of aligning, leveling, and fastening the frame. Nailing this part first prevents almost all the common headaches people run into later.
After you've got the hinge-side bar plumb and secured, use some painter's tape to temporarily stick the other frame pieces in place. This lets you stand back and visually check for an even gap all the way around before you commit to drilling permanent holes. It’s a simple dry-fit that can save you a world of hurt.
Don't skip the dry fit. Taping the frame in place for a visual check can reveal subtle issues with your door frame's alignment that a tape measure alone might miss. It’s a five-minute step that can save you an hour of frustration.
Securing the Door and Hardware
Okay, frame’s in. Time to hang the door. I find it’s always easier to attach the hinges to the door first. Then, use some shims to prop the door up in the opening, creating a nice, even gap along the bottom. This holds the weight and frees up your hands to line up the hinges with the z-bar.
When you're driving in the screws, set your drill to a low torque setting. You have to remember that aluminum is a soft metal, and it’s incredibly easy to strip the screw holes if you go in with too much power. A gentle touch is all you need for a secure fit that won't damage the frame.
Next up is the latch-side hardware—the handle, latch, and strike plate. Your goal is to position the strike plate on the jamb so the latch clicks in securely every time. This creates that tight seal that actually keeps the bugs out. For a deeper dive into getting this just right, our complete guide on DIY screen door installation covers common latch alignment problems and how to fix them.
Installing and Tuning the Pneumatic Closer
The last piece of the puzzle is that little piston-like arm, the pneumatic closer. This is what gives your door that satisfying, gentle self-closing action. Just follow the template in your kit to mount the main cylinder to the door and the bracket to the frame.
The real craft comes in with the final adjustments.
- Closing Speed: Look for a small adjustment screw on the end of the cylinder. A slight turn one way or the other controls how fast the door swings shut.
- Latching Power: Some closers have a second adjustment for the last few inches of travel. This gives it that final little "push" to engage the latch without slamming shut.
Spend a few minutes playing with these settings. You’re aiming for a door that closes reliably on its own and ends with a soft click, not a jarring bang. This final touch is what truly separates a DIY job from a professional-quality screen doors installation.
How to Install Sliding Screen Doors
Sliding screen doors get a bad rap for being finicky, but I've found that a perfect glide really just comes down to precision. A hinged door needs a plumb frame to work right, but a sliding screen door's performance is all about the rollers. Get those tiny wheels adjusted just so, and the door will move like it's on air. Get it wrong, and you're in for a world of scraping, sticking, and jumping the track.
The real secret to this kind of screen doors installation is mastering the roller adjustments. You’ll find these as small screws on the bottom, and sometimes top, edges of the door frame. These screws are what raise and lower the wheels, letting you fine-tune the door's height and get it perfectly level within the frame.
Setting the Door on Its Tracks
The first challenge is just getting the door into its tracks without bending that thin aluminum frame. This is a common point of failure—people try to force it. Don't. The trick is to start by retracting all the rollers as far as they’ll go by turning the adjustment screws. This simple move gives you the maximum clearance to work with.
With the rollers pulled in, lift the top of the door into the deep upper channel of the frame. It has to go in first. Once you feel it's secure in that top track, you can swing the bottom of the door inward and gently guide the bottom rollers onto their track. It should pop right into place without much effort at all.
A classic rookie mistake is trying to install the bottom of the door first. Always, always start with the top. The upper track is intentionally designed to be deeper to give you the wiggle room needed to lift the door up and then swing the bottom into place.
Fine-Tuning the Rollers for a Smooth Glide
Okay, the door is on the track. Now for the most important part. You’ll want to start lowering the rollers just enough so they lift the door frame slightly off the bottom track. The entire weight of the door should be resting on the wheels, not dragging on the frame itself.
I always make tiny, quarter-turn adjustments to each screw, focusing on one corner at a time. After every little tweak, slide the door back and forth to feel the difference. You're looking for that silent, friction-free glide.
- If the door scrapes at the bottom: Your rollers are set too low. Raise them up a bit until the scraping sound disappears.
- If the door feels wobbly or jumps the track: The rollers are too high and aren't making solid contact. Lower them until the door feels stable and secure.
- If the door sticks on one side: This usually means your threshold isn't perfectly level. You can compensate by adjusting the rollers on one side independently until the door hangs parallel with the top track.
Aligning the Latch for a Secure Close
Once your door glides like a dream, the last step is to align the latch. Close the door until it meets the jamb and take a close look at the alignment between the latch on the door and the strike plate on the frame. If they're off, resist the urge to mess with the door's rollers—you'll undo all your hard work.
The strike plate on the door jamb is almost always adjustable for this very reason. Just loosen its mounting screws and slide it up or down until you hear the latch click securely into place. Tighten those screws back down, and you’re finished. This final touch ensures your door not only moves beautifully but also gives you a bug-tight seal.
Even with the best prep, sometimes things just don't go as planned. I've run into my fair share of quirky frames and stubborn rollers over the years. Here’s a quick troubleshooting table for some of the most common issues you might face during installation.
Common Installation Issues and Quick Fixes
| Problem | Likely Cause | Solution |
|---|---|---|
| Door is difficult to place in the top track | Rollers are not fully retracted. | Double-check the adjustment screws on both the top and bottom rollers. Turn them counter-clockwise until they are fully retracted. |
| Door glides smoothly but is loud | Rollers are dirty or need lubrication. | Remove the door, clean any debris from the wheels with a stiff brush, and apply a silicone-based lubricant. Avoid oil-based lubricants as they attract dirt. |
| Latch won't engage even after adjustment | The door frame is warped or the latch is faulty. | Check if the door frame is bowed. If it is, you may need to shim the track. If the frame is straight, the latch mechanism itself might need to be replaced. |
| There's a gap at the top or bottom when closed | The door frame isn't square. | Use the roller adjustments to raise or lower one side of the door, making it hang parallel to the jamb. This can often close minor gaps. |
Remember, a little patience goes a long way with sliding doors. Taking the time to make those small, incremental adjustments is what separates a frustrating, jerky door from one that you can open and close with a single finger.
Installing Modern Retractable Screen Doors
Retractable screens offer a fantastic, clean look for just about any doorway, and you might be surprised to find that installing one is less of a headache than you'd think. The whole secret to a smooth-operating retractable screen isn't in the screen itself, but in getting the main housing cassette perfectly set up.
Think of the cassette as the command center—it’s where the screen lives when it's rolled up. Getting this part perfectly level is the one step you absolutely can't fudge. If it's even slightly off, the screen will fight you every time, either binding up or retracting crookedly. So, grab your level and don't even think about picking up a screw until that bubble is dead center.
Measuring and Cutting the Tracks
Once the housing is securely mounted, it's time to tackle the top and bottom tracks. These are the guides that ensure the screen glides smoothly, so precision is your best friend here.
Measure the opening from the inside edge of the cassette to the far side of the door jamb. Do this for both the top and the bottom. I can't stress this enough: measure both spots separately. Door frames are rarely perfectly square. Once you have your numbers, transfer them to the tracks and use a hacksaw with a fine-toothed blade to get a clean, straight cut.
I see this all the time: people cut the tracks just a hair too long, thinking a tight fit is better. It's not. An overly snug track will bow and cause the screen to stick. Trust me, it's much better to be a millimeter short than a millimeter too long.
Attaching and Adjusting the System
With your tracks cut to size, they should slide right into place. Most systems have end caps that connect the tracks to the main housing and the latch-side jamb. Once the tracks are in, you can attach the vertical pull bar to the screen mesh.
The final, and most satisfying, step is dialing in the spring tension. This little adjustment controls how fast the screen retracts. You'll usually find an adjustment screw on the end of the housing. A few simple turns can transform a jarring, loud snap into a soft, controlled glide. It’s a finishing touch that makes all the difference in how the door feels day-to-day.
This kind of screen technology is popping up in more places than just homes. You're even seeing specialized platform screen doors in public transit systems. The global market for these was valued at USD 916.5 million in 2024, and it's on a clear upward trend. You can dig into more data on this growing market over at Fact.MR.
Adapting for Different Door Types
One of the best things about retractable screens is how adaptable they are. The basic installation process is the same, but you’ll make small tweaks depending on the door.
- Single Doors: This is your bread-and-butter installation. Just follow the standard steps, and you'll be set.
- French Doors: For these, you'll typically install two separate screen systems that meet right in the middle. It’s a great solution that preserves the classic, elegant look of the double doors.
If you're tackling a more complex project, our in-depth guide to retractable screen door installation has more specific tips and tricks. When you get it right, these screens give you a completely unobstructed view when you want it and reliable protection when you don't—the perfect blend of style and function.
Answering Your Screen Door Installation Questions
Even the most straightforward DIY project can throw you a curveball. When it comes to screen door installation, a few common questions always seem to come up. Let's tackle them head-on so you can avoid any snags and get the job done right.
How Do I Measure for a New Screen Door?
This is where it all begins, and accuracy is everything. You're not just measuring the opening; you're measuring the inside of the door frame where the new door will actually be mounted.
First, grab your tape measure and get three width measurements: one across the top, another in the middle, and a final one at the bottom. Door frames are rarely perfectly square, so don't be surprised if they differ. The key is to use the smallest of these three numbers for your final width.
Next, do the same for the height. Measure from the top of the threshold (the part you step over) all the way up to the inside of the top door jamb. Take this measurement on both the left and right sides. Just like with the width, you'll want to use the shorter of the two dimensions. This little trick guarantees your door will fit without binding, even in a slightly wonky frame.
Can I Install a Screen Door if My Main Door Swings Out?
You sure can, but it changes the game a bit. A standard hinged screen door that also swings outward is usually a no-go, as the two doors would constantly be in each other's way.
Your best bet for an out-swinging main door is almost always a retractable screen door. These clever designs are mounted on the interior side of your door frame, rolling away into a discreet housing when not in use. They stay completely out of the way of your main door and don't affect your home's curb appeal.
If you're set on a traditional door, some companies make specialized out-swing models. Just be absolutely certain you have enough porch or landing space for both doors to open fully without colliding with railings, furniture, or each other.
What if My Door Frame Isn't Square?
Welcome to the club! An out-of-square door frame is one of the most common things you'll encounter, especially in older houses. It’s not a deal-breaker.
If you’re fitting a traditional hinged screen door, the mounting rails (often called z-bars) are your solution. They can typically be trimmed with a simple hacksaw to match the unique angles of your frame, creating a custom fit.
For sliding screen doors, the fix is in the adjustable rollers. You can raise or lower the wheels on each side independently to compensate for a slanted track or threshold. This ensures the door rolls smoothly and seals properly when it's closed.
How Do I Know if I Need a Left-Hand or Right-Hand Door?
This sounds complicated, but it's actually pretty simple. Go outside and face the doorway where the screen door will be installed.
- Look at your main entry door. If its hinges are on the left side, you need a left-hand screen door.
- If the main door's hinges are on the right side, you'll need a right-hand screen door.
The screen door handle will always be on the opposite side of its hinges, just like your main door. Thankfully, a lot of modern kits are designed to be reversible, which takes the guesswork out of it. Still, it's always smart to know your door's "handing" before you head to the store.
If you run into a tricky situation or just want a flawless result without the weekend warrior hassle, Sparkle Tech Screen Service is ready to help. We handle everything from installing new sun and bug screens to expert repairs and rescreening, and we can often get it done with same-week service.
Get a quick quote for your screen door installation from Sparkle Tech Screen Service


