


Rescreening your own window screens is one of those classic DIY projects that just makes sense. It’s quick, it’s affordable, and it makes a huge difference in how your home looks and feels. For a small investment in a few basic tools and materials, you can knock out those torn, faded, or damaged screens in an afternoon. Honestly, it’s one of the most satisfying weekend upgrades you can do.
Why Bother Rescreening? It's More Than Just a Pretty Fix
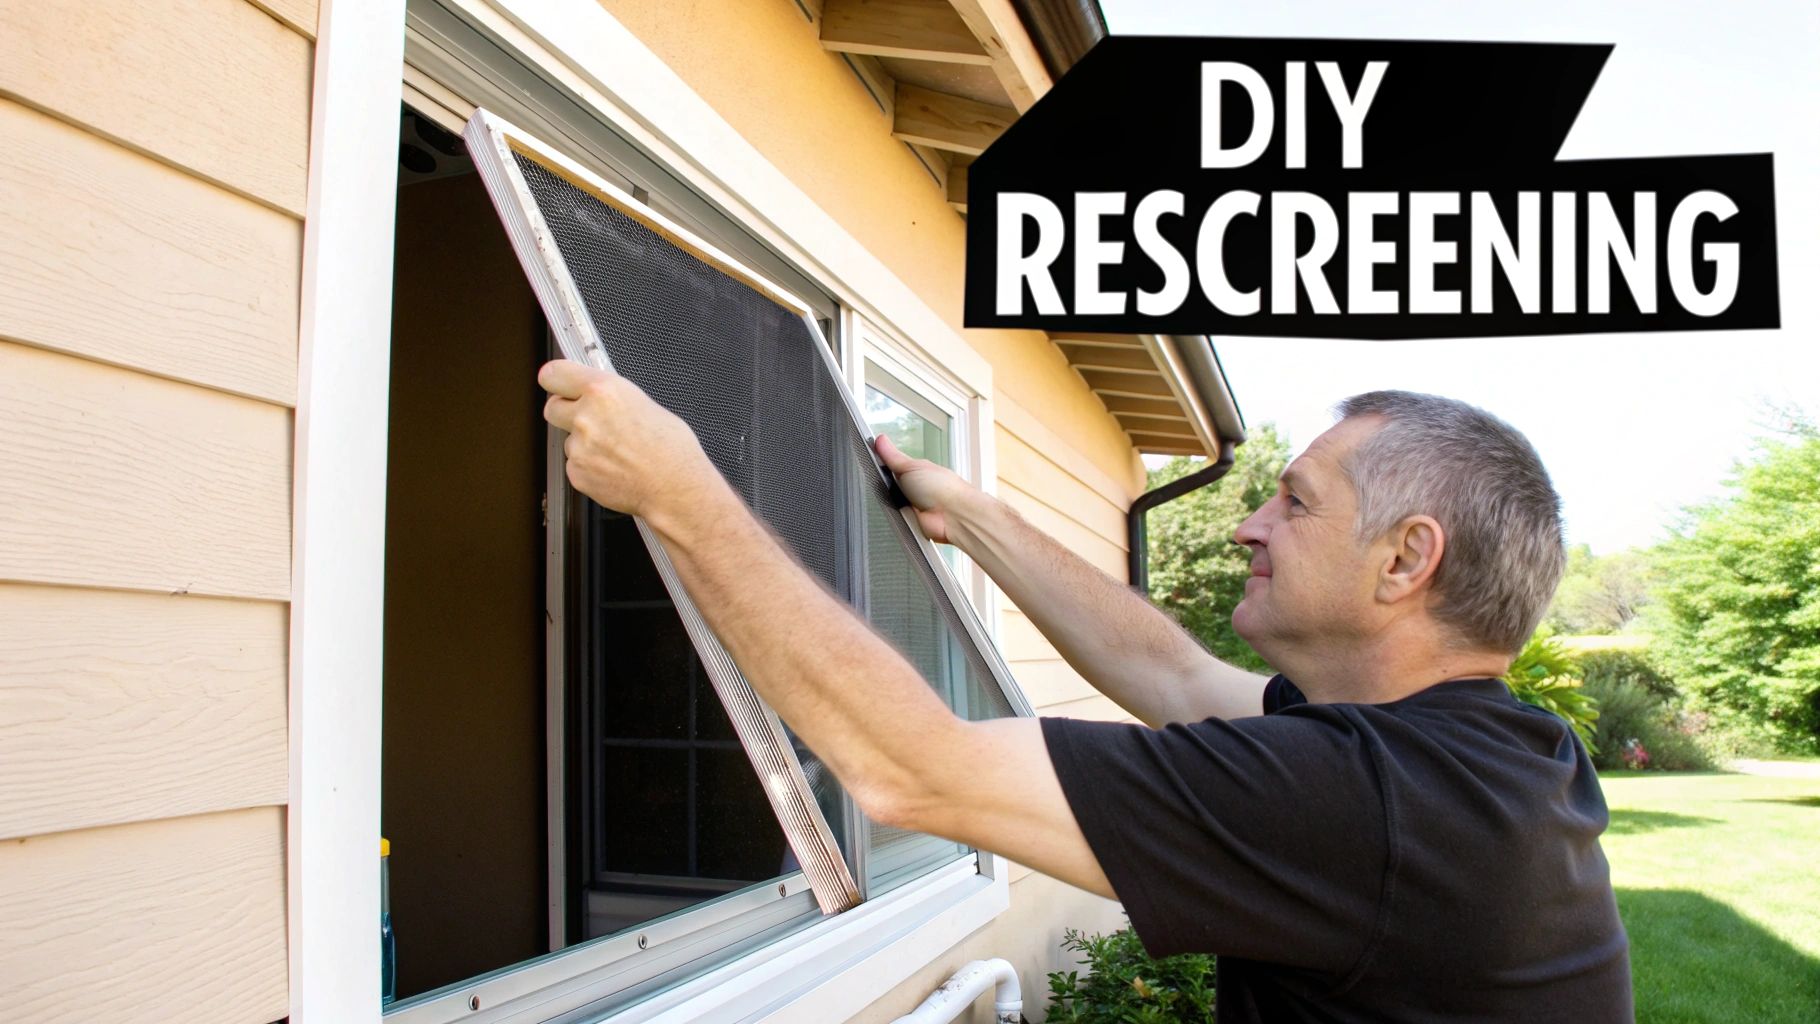
Let's face it, a tattered window screen looks sloppy. But beyond appearances, a ripped screen is a broken barrier. It’s an open invitation for every fly, mosquito, and spider to come on in. Taking the time to rescreen is about reclaiming your windows, so you can enjoy a cool breeze without the bug invasion.
Here in Arizona, the need for this simple fix is almost constant. The relentless sun just bakes the screen material, making it brittle and easy to tear. Throw in a good monsoon storm, a cat who thinks the screen is a climbing post, or an accidental poke, and you can see why screens don't last forever.
A fresh, tight screen instantly boosts your curb appeal, but more importantly, it makes your window functional again. You get better airflow, a clearer view, and peace of mind knowing your home is sealed off from pests.
The Perks Go Beyond Bug Protection
Keeping bugs out is the main reason people tackle this job, but the benefits of new screens don't stop there. Modern screen materials offer some pretty impressive advantages that can really improve your home.
- Better Energy Efficiency: If you're looking to save a few bucks, specialized solar screens are a game-changer. They can block a huge chunk of the sun's heat, giving your AC a much-needed break and lowering your energy bills.
- Tougher and More Durable: Have pets? You need pet-resistant screens. They're built to handle claws and paws, saving you the headache of doing this job over and over again.
- A Little More Privacy: Some screen types are designed to give you daytime privacy. You can see out perfectly fine, but people walking by can't easily see in.
This is the perfect example of a high-impact, low-cost home improvement. With everyone focusing on making their homes more functional and efficient, window screens have become big business. In fact, the global window screen market hit USD 2.41 billion in 2024. North America is leading the charge, which isn't surprising given our obsession with home upgrades. You can dig into more window screen market trends and growth insights if you're curious.
At the end of the day, learning to rescreen is a genuinely useful skill. Once you get the hang of it, you can fix any screen in your house, from a small bathroom window to that big sliding patio door. It’s a project that pays you back in savings, comfort, and the simple satisfaction of a job well done.
Picking the Right Screen Material and Tools
Trying to rescreen a window without the right gear is a recipe for frustration. You might get it done, but the end result will likely be a saggy, unprofessional mess. Getting your toolkit and materials lined up first is the real start of the project, and it's about more than just a shopping list.
When you get right down to it, the whole job depends on two things: the right screen fabric and the perfect size of spline to hold it all together. If you mess up either one, you’ll just be doing the job all over again in a few months.
Your Go-To Rescreening Toolkit
The good news is you don't need a professional workshop to pull this off. A handful of specific tools, most of which are pretty cheap, are all that stand between you and a perfectly taut, clean screen installation.
- Spline Roller: This is the non-negotiable, must-have tool. One end has a convex (rounded out) wheel to push the spline into the channel, and the other has a concave (rounded in) wheel to seat it securely. Trying to fake it with a screwdriver is the fastest way to tear your brand-new screen.
- Utility Knife: A fresh, sharp blade is critical for trimming the extra mesh. A dull knife will just snag and pull the fibers, leaving you with a frayed edge that screams "amateur."
- Flat-Head Screwdriver or Awl: You'll need something small and sturdy to dig out the old, dried-up spline from the frame's channel. It can be surprisingly stubborn.
- Measuring Tape: It’s the oldest rule in the book for a reason: measure twice, cut once. Screen mesh isn't free, so don't waste it.
Seriously, don't skip the spline roller. It’s the one tool that makes the difference between a professional-looking job and a DIY disaster. It provides firm, even pressure that you just can't replicate with anything else.
Finding the Perfect Screen Material
The screen mesh itself is where you get to make some choices based on your actual needs. What you pick will affect everything from durability and airflow to how much your air conditioner runs in the summer. Most homeowners will land on one of these three.
Standard Fiberglass Screen
This is the stuff you see everywhere, and for good reason. Fiberglass is inexpensive, flexible, and very forgiving to work with since it doesn’t crease or dent like old-school aluminum. It gives you great visibility and airflow, making it the standard choice for most windows.
The main downside? Durability. It can tear easily from pet claws, a stray branch, or just from getting old and brittle in the Arizona sun.
Pet-Resistant Screen
If you’ve got a dog that likes to greet you at the patio door or a cat who thinks the screen is a climbing gym, this is a must-have. Made from a tough, vinyl-coated polyester, this material is about seven times stronger than standard fiberglass.
The trade-off is that the thicker mesh slightly reduces your view and airflow, but it's a small price to pay to avoid rescreening your door every other month.
Solar Screen
Living in a sunny climate means solar screens are less of a luxury and more of a necessity. This specialized mesh is built to absorb and block a huge amount of the sun's heat and glare before it ever hits the glass. A good solar screen can block up to 90% of solar heat. That means lower cooling bills and less UV fading on your floors and furniture.
Much like a pet screen, you'll see a slight reduction in visibility, but the energy savings and added comfort usually make it a no-brainer. To get a really detailed breakdown of your options, take a look at our guide on choosing the best window screen material for your home.
Here’s a quick cheat sheet to help you decide:
| Screen Type | Best For | Key Benefit | Potential Drawback |
|---|---|---|---|
| Fiberglass | General use, budget projects | Excellent visibility & airflow | Least durable, tears easily |
| Pet Screen | Homes with pets | Extremely durable & tear-resistant | Reduced visibility & airflow |
| Solar Screen | Sunny, hot climates | Blocks heat, saves on energy costs | Darkens rooms slightly |
Finally, don't forget the spline! This is the rubbery cord that locks the screen mesh into the frame channel. The best way to get the right size is to take a small piece of your old spline with you to the hardware store. If it’s too thin, the screen will pop right out. If it’s too thick, you’ll never get it installed and might even damage the frame. Getting this tiny detail right is absolutely critical.
The Core Technique for Replacing a Standard Window Screen
Alright, you've got your tools and your new screen material picked out. Now for the fun part. Rescreening a standard window is all about technique, not brute force. Get this right, and you'll have a tight, clean-looking screen that will last for years.
We're going to walk through the process of turning that ripped, old screen into something you can be proud of. The most important thing? Work on a big, flat surface where you have plenty of room to move around.
Preparing the Frame for a Fresh Start
First things first: the old screen has to come out. Honestly, this can be the most annoying part of the whole job, especially if the old spline—that rubber cord holding the screen in—has been baking in the sun for a decade.
Find an end of the old spline and use a small, flat-head screwdriver or an awl to pry it up out of its channel. Once you get a little bit loose, you can usually just pull the whole thing out in one piece. If it’s old and brittle, it might snap on you. No big deal, just keep working your way around the frame until it's all gone.
With the spline out, the old mesh just lifts right off. Don't skip this next step: clean the frame thoroughly. Use a stiff brush or a rag to get all the gunk, dust, and leftover bits of old spline out of the channel. A clean channel is the secret to getting the new spline to sit perfectly and hold tight.
Laying and Securing the New Screen
This is where your finesse comes into play. Lay the clean frame down on your work surface. Unroll the new screen mesh over it, making sure you have at least two inches of overlap on all four sides. That extra material is your "handle" while you work and ensures you don't end up short.
Time to grab your spline roller—this little tool is your best friend for getting professional results.
Start in one of the top corners.
- First, use the convex wheel (the one that's rounded outward) to gently press the screen mesh down into the channel for a few inches. You're just creating a little pocket to get things started.
- Next, cut the end of your new spline at a 45-degree angle for a clean corner fit. Press that end into the channel right over the mesh you just pushed in.
- Now, switch to the concave wheel (the grooved one). Roll it firmly along the spline, seating it deep into the channel all the way down that first side. Use steady, even pressure. The goal is just to lock in this first side without making it drum-tight just yet.
This simple workflow is the key to the whole process.
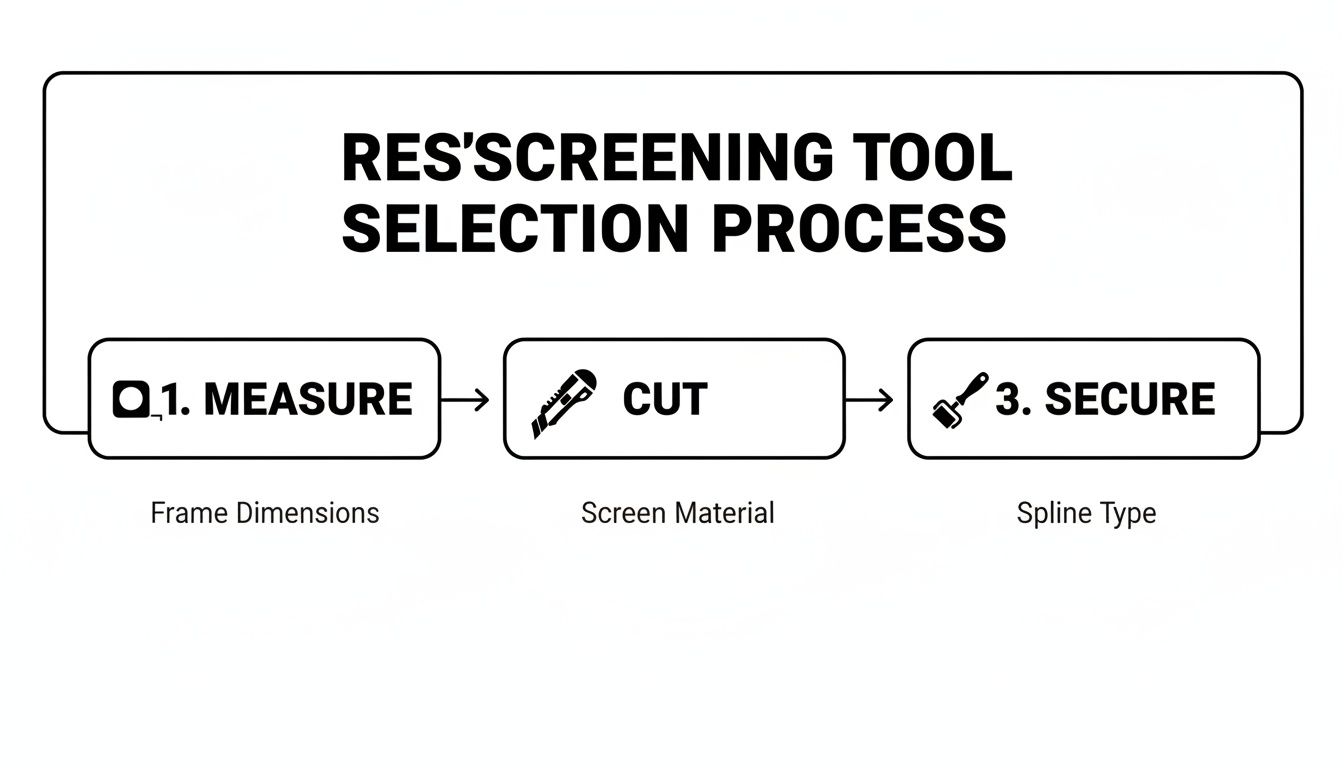
As you can see, it’s a logical flow: measure, cut, and then secure. The spline roller is what brings it all home with a professional finish.
Mastering the Art of Screen Tension
With one side splined in, move directly to the opposite side. This is the most critical step for getting a tight, wrinkle-free screen. Pull the mesh gently but firmly across the frame—just enough to take out the slack. Don't yank on it with all your might.
While holding that light tension, use your spline roller to push the spline into the channel on this second side. Now your screen is secured along two parallel sides.
Pro Tip: The number one mistake I see people make is pulling the screen way too tight on those first two sides. This can actually bend the frame inward, creating a weird hourglass shape. The real tension comes from the last two sides.
Now for the magic. Move to one of the remaining shorter sides. As you roll the spline in, you'll feel the mesh start to tighten up beautifully. Repeat on the final side, applying just a gentle outward pull on the fabric as you roll. This final pass is what removes any last wrinkles and gives you that perfect, taut surface.
Take a look at your work. See any sags? Don't sweat it. Fiberglass screen is pretty forgiving. Just pull out a section of the spline, smooth the screen out, and roll it back in.
The Final Trim for a Clean Look
The only thing left is to trim off the excess screen. With a very sharp utility knife, carefully cut away the extra material.
Here's the best way to do it: hold the knife at a slight angle and run the blade right along the outer edge of the spline. The frame's channel acts as a perfect guide, giving you a clean, straight line. Go slow here. The last thing you want is to slip and slice your brand-new screen or scratch the paint on the frame.
Once you’ve trimmed all four sides, you're done. Stand the screen up and admire it. You did that
Handling Sliding Doors and Large Patio Screens
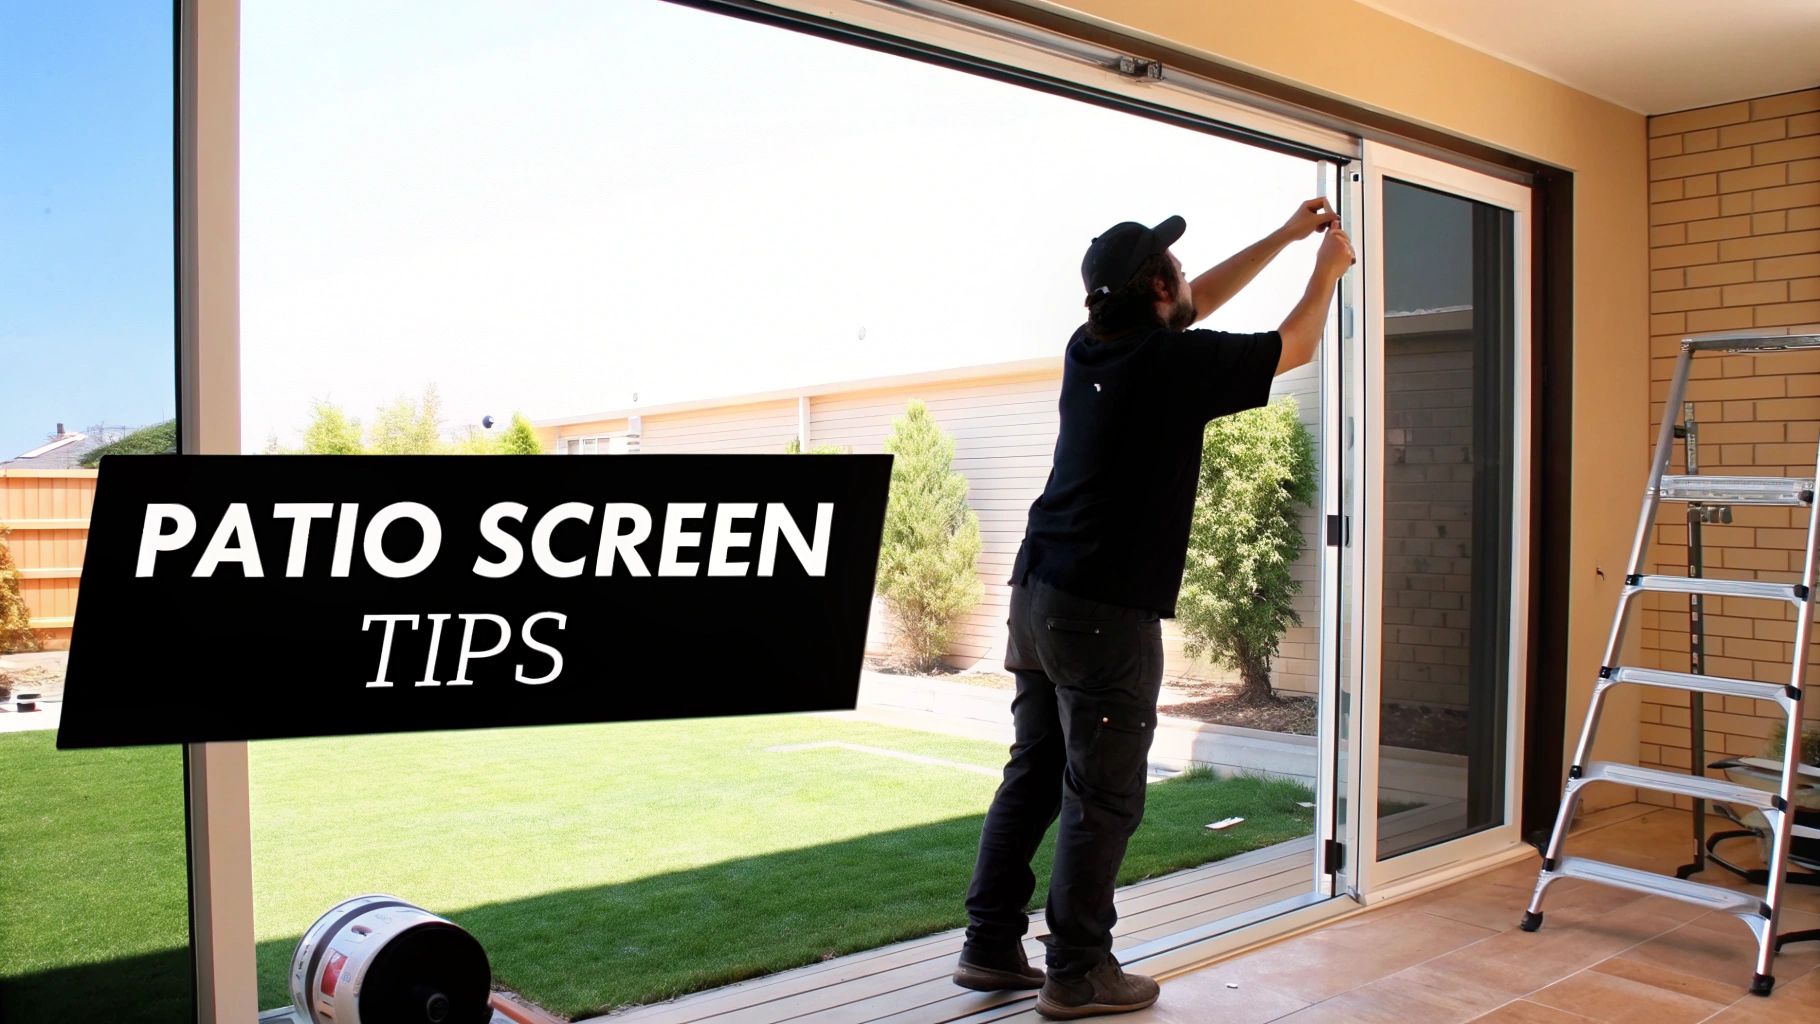
Once you’ve got the hang of rescreening a standard window, you'll start eyeing the bigger projects around your home. Sliding screen doors and large patio enclosures are a different beast altogether. It’s not just the size—these often have unique hardware and demand a bit more finesse to get that tight, professional look.
The core idea is the same, but the scale changes everything. You’ll need more room to work, a healthy dose of patience, and a few pro tricks to avoid ending up with a saggy, wrinkled mess.
Tackling Sliding Screen Doors
Sliding screen doors are true workhorses, constantly taking a beating from traffic, pets, and the elements. The rescreening process is a lot like a window's, but with some crucial differences.
First off, find yourself a large, flat work surface. I’ve seen people try this on a cramped driveway, and it never ends well. A couple of sawhorses with a sheet of plywood laid across is the perfect setup.
Getting the door off its track can be the first hurdle. Most have adjustable rollers at the top and bottom, usually held in by a screw. Loosen these, and you should be able to lift the door up and out. Whatever you do, don't force it—you could bend the frame or break the rollers.
Expert Tip: Before you pull out the old screen, give the rollers a good look. Are they cracked, rusty, or seized up? Now is the time to replace them. Take one to your local hardware store to find a match. It’s a small, cheap part that makes a massive difference in how smoothly your door glides.
Strategies for Large Patio Enclosures
Moving on to a full patio enclosure is a serious step up. You’re no longer working with a portable frame but a large, fixed structure. The biggest challenge here is wrangling a giant roll of screen material while getting the tension just right across a huge span.
Forget trying this solo. This is a two-person job, period. One person will need to manage the screen roll, keeping it straight and taut, while the other handles the spline roller.
Here’s the method that works best for large panels:
- Start at the Top: Lock in the entire top edge with spline first. Gravity becomes your friend here, letting the screen hang down naturally.
- Move to a Side: With your helper keeping light tension, spline one of the vertical sides from top to bottom.
- Tension the Bottom: Now for the critical part. Move to the bottom edge and gently pull down to remove any vertical sagging before you spline it in place.
- Finish the Final Side: The last side is where you work out the final horizontal wrinkles. Pull the screen taut as you spline, and you’ll end up with a perfectly tight finish.
Choosing the right material for these large areas is also key. More and more, people are opting for advanced, coated screens for better durability and energy savings. This isn't just a niche trend; the market for plastics-coated window screens was valued at USD 1.88 billion in 2023 and is expected to hit USD 2.52 billion by 2032. This growth is all about consumers wanting better thermal insulation and performance. You can dig into the trends in the coated window screen market to see why these materials are gaining so much traction.
Working with Thicker Solar Screens
Whether it’s for a door or a patio, installing heavy-duty solar or pet-resistant screens requires more muscle. This stuff is way thicker and less forgiving than standard fiberglass mesh. That stiffness is what makes it so durable, but it also makes the install a workout.
Because the material is thicker, it crowds the spline channel in the frame. This is a common hang-up. In most cases, you’ll need to use a spline that is one size smaller than what you’d use for standard screening. If you try to jam the original size in, you’ll fight it the whole way and risk damaging the screen or the frame.
The technique is the same, but expect to apply more force with your spline tool. A cheap, flimsy roller will bend or break, so make sure you have a sturdy one for this job. The payoff is an incredibly tough screen that can significantly cut down on heat and stand up to almost anything. If you're tackling this, check out our guide on rescreening your patio door for more specific tips.
When to DIY vs. Calling a Professional
So, you've got a torn screen. The big question is, do you roll up your sleeves and tackle it yourself, or do you call in a pro? It’s a classic homeowner dilemma, and honestly, there’s no single right answer. It really boils down to the size of the job, how comfortable you are with this kind of work, and what your time is worth.
There's a real sense of accomplishment in fixing something yourself. But sometimes, passing the job off to an expert is just the smarter, saner choice.
A DIY approach is perfect for a few common scenarios. If you're just replacing one or two standard window screens on the first floor, it's a very manageable project. With a little patience and the right tools, it makes for a great weekend task.
It's also a good fit if you genuinely enjoy home improvement projects and see it as a hobby. The materials for a couple of screens won't break the bank, making it a very budget-friendly repair.
When a Professional Makes More Sense
On the flip side, some jobs can quickly spiral from a simple task into a major headache. That’s when it’s time to pick up the phone.
I'd strongly suggest hiring a pro if you're dealing with any of these situations:
- Second-Story Windows: Juggling screen frames, tools, and rolls of mesh while perched on a ladder is not just a hassle—it's a safety risk. Professionals have the proper equipment and experience to work at height safely and efficiently.
- A Lot of Screens: If you need to do ten, fifteen, or more screens, the time really starts to add up. What might take you several weekends, a pro can usually knock out in just a few hours.
- Large or Odd-Shaped Frames: Big patio door screens and custom-sized windows are a different beast altogether. Getting the screen perfectly taut across a large surface without any wrinkles or sags takes a practiced hand.
- Specialty Screens: Working with heavy-duty solar screens or tough pet-resistant mesh requires a lot more muscle and a specific technique to avoid damage. A poor installation can completely defeat the purpose of using these premium materials.
The real value of a professional service isn't just the labor; it's the guaranteed result. Experts bring specialized tools, high-quality materials, and the experience to overcome any unexpected issues, saving you time and frustration.
The Growing Demand for Quality Screens
We're seeing a clear trend: more and more homeowners are opting for high-quality, professional screen solutions. As people focus more on keeping pests out without chemicals and improving home comfort, the demand has grown.
The global insect screen market was valued at USD 789.40 million in 2024 and is projected to hit USD 1,184.19 million by 2032. This isn't just a random statistic; it shows a real shift toward durable, effective screens that professionals are best equipped to install. You can learn more about the growth of the insect screen market on Data Bridge Market Research.
In the end, it’s a trade-off between cost, convenience, and quality. You can definitely save on labor by doing it yourself, but a professional ensures the job is done right the first time, every time.
To help you weigh your options, take a look at our guide on the cost to rescreen windows. It gives you a realistic breakdown of professional pricing. At Sparkle Tech Screen Service, we’re all about providing fast, reliable service that gets your screens looking brand new—without you having to lift a finger.
Questions We Hear All the Time
Even a project that seems simple on the surface can throw you a curveball. When it comes to rescreening, a few common questions always seem to pop up right when you're in the middle of the job. Here are some quick, practical answers from our experience in the field.
How Do I Know What Size Spline to Buy?
This is the one detail you absolutely have to get right. Guessing is just asking for a headache. The most foolproof method is to pull out a small piece of your old spline and take it with you to the hardware store. Physically matching it up is the only way to be sure.
If your spline is too thin, the screen will just pop right out of the channel during the next strong windstorm. On the other hand, if it's too thick, you'll fight to get it in, and you might even bend the aluminum frame in the process.
Here's a pro tip: if you're upgrading to a thicker material like a heavy-duty solar screen, you'll often need to go down a size in spline from what was originally used with your old fiberglass screen.
How Can I Fix Wrinkles in My New Screen?
Seeing wrinkles or sags after all that work is frustrating, but it's usually an easy fix. It almost always means the tension was uneven when you installed the spline.
Simply pull out the spline from the wrinkled section, pull the screen material smooth (but not overly tight), and carefully roll the spline back into the groove. The key is to apply light but consistent outward pressure on the screen as you work. When you start a frame, keep the first two sides snug but not tight—use the last two sides to really pull the screen taut for that perfect, drum-like finish.
Are Solar Screens Really Worth the Extra Cost?
For a place like Arizona, the answer is an emphatic yes. Solar screens are more than just a minor upgrade; they can block up to 90% of the sun's heat from ever reaching your window panes. That has a massive impact on your summer cooling bills and eases the burden on your AC unit.
It's not just about the energy savings, either. Solar screens slash the intense glare that makes rooms uncomfortable and, just as importantly, they protect your furniture, flooring, and art from fading under constant UV exposure. They cost more upfront, but the return on investment in comfort and savings is undeniable.
Can I Rescreen a Window Without Taking the Frame Out?
I know it seems like a great shortcut, especially for a window on the first floor, but we strongly advise against it. Getting a clean, tight, professional-looking result depends entirely on working on a large, flat surface.
Trying to rescreen a frame while it's still in the window makes it nearly impossible to apply even tension. You're far more likely to end up with a wrinkly, loose screen. Take the few extra minutes to pop the frame out—you'll thank yourself later.
Once your new screens are in, you'll want to keep them looking great. For a full rundown on care, you can learn how to properly clean and maintain your window screens.
If you'd rather skip the hassle and get a perfect finish every time, trust the experts at Sparkle Tech Screen Service. We handle everything from standard bug screens to high-performance solar screens with same-week service. Visit us at https://sparkletechscreenservice.com or just text us at 623-233-0404 for a quick quote.


