


Before you dive into replacing your retractable screen door, let's talk about getting your tools in order. Nothing tanks a DIY project faster than realizing you're missing a crucial piece of equipment halfway through. A little prep work here will save you a world of frustration and make the entire job feel less like a chore and more like a satisfying home improvement win.
Gathering Your Toolkit For A Flawless Screen Replacement
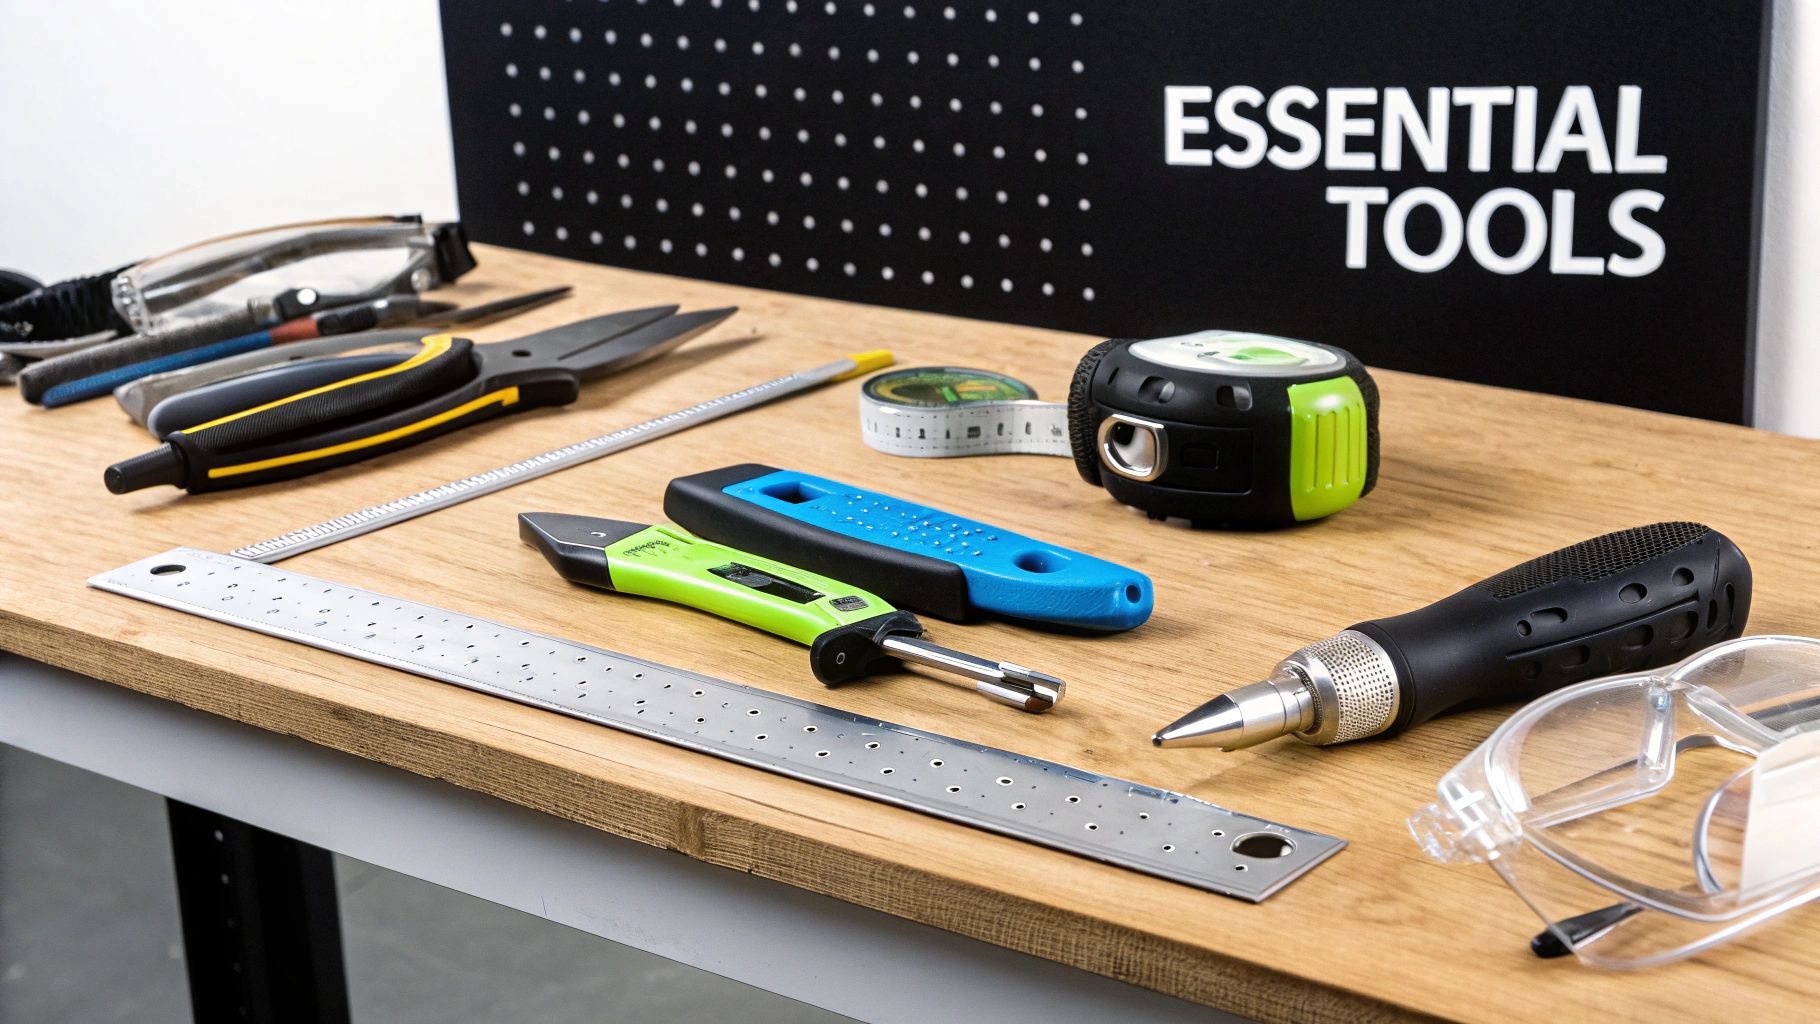
This isn't about running out and buying a top-of-the-line professional setup. It’s about having the right tools for this specific task. The difference between a beautifully taut, new screen and one that's saggy and wrinkled often comes down to a couple of simple, specialized items.
Think of it this way: you wouldn't try to bake a cake without a mixing bowl. Similarly, trying to install a screen without a spline roller is just setting yourself up for a struggle.
Your Project Toolkit Must-Haves vs Nice-to-Haves
To make it easy, I've broken down the list into what's absolutely essential and what's simply nice to have. This table will help you quickly see what you need to grab from the garage and what might be worth picking up to make your life easier.
| Tool | Essential or Optional | Pro Tip |
|---|---|---|
| Tape Measure | Essential | Double-check your measurements before every cut. Measure twice, cut once! |
| Utility Knife | Essential | Start with a fresh blade. A dull one will snag and tear the mesh, wasting your material. |
| Screwdriver Set | Essential | Most doors use Phillips heads, but a flathead is great for prying or minor adjustments. |
| Spline Roller | Essential | This little gadget is the secret to a professional finish, ensuring the spline is seated perfectly. |
| Safety Glasses & Gloves | Essential | Protect your eyes from flying debris and your hands from sharp edges or spring tension. |
| Non-Marring Pry Tool | Optional | Excellent for removing plastic end caps without leaving ugly scratches on the frame. |
| Small Clamps | Optional | These are a huge help for holding the screen taut while you work, especially if you're solo. |
| Rubbing Alcohol & Cloths | Optional | Perfect for cleaning out the housing tracks before installing the new screen. Don't skip this! |
Having these items ready to go before you even touch the first screw will make the entire process flow smoothly. No more stopping midway through to hunt for a tool you forgot.
A common mistake I see is people trying to force the spline in with a screwdriver instead of a proper roller. This almost always results in a torn screen or a poorly seated spline that will pop out later. Just get the roller—it's inexpensive and worth every penny.
If you're curious about what a professional's full kit looks like for all types of screen jobs, our complete list of essential window screen repair tools covers everything you could possibly need.
How to Prepare Your Door for a Seamless Screen Swap
Before you even think about the new mesh, the real work begins with proper prep. This isn't just about clearing a workspace; it's about setting the stage for a smooth, headache-free replacement. Trust me, spending a little extra time here will save you a world of frustration down the road and prevent any accidental damage to your door frame.
First things first, you need to get the entire screen cassette—that's the housing holding the rolled-up screen—off the door frame. Grab your tools, but before you start unscrewing, take a good look at how your particular unit is attached. Most are fairly simple, secured by a handful of screws.
- Surface-mounted units are the most obvious; you'll see the screws fastening the cassette right onto the face of the door jamb.
- In-jamb units are a bit stealthier, with the screws often hidden inside the track channels.
Once you’ve located them, carefully back out the screws. Gently wiggle the cassette and its tracks to work them free from the frame. Whatever you do, don't force it. If it feels stuck, there's probably a hidden screw you missed.
Give Your Components a Deep Clean
With the cassette safely off the door, lay it on a soft, protected surface like an old blanket or a drop cloth. Now it’s time to clean. You'd be amazed at how much dirt, pollen, and general gunk builds up in the tracks and housing over the years. This buildup is the number one cause of screens that stick or operate with a jerky motion.
Start with a vacuum and a brush attachment to get all the loose debris out of the tracks and from inside the main housing. If you’ve got some stubborn grime caked on, a cloth dampened with a mild cleaner or a bit of rubbing alcohol will do the trick. A clean system runs smoothly.
A quick 15-minute deep clean right now can save you hours of troubleshooting later. I've seen it happen time and again: someone puts beautiful new mesh into a dirty mechanism, only to have it jam on the very first pull.
Inspect Everything for Wear and Tear
While everything is sparkling clean, you have the perfect opportunity to play detective. This is your chance to spot small problems before they turn into major failures after you've already installed the new screen.
Here’s your inspection checklist:
- Bent or Dented Tracks: Run your fingers along the top and bottom guides. Even a tiny dent can throw off the screen's path. If you find one, you can often gently straighten it with a pair of pliers.
- Worn or Broken End Caps: Check the plastic pieces at the ends of the housing and tracks. If they're cracked or missing, they’re usually a cheap and easy part to replace.
- Spring Tension: Without pulling the old mesh out just yet, give the roller a gentle turn. Does it feel like it has a solid spring-back, or is it weak and lifeless? A loose-feeling spring is a telltale sign that it might be time to call in a pro.
Paying attention to these small details is what really elevates a DIY repair to a professional-quality job. It's how you ensure all your hard work results in a retractable screen door that works just as well as it did the day it was installed.
How to Safely Remove the Old Screen Mesh from the Roller
Alright, with the cassette on your workbench, you’ve arrived at the most delicate part of the project. This is where a little bit of patience will go a long way. The internal spring mechanism is under tension, so handling it carefully is key to avoiding damage or a snapped spring.
The main task here is to detach the old, torn screen from both the roller tube inside the cassette and the pull bar at its leading edge.

First things first, you need to gently pull the old screen mesh all the way out of its housing. Extend it completely, just as if you were closing the door. You’ll need to stop it from snapping back into the cassette while you work. The easiest way to do this is with a small spring clamp or even a sturdy piece of painter's tape wrapped around the roller tube. This locks it in place so you aren't fighting the spring the whole time.
Figuring Out How It’s Attached
Now, take a close look at how the screen is actually fastened to the roller tube. Most retractable doors use one of a few common methods. Getting this right is crucial for a clean removal.
- Spline: This is the most popular method. You'll see a skinny rubber or vinyl cord (the spline) wedged into a channel on the roller, pinning the screen’s edge down.
- Adhesive: Some brands use a powerful, double-sided tape or a bead of industrial glue to stick the screen directly onto the roller.
- Tension Rod: You'll see this less often, but some designs have a small rod sewn into a pocket at the screen's end. This rod-and-pocket combo then slides neatly into a groove on the roller tube.
Once you know what you're dealing with, you can get to work. Remember, you'll likely repeat this same process for both the roller tube and the pull bar.
Getting a Clean Removal
If your screen uses a spline, grab a small flathead screwdriver or an awl and gently pry up one end of the old spline. As soon as you have enough to grab, you should be able to pull the entire thing out of its channel in one piece. Go easy here—if the spline is old and sun-baked, it can get brittle and break off into tiny, annoying bits.
For screens attached with adhesive, a little heat can be your best friend. A hairdryer on a low setting will soften the glue enough to make removal much easier. Slowly and carefully peel the old mesh away from the roller. If you're left with a sticky mess, a cloth dampened with a bit of rubbing alcohol will clean it right off, prepping the surface for the new screen.
Pro Tip: Before you pull the old screen off completely, snap a quick picture with your phone. A photo showing exactly how it was attached can be a real lifesaver when it's time to put the new screen on, taking all the guesswork out of alignment.
If you have a tension rod system, it's usually just a matter of finding the end cap on the roller’s groove. Pop it off, and you can slide the old screen and its rod right out the side.
Taking your time here really sets you up for a smooth installation. This careful disassembly is a critical step when you replace screen on retractable screen door parts. Your goal is a perfectly clean slate—no leftover material, broken spline pieces, or sticky residue—ready for the new mesh.
Choosing and Cutting Your New Screen Mesh Like a Pro
With the old, worn-out screen gone, it's time for the fun part: picking the new mesh. This decision goes way beyond color—it's about matching the material to how you live. The right choice can affect everything from how long the screen lasts to how clear your view is.
So, what’s your main goal? Are you tired of your cat clawing through the screen every other week? Or is your living room baking in the afternoon sun? Your daily life is the best guide for choosing the right material.
Matching Mesh to Your Lifestyle
Not just any screen mesh will do for a retractable system. It has to be flexible enough to handle being rolled and unrolled constantly without getting creased or frayed. Stiff, brittle material just won't last.
Here's a quick rundown of the most popular choices:
- Standard Fiberglass: Think of this as the reliable, all-around option. It’s affordable, flexible, doesn't rust, and works perfectly for most homes. You'll get good visibility and plenty of airflow.
- Pet-Resistant Screen: An absolute must-have for anyone with furry friends. This stuff is made from a seriously tough vinyl-coated polyester that’s seven times stronger than the standard mesh. It can take a lot of scratching and pushing without giving up.
- Solar or Sun-Control Screen: If you want to block the sun's harsh rays, this is your go-to. Its dense weave blocks a ton of UV light, which keeps your home cooler and prevents your furniture from fading. The only trade-off is slightly less visibility and airflow, but for many, it's well worth it.
If you want to get into the nitty-gritty of these materials, check out our guide on the different types of window screen mesh to find your perfect match. It's a choice more and more homeowners are making, especially as retractable doors become more common. A lot of doors installed over the last decade are right around the age for a mesh refresh, making this a really smart upgrade.
The Art of Measuring and Cutting
You know the old saying: measure twice, cut once. I can't stress this enough. One bad cut, and you're out the cost of a new roll of mesh. Accuracy is everything here.
Start by laying your old screen flat on a clean floor or a large table. This is your pattern. Get the exact width and height.
My Pro Tip: Don't cut the new mesh to the exact same size as the old one. You need some extra slack to wrap around the roller at the top and the pull bar at the bottom. A good rule of thumb is to add an extra 6 to 8 inches to the total height. This gives you plenty of wiggle room.
When you're ready to make the cut, grab a sharp utility knife and a long straightedge—a metal yardstick or a carpenter's square works great. The goal here is a perfectly straight, square cut. If it's even slightly off-angle, the screen will roll up crookedly, which causes wrinkles and can make it jam in the tracks. Take your time, apply steady pressure, and focus on one clean, straight line.
Installing and Tensioning the New Screen for Smooth Operation
Alright, you're on the home stretch. This is where all that careful prep work comes together and you bring your retractable screen door back to life. Getting the screen attached is one thing, but nailing the tension is what gives you that perfect, smooth glide.
Attaching the New Mesh
Essentially, you're just doing the removal process in reverse. Lay your roller tube and pull bar out on your work surface. Take your new screen and carefully align its top edge with the channel on the roller tube.
I can't stress this enough: get it perfectly straight. If you start crooked, you'll be fighting wrinkles and jams later.
Once it's lined up, use your spline roller to gently press the new spline into the channel, right over the mesh. You're looking for steady, even pressure to seat it all the way in. Repeat this process for the pull bar on the other end, making sure the screen stays taut and square between the two parts.
This simple diagram really breaks down the prep work that gets you to this point.
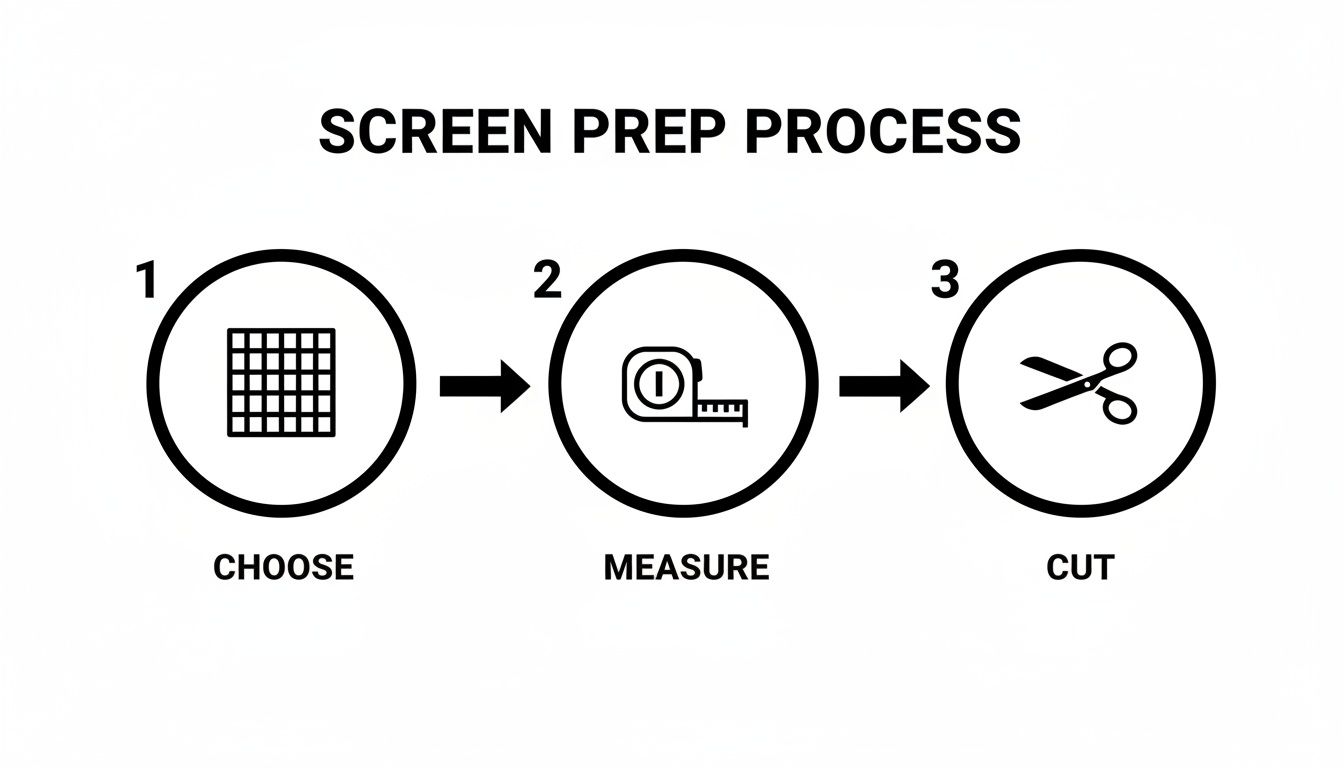
Success here really depends on getting those three foundational steps right before you even think about winding the spring.
Achieving the Perfect Spring Tension
With the new mesh secured, it's time for the most critical step: tensioning. This is the secret sauce that makes the door retract smoothly instead of snapping back violently or, even worse, sagging halfway. You want just enough pull to guide the screen fully into its housing without a fight.
Before you slide the roller back into its housing, you need to pre-tension the spring. Hold the housing firmly in one hand and use your pliers to turn the end cap of the roller tube. Every full turn winds the spring tighter, adding more retracting power.
For most standard-sized doors, a good starting point is 12 to 15 full rotations. This usually provides plenty of power for a smooth return trip without making the screen hard to pull out.
Pro Tip: Think of it like winding up an old toy car. Too few winds, and it just sputters out. Too many, and it shoots across the floor and crashes. You're aiming for that sweet spot—a controlled, effortless glide back into the housing.
After you've wound it, carefully slide the whole roller assembly back into the cassette and secure the end caps. Now for the moment of truth.
Fine-Tuning and Troubleshooting
Pull the screen out a few feet and let it go. Watch how it retracts. This is where you dial it in.
-
Does it retract too slowly or stop short? You need more tension. Take the roller assembly back out and give the spring 2-3 more full rotations. Put it back together and test it again.
-
Does it slam back into the housing? Way too much tension. You'll need to carefully unwind the spring by 2-3 rotations to ease up on the speed.
-
Is the screen retracting unevenly or wrinkling? This is almost always an alignment problem. It means the mesh wasn't cut perfectly square or wasn't attached straight on the roller or pull bar. Unfortunately, the only fix is to detach it and start that step over.
Once you’re happy with the speed and smoothness, you can reinstall the entire cassette into the door frame. Give it one final test in its new home, and you’re done. This methodical approach is how professionals replace screen on retractable screen door mechanisms to ensure a repair that lasts.
When to Put Down the Tools and Call a Pro
There's a great deal of satisfaction in tackling a home repair yourself, and replacing screen mesh is often a perfect weekend project. But sometimes, what looks like a simple fix can snowball into a major headache. Knowing when to hand the job over to a professional is key to avoiding frustration and potentially costly mistakes.
What begins as a straightforward plan to replace screen on retractable screen door can quickly reveal a deeper mechanical issue. That's when you need to weigh the risks of making things worse versus calling in someone with the right experience.
Red Flags That Point to a Bigger Problem
Certain symptoms are dead giveaways that the issue goes beyond just torn fabric. If you run into any of these situations, it's a solid sign that you need an expert's touch.
- Damaged Cassette Housing: The metal box that holds the screen roll is critical. If it's dented, cracked, or bent out of shape, the screen will never glide smoothly, no matter how perfectly you install the new mesh.
- Broken Spring Mechanism: The spring is the engine of the whole system. A loud snap is the classic sign of a broken spring. If the roller just spins freely with zero tension, that's another indicator. This isn't a simple DIY fix.
- Seriously Dented Tracks: You might be able to gently bend a minor ding back into shape. But if the guide rails are badly bent or have deep dents, the screen will snag, jam, or jump the track every time.
- Complex Door Systems: Got a set of French doors with two screens that meet in the middle? These synchronized systems are notoriously tricky. Getting the alignment and tension just right on one is hard enough; doing it for two is a whole other level of difficulty.
A quick word of caution: That internal spring is wound under a lot of tension. If you don't know exactly what you're doing, trying to fix or replace it can be genuinely dangerous. A pro has the specialized tools and safety know-how to handle it without risk.
For homeowners facing these kinds of mechanical failures, especially in the Phoenix area, making a service call is the smartest, safest move. A seasoned technician can pinpoint the real problem in minutes and will have the specific parts needed for the repair—parts you almost certainly won't find at a big-box hardware store.
If you want to see what's involved in a professional repair, you can learn more about local screen replacement services and ensure the job is done right the first time.
When the repair is more than you bargained for, Sparkle Tech Screen Service is ready to help. Our experts can handle complex mechanical failures and ensure your retractable door operates like new. Get your free quote today!


