


Taking off a patio screen door sounds like a hassle, but it's usually a quick job you can knock out in less than an hour. For most standard sliding doors, the secret lies in finding the roller adjustment screws. You'll typically spot them tucked into the top and bottom corners of the door frame. A few counter-clockwise turns should loosen the tension, giving you just enough wiggle room to lift the door up and swing the bottom right out of its track.
Why Bother Removing Your Patio Screen Door?
Getting comfortable with taking your screen door off its track is one of those handy homeowner skills that pays off. It's not just something you do when it's time for a full replacement. You might need to pop it off for a deep clean, put it away for the winter, or get it ready for a professional rescreening.
Think about it: that annoying door that sticks, squeals, or constantly jumps its track isn't just a minor frustration. It's practically screaming that its rollers and track are clogged with gunk. The only way to really get in there and fix the problem is to take the door off.
Once it's removed, you can finally get full access to clean out all the dirt, pet hair, and mystery debris that's been building up for years. Nine times out of ten, a dirty track is the real culprit behind a stubborn door. This also gives you the perfect chance to check out the rollers, clean them, and give them a good lubrication, which can make them last a whole lot longer and glide like new.
More Than Just a Quick Fix
Learning this one skill opens the door (pun intended) to a bunch of other simple home improvement wins. If you've got a torn or sun-faded screen, the first step to replacing the mesh is always removing the door. Laying it flat on a sawhorse or the driveway makes the whole rescreening job infinitely easier and more precise.
A Quick Tip from Experience: Before you grab your tools, take a good, hard look at the door. Is the frame bent out of shape? Are the rollers rusted solid and refusing to budge? Spotting these major issues early can save you a huge headache and help you decide if this is a simple DIY fix or a job better left to a pro.
It’s no surprise that people are putting more effort into their outdoor spaces. In fact, the global market for exterior doors is expected to reach a massive $153.98 billion by 2029, which just goes to show how much we value having a nice, functional entryway to our backyards. You can dig into the numbers in this global market report about exterior doors.
Mastering a basic task like this helps you protect that investment. Whether you're doing a quick cleaning or gearing up for a full replacement, knowing how to handle your screen door puts you in charge of your home's upkeep and keeps a little extra cash in your pocket.
Getting Ready for a Smooth Removal
Before you even touch a screwdriver, taking a few minutes to prep can be the difference between a quick, easy job and a whole afternoon of frustration. It’s all about knowing what you’re up against. Start by giving the door a good once-over.
Take a close look at the frame. Do you see any dings, dents, or obvious bends? A warped frame can really wedge a door into its track, making it a nightmare to get out. Next, peek at the rollers on the bottom corners. If they’re caked in rust, cracked, or worn down to nubs, you’ll know ahead of time that they might not cooperate when you try to retract them.
Figure Out What Kind of Door You Have
Patio screen doors aren't all the same, and how you remove yours depends entirely on its design. Most of what you'll see out there are standard sliding screen doors that glide along a top and bottom track. But you might also run into a few other types:
- Hinged Screen Doors: These are pretty straightforward—they swing open and closed just like a bedroom door and are secured with hinge pins.
- Retractable Screen Doors: These are the ones that disappear into a housing on the side of the door frame. They're a bit more delicate and have a completely different removal process.
Knowing your door type is critical. You can't just lift a hinged door out of a track, so identifying it first saves you from trying a removal method that was never going to work.
Safety First, and Clear the Decks
With your door identified, it’s time to get your space and yourself ready. Old aluminum screen frames can have some surprisingly sharp edges, especially if they’ve been beaten up by the weather over the years.
A good pair of work gloves is a non-negotiable here—they’ll save your hands from getting sliced up. Same goes for safety glasses. You never know when a bit of dust, debris, or a stubborn screw will go flying.
Last but not least, give yourself plenty of elbow room. Clear away any patio furniture, grills, or potted plants at least five or six feet from the door, both inside and out. The moment that door comes free, you’ll need a clear path to carry it away without tripping or banging it into something. A clean, safe workspace is the final check before you can confidently get that door out and move on with your project.
Removing a Sliding Screen Door Like a Pro
Alright, let's get to the main event: taking that sliding screen door off its track. This is by far the most common type of patio screen door out there, and you'll probably be surprised at how straightforward the process is. It all comes down to a clever little component—the adjustable rollers.
These small wheels are usually hidden inside the top and bottom corners of the door frame. They're spring-loaded, and a simple tension screw controls how much they extend. Your job is to find those screws, which are almost always accessible through small holes on the face or edge of the door's vertical frame.
Locating and Adjusting the Tension Screws
Grab a Phillips head screwdriver and get down close to the bottom of the screen door. Look for a small screw head recessed in an access hole. Here’s the key: you need to turn this screw counter-clockwise.
As you turn it, you're essentially pulling the wheel up into the door frame. This releases the tension that holds the door so tightly in its track. Give it a few turns on both bottom corners. You should feel the door start to loosen and get some vertical wiggle room. Some doors have these same adjustable rollers at the top, so be sure to check and repeat the process if you see screws there, too.
Pro Tip: If a screw feels rusted or just won't budge, don't force it and strip the head. A quick spray of a penetrating oil like WD-40 is your best friend here. Let it sit for a few minutes to work its magic, and the screw should turn much more easily.
Taking care of your patio is a common weekend project, and it's a growing trend. The global patio doors market, valued at $38 billion in 2022, is expected to hit $59.3 billion by 2032. That's a lot of homeowners invested in their outdoor spaces. You can read more about patio door market trends on Allied Market Research.
The Final Lift and Swing Maneuver
Once you've backed out the screws and the door feels loose, it's time to set it free. I find it’s easiest to do this from outside. Get a solid grip on both sides of the door frame.
Now for the two-part motion that gets the job done:
- Lift Straight Up: With a firm grip, pull the entire door directly upward into the top track. Retracting those rollers should give you just enough clearance for the bottom wheels to clear the track lip.
- Swing the Bottom Out: While it's lifted, swing the bottom of the door out toward you.
- Lower and Release: With the bottom free, you can now lower the door, and the top rollers will pop right out of the upper track.
Be ready for the weight. Older aluminum doors can be a bit hefty, while newer vinyl ones are often light as a feather. If a wheel catches on the track's lip, you can usually use a flathead screwdriver to gently pry it over the edge. If you find a roller is completely jammed or broken, our specialized guide on patio sliding screen door repair has some more advanced troubleshooting tips.
This flowchart lays out the simple prep work that makes the whole process smoother.
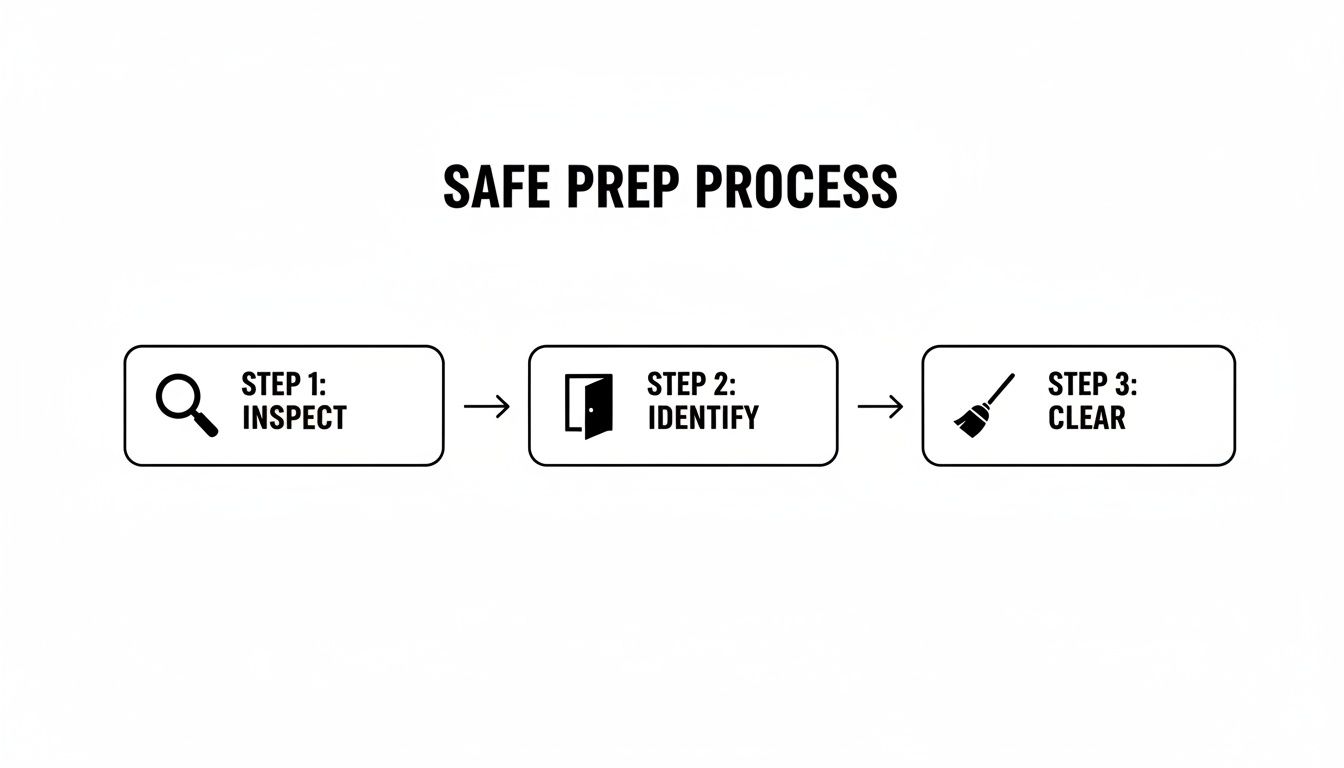
Running through these three steps—Inspect, Identify, and Clear—is the best way to make sure you can work safely and without accidentally damaging the door or your home.
Taking On Hinged and Retractable Screen Doors
Not every patio screen door slides. If yours swings open on hinges or retracts into a housing unit, your removal strategy is going to look a bit different. These doors need a slightly more delicate touch than their sliding cousins, but the job is perfectly doable once you know the right moves.
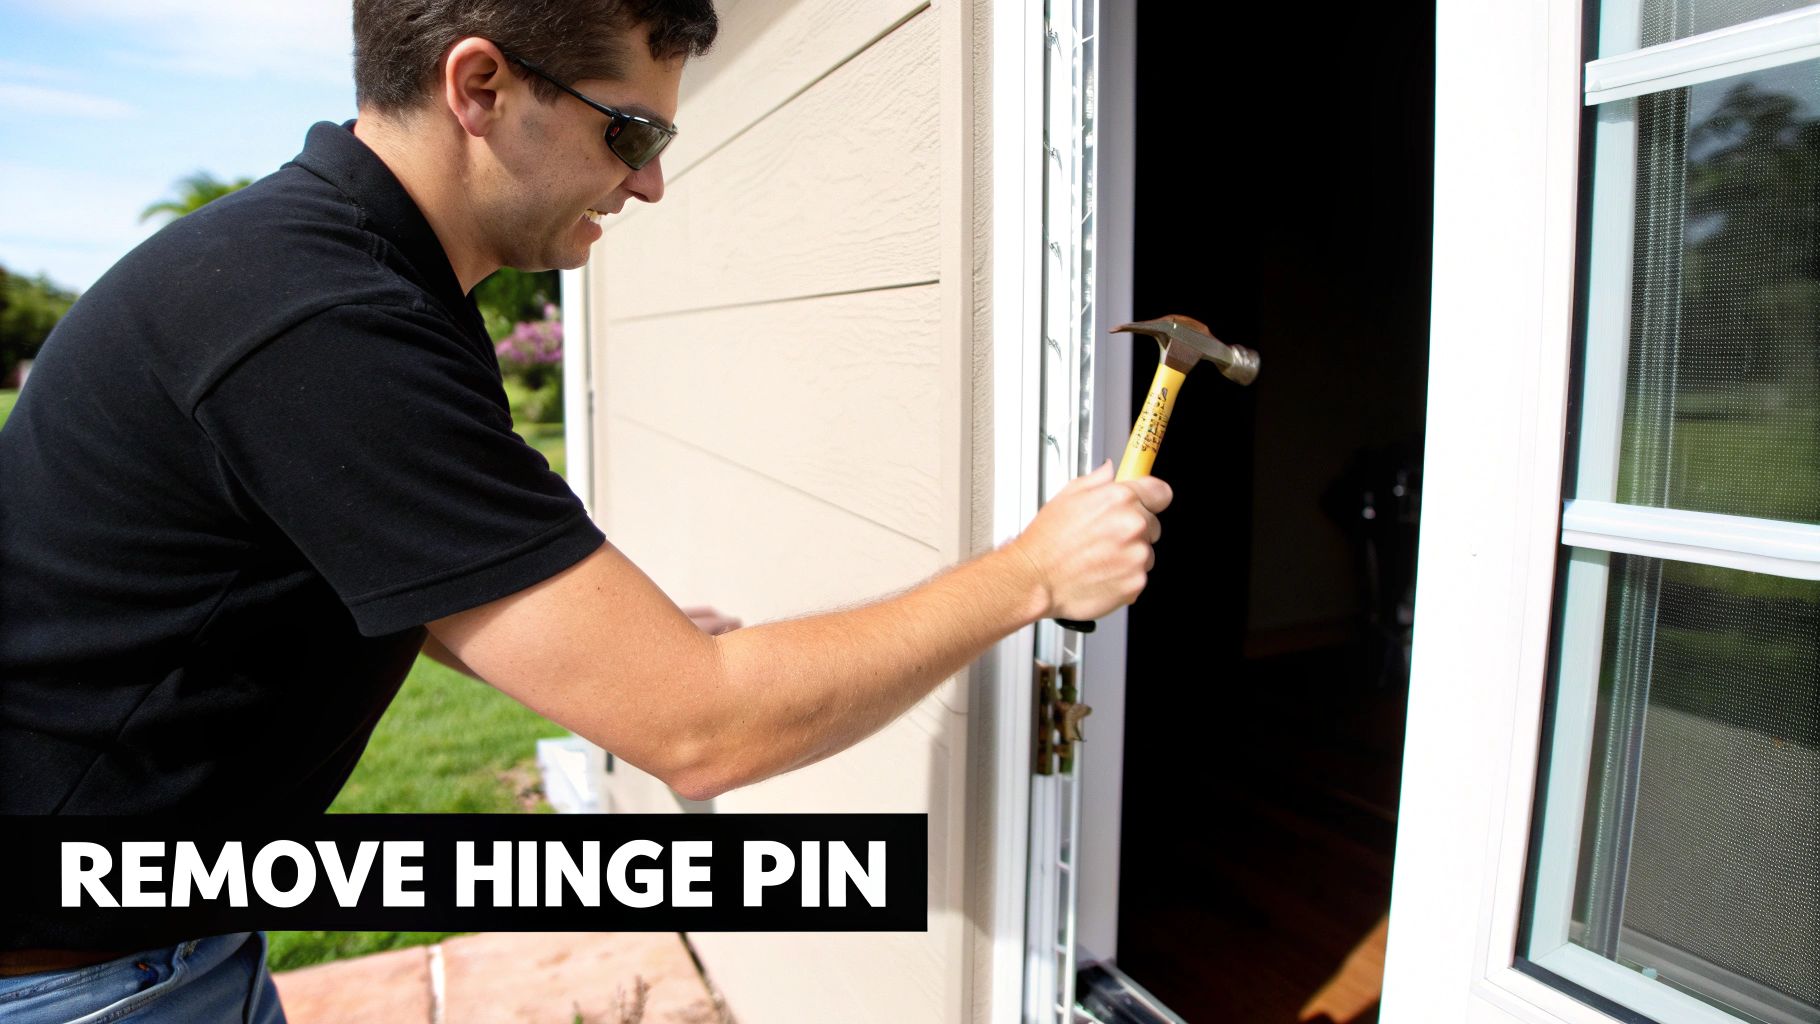
With a standard hinged screen door, it's all about the hinge pins. Those are the metal rods running through the center of each hinge, holding the whole thing together. To tackle this, you'll need a hammer and something to tap with—a nail set works great, but a slender, sturdy flathead screwdriver will do the trick in a pinch.
How to Remove a Hinged Door
Start at the bottom hinge. Place the tip of your nail set or screwdriver against the bottom of the pin and give it a few solid but careful taps upward with your hammer. You'll see the pin start to work its way out.
Keep tapping until you can get a good grip on the top of the pin and pull it all the way out.
Move on to the middle hinge and do the same thing. But hold off on that top hinge for just a moment.
Safety is Non-Negotiable Here: Before you even think about removing that last pin, the door's full weight needs to be supported. This is a two-person job. Have a friend hold the door securely, or brace it from underneath with some wood blocks. The instant that top pin is out, the door is free, and it will fall.
Dealing with a Retractable Screen Door
Retractable screens are a whole different ballgame. They're built around a spring-loaded system tucked inside a housing, or "cassette," on the side of the door frame. If you try to force anything here, you're almost guaranteed to break something.
The removal process usually boils down to two key steps:
- Freeing the Cassette: First, you need to detach the main housing. Look closely for screws or retaining clips that attach the cassette to the mounting brackets on the door frame. Once you've removed those, the main unit should lift off.
- Releasing the Pull Bar: The bar you grab to pull the screen across slides in a track. To get it out, you typically need to slide it to one end where there's a small opening or notch designed for its removal.
These clever systems are catching on fast. In fact, the global market for retractable screen doors was pegged at an estimated $371.5 million in 2024, largely because so many people are upgrading their patios. You can find more details on this growing market at cognitivemarketresearch.com.
Given how intricate these can be, if you hit a snag or feel any real resistance, the best thing to do is stop. The internal mechanics are sensitive. For those thinking about getting a new one, learning about retractable screen door installation can give you a better feel for how they come apart, which might make the removal process feel a lot less intimidating.
Navigating Common Removal Headaches and Next Steps
Let's be honest: sometimes a project that looks simple on paper decides to fight back. When you're trying to get a patio screen door off its track, you can easily hit a snag with stubborn hardware that just won't budge. Don't get frustrated—most of these issues are pretty common, and a little bit of know-how goes a long way.
A stripped screw on a roller is probably the most frequent culprit. You put your screwdriver in, turn, and… nothing but a sad spinning sound. The first thing to do is stop. Forcing it will only make it worse. A classic trick is to stretch a wide rubber band over the screw head before putting your screwdriver in. That extra bit of rubber can give you just enough grip to get the screw moving. If that fails, a dedicated screw extractor bit is a fantastic tool to have in your kit.
Dealing With Rusted or Jammed Parts
After years of rain and humidity, it's no surprise when rollers, screws, and tracks get caked with rust and grime. Sometimes the door feels like it's been welded to the frame. When you encounter a screw that's seized up with rust, your best friend is a can of penetrating oil.
Give the screw and the entire roller mechanism a good spray. Don't be shy with it. The key is to let it sit for at least 15-20 minutes. This gives the oil a chance to work its way into the threads and break down the corrosion. For really stubborn spots, a few gentle taps with a hammer near the screw can help the oil penetrate even deeper.
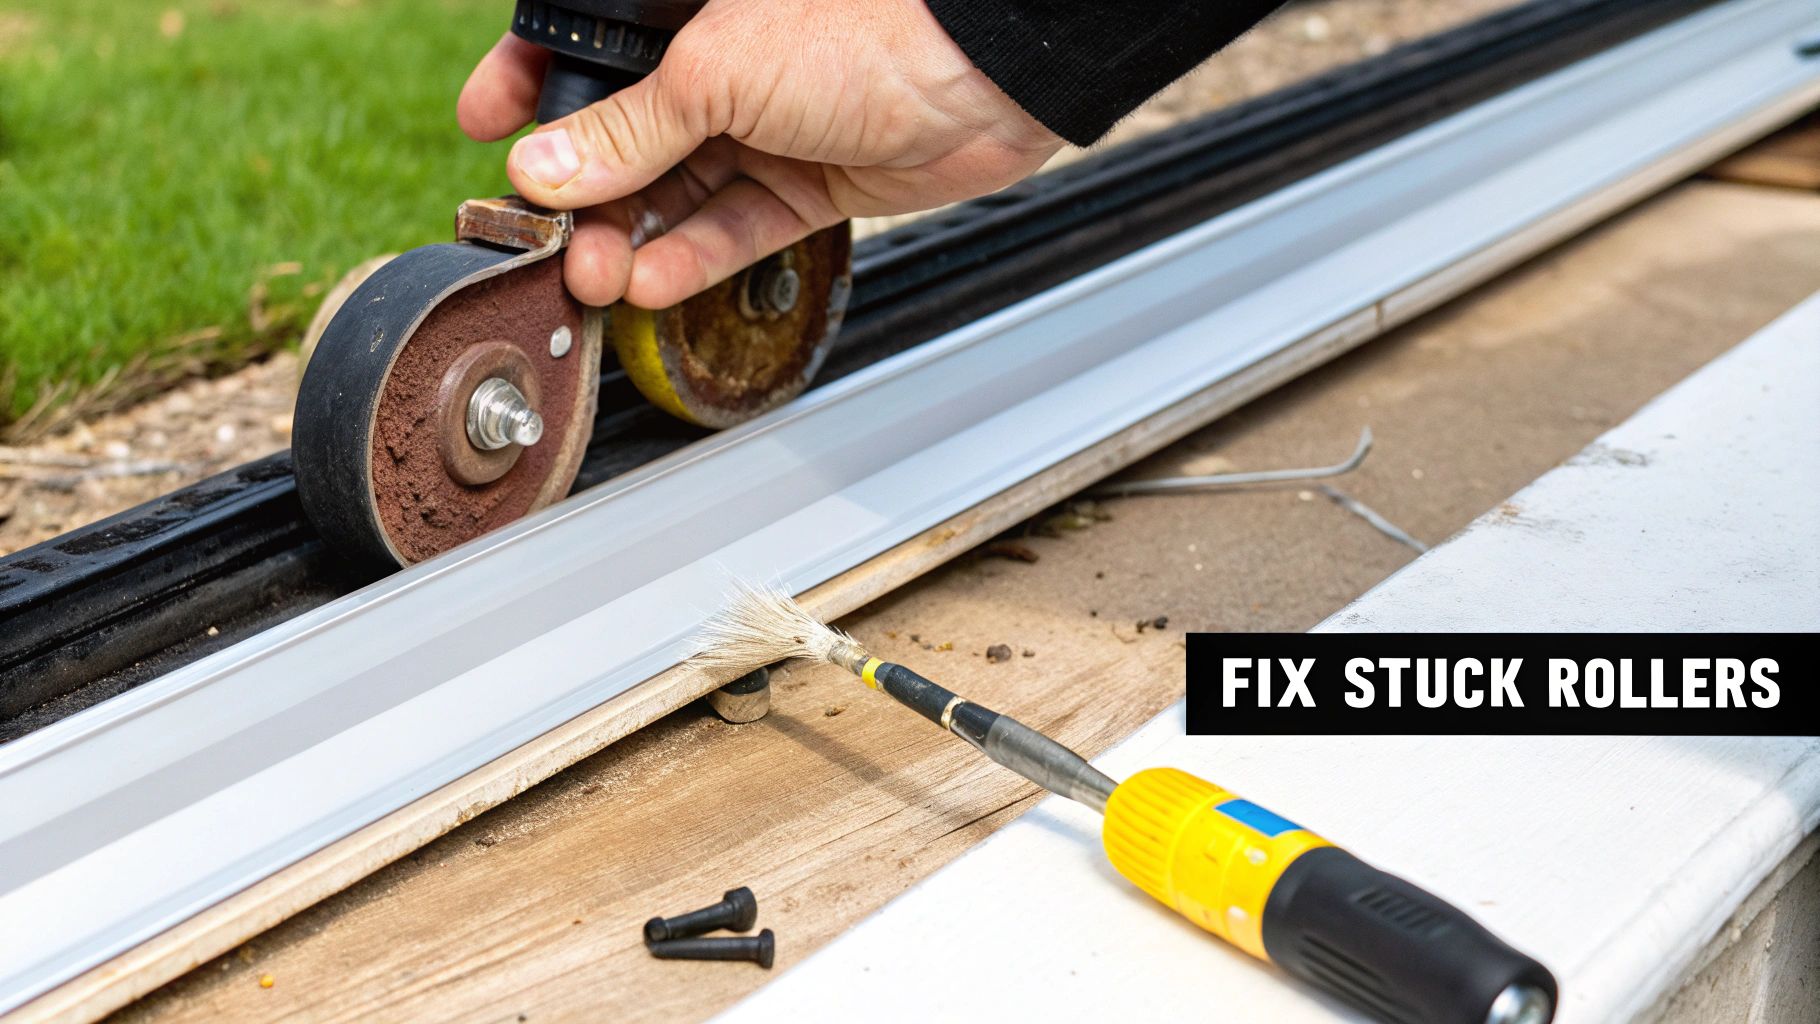
What if the whole door is stuck and refuses to lift out? The problem is almost always in the bottom track.
- Check the Track: Get down low and look for debris. Tiny pebbles, dirt buildup, or even a dent in the track can stop a roller in its tracks.
- Get Some Leverage: A flat pry bar or even a stiff putty knife can give you the leverage you need. Gently wedge it under a bottom corner of the door and lift, creating just enough clearance to get over the obstruction.
- Phone a Friend: An extra set of hands makes a huge difference. Have your helper gently wiggle the door side-to-side while you lift from the bottom. This little bit of movement is often all it takes to free a stuck roller.
I once spent an hour fighting a door that screeched and jumped off its track every time you touched it. I finally realized the rollers were completely seized with rust. A heavy dose of penetrating oil, a bit of prying, and the amount of dirt that fell out was incredible. It was a whole new door after that.
What to Do After the Door Is Out
Once the door is free, you're not quite finished. Storing it correctly is critical, especially if you plan on putting it back. Always store the door completely flat or standing perfectly straight up against a wall in your garage. If you lean it at an angle for a long time, the frame can warp, and you’ll have a nightmare trying to reinstall it.
With the door out, now is the perfect time to take some measurements for whatever comes next.
Common Removal Problems and How to Solve Them
It's common to run into a few specific issues when taking out an older screen door. Here’s a quick troubleshooting table I've put together based on years of experience.
| Problem | Likely Cause | Recommended Solution |
|---|---|---|
| Roller screw is stripped. | The screw head is worn out from previous attempts or rust. | Place a wide rubber band over the screw head for extra grip. If that fails, use a dedicated screw extractor bit. |
| Roller is stuck/won't retract. | Rust, dirt, and grime have seized the spring mechanism inside the roller. | Spray penetrating oil directly into the roller housing. Let it sit for 20 minutes, then gently tap the roller with a hammer. |
| Door won't lift high enough. | The top track is bent, or the top rollers are still engaged. | Ensure you've fully retracted the top rollers. If the track is bent, use a block of wood and a hammer to gently tap it back into shape. |
| The bottom of the door is jammed. | Debris (pebbles, leaves, dirt) is blocking the bottom track. | Use a stiff brush and a vacuum to thoroughly clean the bottom track. Use a pry bar for gentle leverage if needed. |
This table should help you tackle the most frequent hang-ups, but every door has its own quirks.
Now, let's get those measurements.
- For a Rescreening Project: You'll want to measure the height and width of the actual screen opening, from one inside edge of the frame to the other. When you buy your new screen mesh, add at least two inches to both of those numbers so you have plenty of extra material to work with.
- For a Full Door Replacement: Measure the entire door frame from the absolute outside edge to the outside edge. Do this for both the height and width. For accuracy, take three measurements for each dimension (top, middle, and bottom for the width; left, right, and center for the height) and use the smallest measurement. This ensures your new door will fit without any issues.
Getting these measurements right from the start will save you a world of frustration. If you're thinking about tackling the next step yourself, our detailed guide on rescreening a patio door offers some great pro tips for getting a tight, professional-looking finish.
Knowing When to Call a Professional
There's a real satisfaction that comes from a successful DIY project, but a seasoned homeowner knows when to hang up the tool belt. Sometimes, what looks like a straightforward patio screen door removal can unearth bigger, more complicated issues. Recognizing those red flags is the key to preventing a small job from turning into a costly repair.
Let's say you get the screen door off, but then you notice the main patio door frame is bent, badly rusted, or the lock assembly feels wobbly. These problems are a whole different ballgame. They go far beyond a simple screen and start touching on the actual security and structural integrity of your home.
If your project reveals a shaky locking mechanism on the main door, or if removing the old screen makes you think about upgrading your home's security, it might be the perfect time to look into professional residential locksmith services.
Signs That Point to a Professional
Some situations are immediate signals that it’s time to stop and call for backup. If you run into any of these, it's probably best to put the tools down.
- A Severely Damaged Frame: A bent, warped, or cracked door frame is more than just an eyesore—it can make it impossible for a new door to fit or operate correctly. A pro has the specialized equipment to properly assess and repair that kind of structural damage.
- Integrated Door Systems: Some modern homes feature complex patio door systems where the screen is built directly into the main glass door unit. Messing with these without the right know-how can easily damage the entire system, leading to a much more expensive fix.
- High-End or Retractable Doors: That sleek, fancy retractable screen isn't just a simple panel. It's a finely tuned piece of machinery. One wrong move could destroy the delicate spring mechanisms or the cassette housing, instantly voiding your warranty.
- Excessive Weight or Awkward Angles: Your safety is non-negotiable. If a door is much heavier than you anticipated or you're stuck on a ladder trying to get the right angle, the risk of injury or dropping the door skyrockets. It’s just not worth it.
For our neighbors in the Phoenix metro area, this is exactly where Sparkle Tech Screen Service can step in. When a simple project suddenly gets complicated, our team has the experience and tools to take over.
We get it—you don't want to wait weeks for a fix. That's why we pride ourselves on providing quick quotes and dependable same-week service. Whether you're stuck with a stubborn removal, dealing with a damaged frame, or ready to upgrade to a brand-new screen, our job is to deliver a fast, safe, and flawless result.
Don't let a frustrating door ruin your weekend. Let us handle the tough stuff so you can get back to enjoying your patio.
Got Questions? We've Got Answers
Even the best-laid plans can hit a snag. When you're wrestling with a patio screen door, questions are bound to come up. Here are a few things people often ask, based on our years of experience on the job.
Are All Patio Screen Door Rollers Adjustable?
You'd think so, but not always. The vast majority of modern sliding screen doors are built with adjustable rollers, usually made of steel or nylon. You'll typically find a small tension screw in an access hole at the top and bottom corners of the door frame that lets you retract them.
However, if you're working with a much older door, or perhaps a builder-grade basic model, you might run into fixed, non-adjustable rollers. A dead giveaway is the lack of any adjustment screws. If you don't see one, your best bet is to lift the door as high as you can and then gently pry the rollers up and over the track's lip with a flathead screwdriver.
Can I Just Clean the Track Without Taking the Door Off?
Sure, you can give it a quick once-over, but you won't get the results you're looking for. For a light dusting, you can slide the door to one side, hit the exposed track with a stiff brush and a vacuum, and then repeat on the other side. It's better than nothing.
But to really solve that annoying sticking and jumping, you have to get the door off. This is the only way to get unobstructed access to the track and dig out all the caked-on gunk that’s been building up for years. It also gives you a clear view to inspect the rollers for wear and tear.
A Pro Tip From the Field: A truly deep track cleaning is the single best thing you can do to make an old door glide like new again. Once the door is out of the way, use a vacuum with a crevice tool to get the loose stuff out. Then, follow up with a cloth and some mild detergent to wipe away the grime. A clean track is a happy track—and it saves your rollers from premature failure.
What If I Find a Tear While I'm Working?
It happens. You take the door off for a good cleaning and suddenly notice a small hole or rip in the mesh that you never saw before. Don't panic—you don't necessarily need to start over from scratch.
For little rips and tears, you can grab a simple peel-and-stick screen patch kit from any hardware store. They're a quick, easy fix for minor damage.
Of course, when a patch just won't cut it and you're looking at a full rescreening or a brand-new installation, that's where we come in. Sparkle Tech Screen Service provides fast quotes and dependable same-week service to get the job done right. Find out more about our screen services and let us handle the hard work for you.


