


Rescreening a door is one of those surprisingly simple DIY projects that makes a huge impact. It's really just a matter of pulling out the old, worn-out screen and spline, stretching a new sheet of screen mesh across the frame, and locking it in place.
With a good flat surface and the right tools, you can knock this out in less than an hour. Think of it less like a major home repair and more like giving your entryway a quick, satisfying refresh.
Gathering Your Essential Rescreening Toolkit
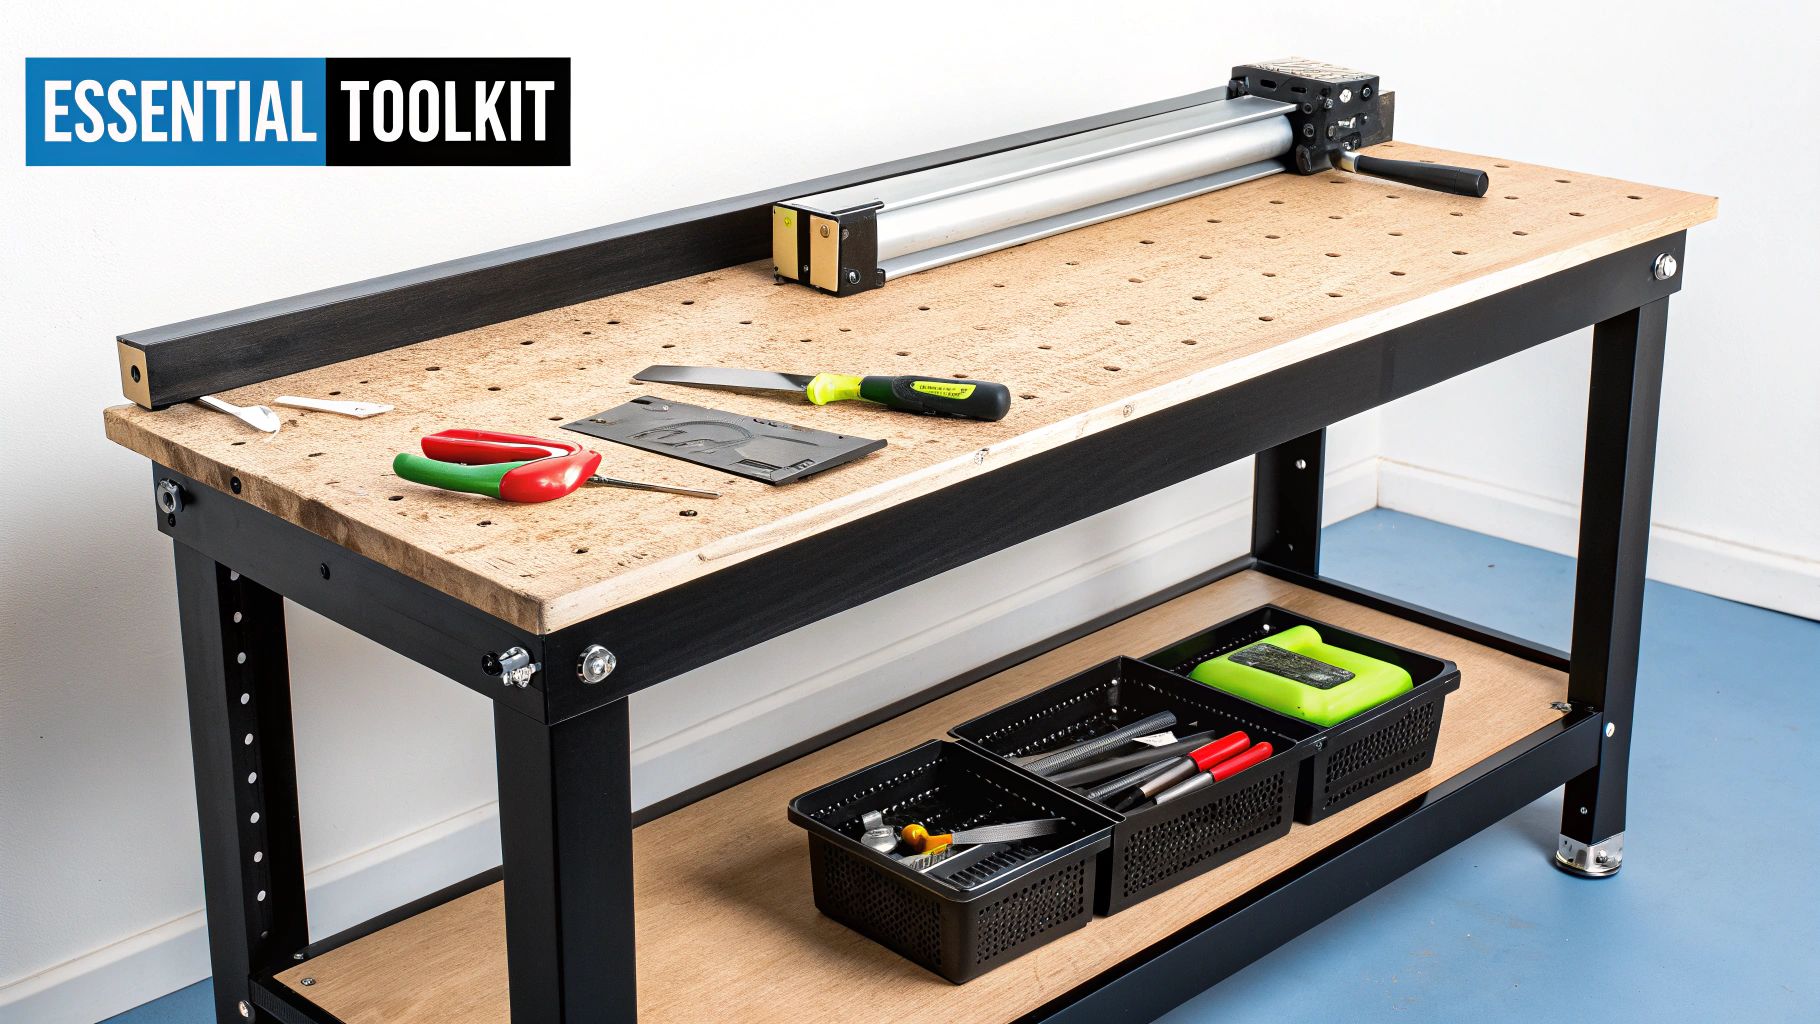
Before you even think about pulling out the old screen, let's talk tools. Getting everything you need together first is the single best thing you can do to make this job go smoothly. It's the difference between a clean, professional finish and a frustrating trip back to the hardware store halfway through.
First things first, you need a large, flat work surface. I can't stress this enough. Trying to rescreen a door while it's still hanging is a recipe for a saggy, wrinkled mess. Laying the door down on a workbench, a couple of sawhorses, or even a clean garage floor gives you the control and leverage you need to pull the screen tight.
Key Tools For A Flawless Finish
The real MVP of this project is the spline roller. This little gadget is inexpensive but absolutely essential. One side has a convex (rounded) wheel to push the screen mesh into the frame's channel, and the other has a concave (grooved) wheel that seats the new spline perfectly over the top. It’s what separates a DIY job from a professional one.
To get started, you'll need to have the right gear on hand. This checklist covers all the essentials for a smooth and successful rescreening project.
Essential Rescreening Toolkit Checklist
| Tool/Material | Purpose | Pro Tip |
|---|---|---|
| Spline Roller | Pressing screen and spline into the frame's channel | The concave wheel is for the spline; the convex wheel is for the screen. |
| Utility Knife | Trimming excess screen material cleanly | Start with a fresh, sharp blade. A dull blade will snag the new screen. |
| Flathead Screwdriver | Prying out the old spline from the corner | Use a small one to avoid scratching or denting the door frame's channel. |
| Clamps (Optional) | Holding the new screen taut while you work | A few spring clamps can act as a helpful "second pair of hands." |
Having these items ready will ensure you can work efficiently from start to finish without any interruptions.
Most of these tools are pretty standard for home projects. For a closer look at what makes each one important, you can check out our guide on essential window screen repair tools, which are the exact same ones you’ll need for a door.
Pro Tip: Don't even think about reusing the old spline. Over the years, sunlight and weather make it brittle. It will almost certainly crack or break as you try to force it back in. A new roll is cheap and guarantees a tight, secure fit for years to come.
Taking the time to do this yourself is part of a bigger trend. More and more homeowners are choosing to repair and maintain what they have instead of replacing it. In fact, the screen door installation and repair market is currently valued at around $2 billion globally. It just goes to show that a little bit of maintenance can go a long way.
Selecting the Best Screen Material for Your Door
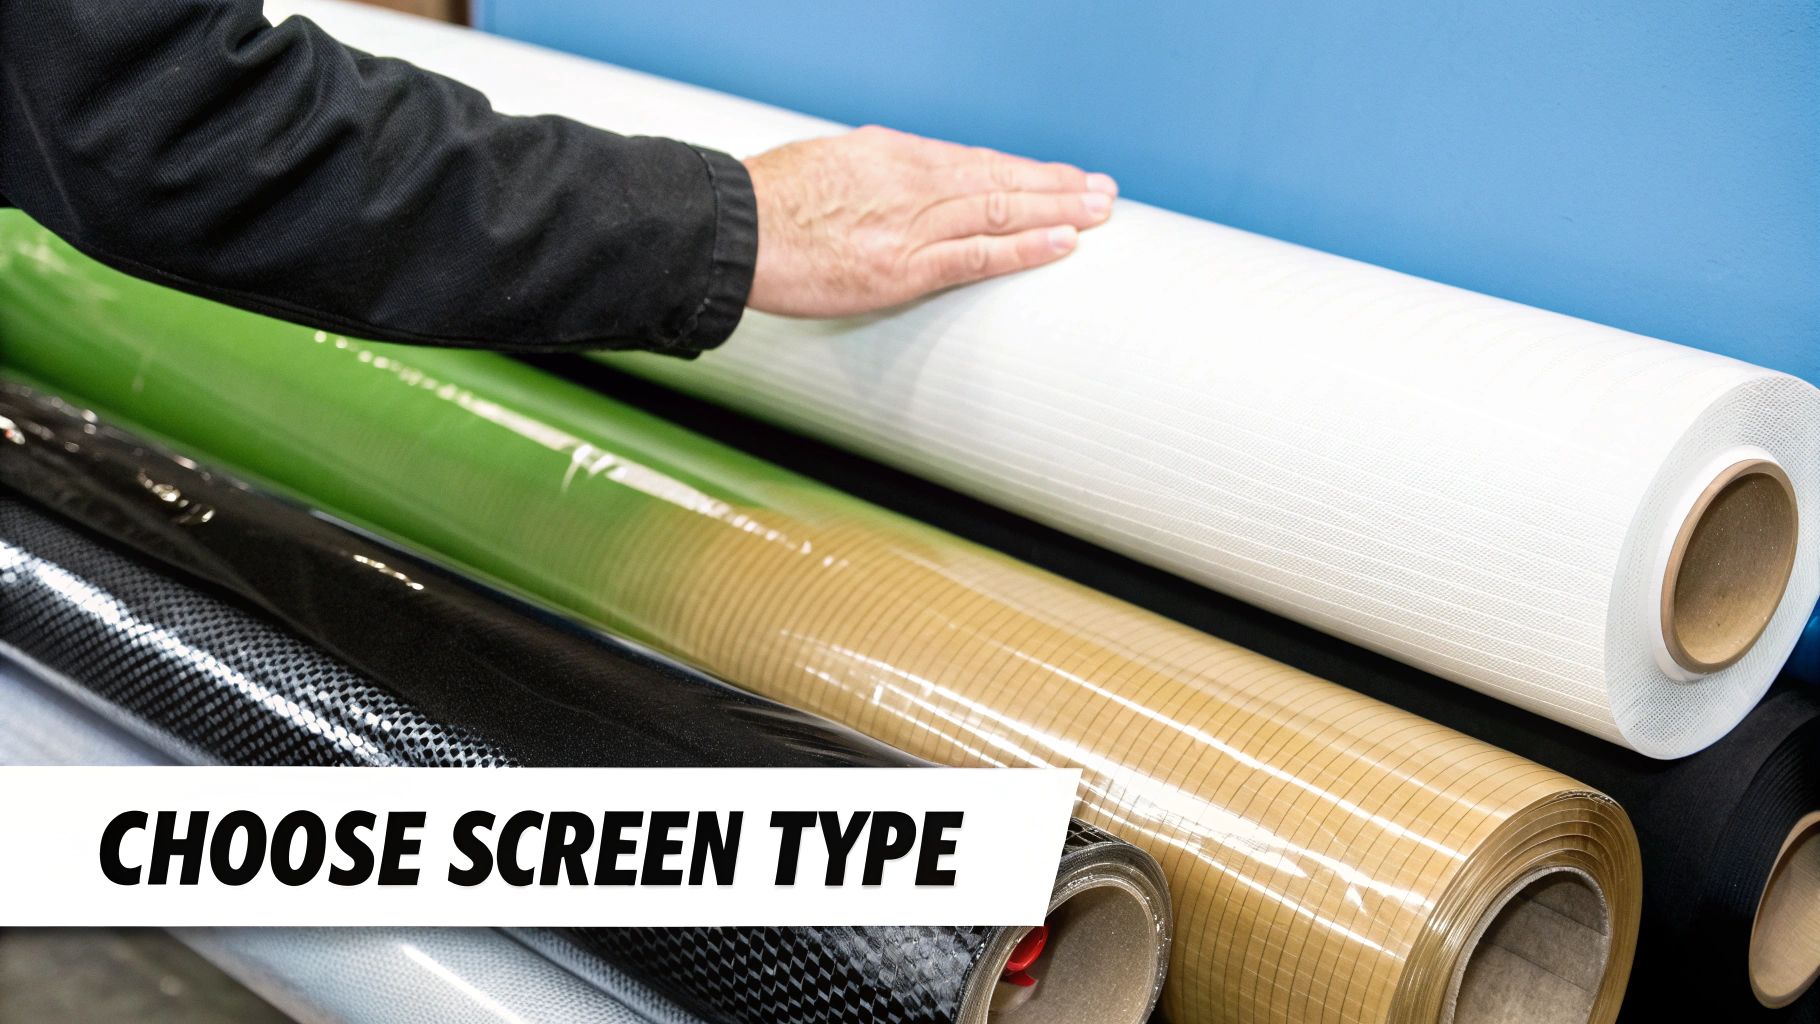
Choosing a new screen isn't just about patching a hole; it’s an opportunity to upgrade your door's function and durability. The material you pick will directly affect everything from the view outside to how often you'll have to do this job again.
Most people are familiar with standard fiberglass screen. It's the go-to for many because it's inexpensive, flexible, and doesn't hold a crease if you mishandle it—making it a forgiving choice for a weekend project. The trade-off is durability; it's the most likely to tear from a pet's claws or an accidental bump.
If you're looking for a step up in both clarity and strength, aluminum screen is a solid choice. It offers a much crisper, cleaner view and resists sagging better than fiberglass. Just be aware that it can dent or crease permanently if hit hard.
Specialty Screens for Specific Needs
Sometimes, a standard material just won't cut it. If you've got pets, kids, or a door that gets blasted by the afternoon sun, it’s worth looking at screens designed to solve those specific problems.
- Pet-Resistant Screen: If you have a dog or cat that loves to scratch, this is your answer. Made from a heavy-duty polyester, it's about 7x stronger than regular fiberglass and built to withstand claws.
- Solar Screen: For doors that face direct sunlight, a solar screen is a game-changer. This thicker mesh is designed to block anywhere from 65% to 90% of the sun's heat and UV rays, which can help lower your cooling costs and stop your floors from fading.
Key Takeaway: The first step in learning how to rescreen a door properly is picking the right material. Think about your home’s location, whether you have pets, and your budget to find the perfect fit.
When you start looking into these tougher, more functional materials, you're tapping into a major trend in home improvement. Homeowners are increasingly focused on security and energy efficiency, which is why the global security screen door market was valued at an impressive $2.5 billion in 2025. People want their homes to be comfortable and secure.
Screen Material Comparison
To make the decision a little easier, here’s a quick breakdown of the most common options and what they do best.
| Material | Best For | Durability | Visibility | Avg. Cost |
|---|---|---|---|---|
| Fiberglass | Budget-friendly repairs, low-traffic areas | Low | Good | $ |
| Aluminum | A clear view and preventing sag over time | Medium | Excellent | $$ |
| Pet-Resistant | Homes with dogs, cats, or small children | Very High | Fair | $$$ |
| Solar Screen | Doors in direct sun, energy efficiency | High | Fair | $$$$ |
Ultimately, the goal is to choose a material that fits your lifestyle so you won't have to tackle this project again anytime soon.
For a deeper dive, our guide on the https://sparkletechscreenservice.com/best-window-screen-material/ covers these options in more detail, and the same logic applies to doors. Remember, a good screen is more than just a barrier; well-installed screens are also effective fly repellents for home entry points, keeping your home comfortable and pest-free.
Prepping the Frame for a Perfect Fit
Alright, you've got your materials, so let's get down to it. This is where the magic happens, and honestly, good prep work is what separates a sloppy job from one that looks like a pro did it. We need a clean slate before the new screen goes on.
First, get that door laid out flat on your work surface. Take a look at the channel running around the frame and find the end of the old spline—that's the rubbery cord tucked in there holding the screen tight.
Grab a small flathead screwdriver or an awl, and carefully dig under one end of the spline to pry it up. Once you have a piece you can grab, just start pulling. Don't be surprised if it's brittle from sun exposure and comes out in a bunch of little pieces. That’s perfectly normal for an older screen.
With the spline gone, you can just lift the old, torn screen right out.
Cleaning the Spline Channel
Now, here's a step a lot of people skip, and it's a huge mistake: you have to clean out that spline groove. You wouldn't believe the amount of dirt, old pollen, and general gunk that builds up in there over the years. If you leave it, the new spline won't sit properly, and you’ll end up with a loose screen.
I usually use a stiff brush, but a screwdriver with a rag wrapped around the tip works just as well. The goal is to get that channel completely clear of any debris. A clean groove lets the new spline seat deeply and grip tightly, which is essential for getting that nice, taut finish we're after.
This handy visual breaks down the prep into three straightforward stages.
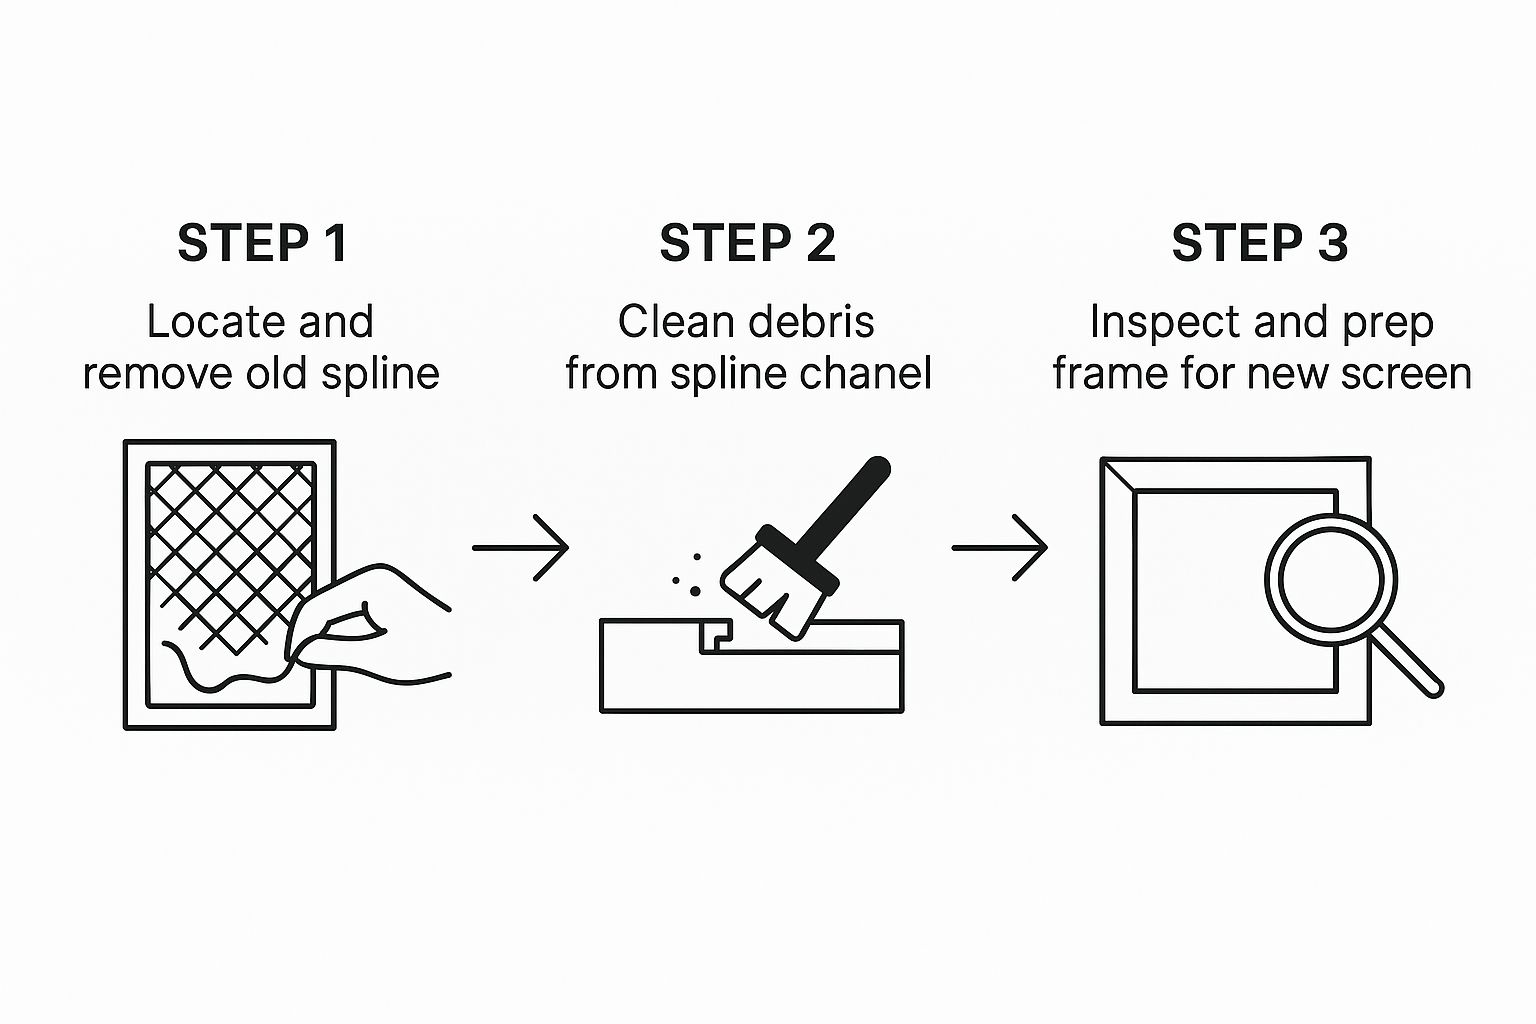
As you can see, it's a simple flow: get the old stuff out, clean the track, and give it a final once-over. This makes sure the frame is 100% ready for the new material.
Key Insight: Take your time with the prep work. Seriously. A perfectly clean spline channel is the foundation of a good rescreening job. Any little bit of crud you leave behind is guaranteed to cause problems with the fit and tension later on.
Installing Your New Screen Like a Pro
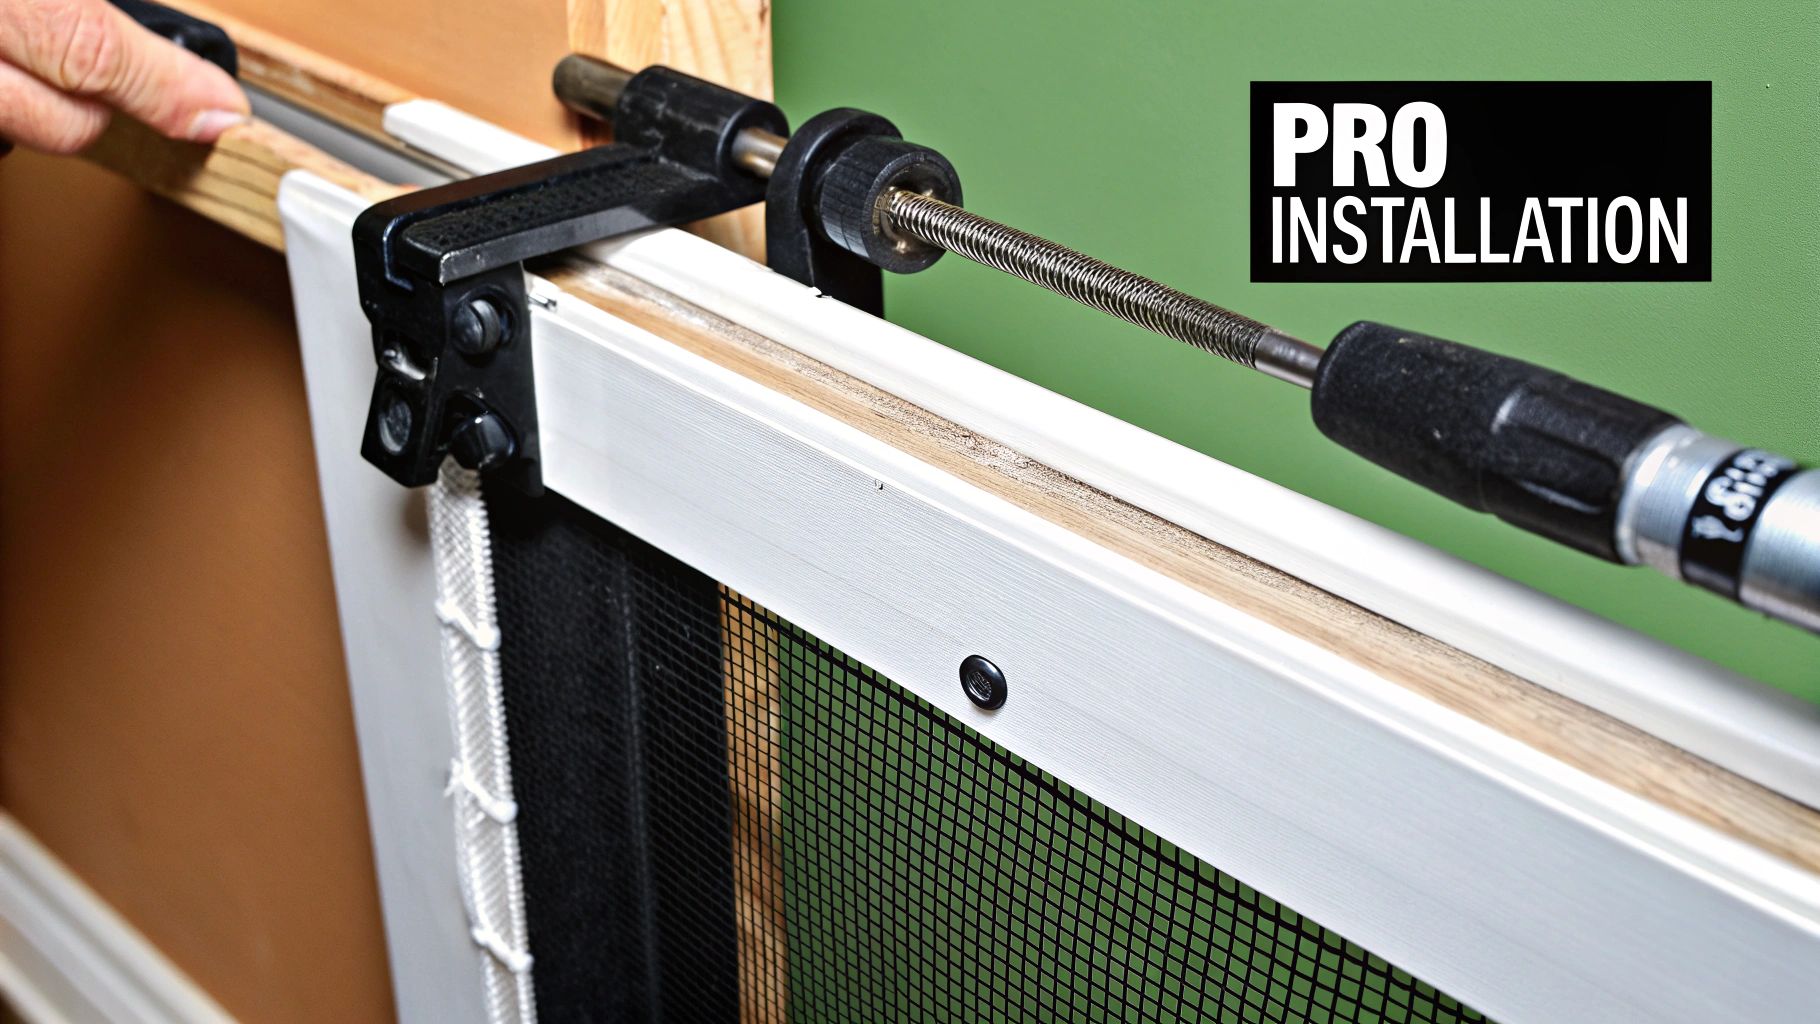
Alright, your frame is prepped and clean, which means you’re at the most satisfying part of the job. This is where you get that perfectly taut, drum-tight finish that makes a screen door look brand new. Remember, it's all about technique, not brute force.
First, unroll your new screen material completely over the door frame. You'll want it to overhang by at least two inches on all four sides. This extra slack is your safety net—it gives you something to hold onto and ensures you don’t come up short if the screen shifts a bit. A couple of spring clamps on one of the shorter sides can be a huge help here, holding the mesh straight while you get started.
The Two-Step Spline Roller Technique
That little spline roller tool is your best friend for a wrinkle-free finish. It has two different wheels for a reason, and using them in the right order is the secret to getting professional results.
- The Convex Wheel: This is the rounded wheel, the one that looks like a tiny pizza cutter. You’ll use this one first to gently press the screen mesh down into the channel before you add the spline. This step creates a perfect little groove and pre-sets the screen, making the next part much smoother.
- The Concave Wheel: This is the wheel with a groove in it. It's shaped to fit perfectly over the spline. After creating the channel with the convex wheel, you'll switch to this side to roll the spline in on top of the mesh, locking it all down.
Start on one of the short sides of the door. Run the convex wheel along the channel to push the screen in. Then, take your new spline and use the concave wheel to roll it firmly into that same groove, securing the screen as you go.
Expert Insight: The real trick to getting a tight screen is to apply gentle but consistent pressure on the mesh, pulling it away from the side you're working on. As you roll the spline down one side, pull the screen taut toward the opposite side. This method systematically removes any slack and prevents sagging later.
Working Your Way Around the Frame
Once you’ve finished that first side, move directly to the opposite side. It’s tempting to work on the adjacent side, but that’s a classic mistake that often leads to wrinkles in the corners. As you start on the second side, keep pulling the screen material gently to maintain that all-important tension.
Repeat this process for the last two sides, always working on opposite ends of the frame. You'll literally see the sags and wrinkles disappear as you lock in that final side.
This kind of DIY project is becoming more and more popular. The global retractable screen door market was valued at around USD 371.5 million in 2024 and is expected to grow, which tells you people are keen on upgrading what they have instead of replacing it. If you're interested in professional options, our overview of the door screen installation process provides a lot more detail.
With the spline fully installed on all four sides, you're ready to make the final trim.
Putting the Finishing Touches on Your Work
With the new screen and spline locked in, you're on the home stretch. This last part is all about getting those clean, sharp edges that scream "professional job." Don't rush through this—a sloppy trim can undo all the careful work you've just put in.
Grab a utility knife with a fresh, sharp blade. The trick here is to cut on the outside of the spline, not the inside. Press the blade against the outer edge of the spline channel, using the door frame itself as your guide. This angle prevents you from accidentally nicking the new spline or, even worse, slicing the screen you just installed.
A steady hand is your best friend here. Aim for long, smooth cuts instead of short, choppy ones. This gives you a perfectly flush edge and keeps the mesh from fraying.
Sidestepping Common Rescreening Goofs
Knowing how to rescreen a door is just as much about knowing what not to do. I’ve seen plenty of simple mistakes turn a straightforward project into a headache. If you know what they are, you can easily avoid them.
- Cutting the Screen Too Small: This is hands-down the most frequent error. Always give yourself at least two extra inches of screen on every side. You can trim away the excess, but you can't magically add more if you cut it too short.
- Over-Stretching the Screen: Everyone wants a tight, drum-like finish, but pulling the screen too hard can actually warp the door frame, causing it to bow inward. This is a real risk with lighter aluminum or vinyl doors. The goal is firm and even tension, not maximum tightness.
- Reusing the Old Spline: I get it, you want to be resourceful. But old spline gets brittle and weak from years of sun exposure. It’ll probably crack as you try to install it and won't have the grip to hold your new screen securely for long.
Pro Tip: A successful rescreening job comes down to avoiding these simple pitfalls. Taking your time with the prep work and the final trim is what separates a quick patch from a durable, professional-looking repair that will last for years.
Answering Your Top Rescreening Questions
Even a project that seems simple can throw you a curveball. Getting a few common questions answered before you start can be the difference between a frustrating afternoon and a perfectly finished screen door. Let's tackle some of the things people often ask.
How Do I Know What Size Spline to Buy?
This is the one detail you absolutely have to get right. By far, the easiest method is to snip a small, one-inch piece of the old spline before you throw it away. Just take that little piece with you to the hardware store.
You can physically match it up to the new spline options to find an exact twin. It takes all the guesswork out of the equation.
If your old spline is long gone or has turned to dust, you'll have to measure the channel in the door frame itself. Spline is sold by its diameter—you'll see sizes like .125 or .140 inches. Grabbing one that's too small is a recipe for a saggy screen that will pop right out the first time the wind blows.
Can I Rescreen a Door Without Removing It?
Technically, yes. Should you? Absolutely not. I've seen people try this, and it rarely ends well.
You need the door lying flat on a stable work surface to get the right leverage and control. This is the only way to pull the screen tight and get that smooth, drum-like tension. Working on it vertically while it's still hanging is a surefire way to end up with frustrating wrinkles and sags you can't fix.
A Word of Advice: Trying to save 10 minutes by leaving the door on its hinges is a classic rookie mistake. That shortcut almost always means you'll be starting over from scratch.
What If My Screen Door Frame Is Bent?
If you're just dealing with a minor bow, you might be able to gently coax it back into shape by hand or with some careful persuasion. But if the frame is seriously bent or warped, you're fighting a losing battle.
A warped frame makes it impossible to get even tension across the screen. If you try to force it, you risk cracking the frame or making the warp even worse. For significant damage, replacing the entire door is usually the smarter, more permanent fix.
While this guide is all about the DIY approach, sometimes a job is just too big or bent to handle. If you'd rather have an expert take a look, you can always explore professional screen services to handle the repair or replacement for you.
At Sparkle Tech Screen Service, we handle everything from simple repairs to full replacements. If you're facing a tricky project or just want a guaranteed perfect finish, give us a call. Learn more at https://sparkletechscreenservice.com.


