


A torn window screen is one of those nagging little home repairs that's all too easy to ignore. But fixing it is a fantastic, straightforward DIY project that makes a bigger difference than you might think, both in keeping bugs out and sprucing up your home's appearance. The best part? You can knock out a window in less than an hour with just a few simple tools, making it one of the most satisfying and budget-friendly upgrades you can do.
Why Bother Rescreening Your Windows?

Before you jump in, it's worth appreciating just how impactful this small project is. A ripped or sun-faded screen isn't just an eyesore; it’s a failure in your home’s first line of defense. Taking the time to rescreen a window pays off immediately in a few practical ways that genuinely improve your day-to-day.
First and foremost, it’s about effective pest control. It doesn't take much—a tiny hole is a welcome mat for mosquitoes, flies, and all sorts of other critters. A fresh, tight screen seals that gap for good, letting you enjoy a nice breeze without inviting in a swarm of unwanted guests.
And let's not forget curb appeal. Faded, saggy, or torn screens can make an otherwise beautiful home look tired and neglected. New screens give your windows a crisp, clean look that instantly sharpens up your home's exterior.
It's More Than Just a Bug Blocker
A good screen does more than just stop insects; it contributes to your home's overall comfort. On a beautiful day, there's nothing better than opening the windows to catch a cross-breeze, which is a lot harder to enjoy when your screens are in bad shape. Good airflow helps cut down on A/C usage, which can lead to some nice savings on your energy bill.
Don't overlook the simple pleasure of a clear view. Old, dusty, and weathered screens can really cloud your outlook and dim the natural light in a room. A new screen is like upgrading to high definition for your windows.
When you get right down to it, rescreening is a project with a huge return for a minimal investment of time and money. It's a skill every homeowner can master, and the payoff is immediate.
- Pest Protection: Your best defense against insects.
- Curb Appeal: An instant facelift for your home's exterior.
- Natural Airflow: Enjoy fresh air without the bugs.
- Cost Savings: Way cheaper than hiring a pro or buying whole new screens.
Choosing the Right Tools and Screen Material
The secret to a smooth, frustration-free project is having everything you need within arm's reach before you even start. Trust me, trying to improvise on a rescreening job can quickly turn a simple task into a major headache. Gathering your supplies first lets you focus on what matters: getting that perfect, tight finish.
Your Essential Rescreening Toolkit
Most of what you'll need is waiting for you at the local hardware store. The one non-negotiable tool is a spline roller. This little gadget has a convex wheel on one end and a concave wheel on the other, and it's specifically designed to press both the screen and the spline neatly into the frame's channel.
Beyond that, your list is pretty simple. Get these items ready on a flat work surface like a workbench or a sturdy table:
- Utility Knife: A fresh, sharp blade is key for trimming the excess screen and getting a clean, professional-looking edge.
- Flat-Head Screwdriver or Awl: You'll need something to carefully pry out the old, brittle spline without gouging the frame.
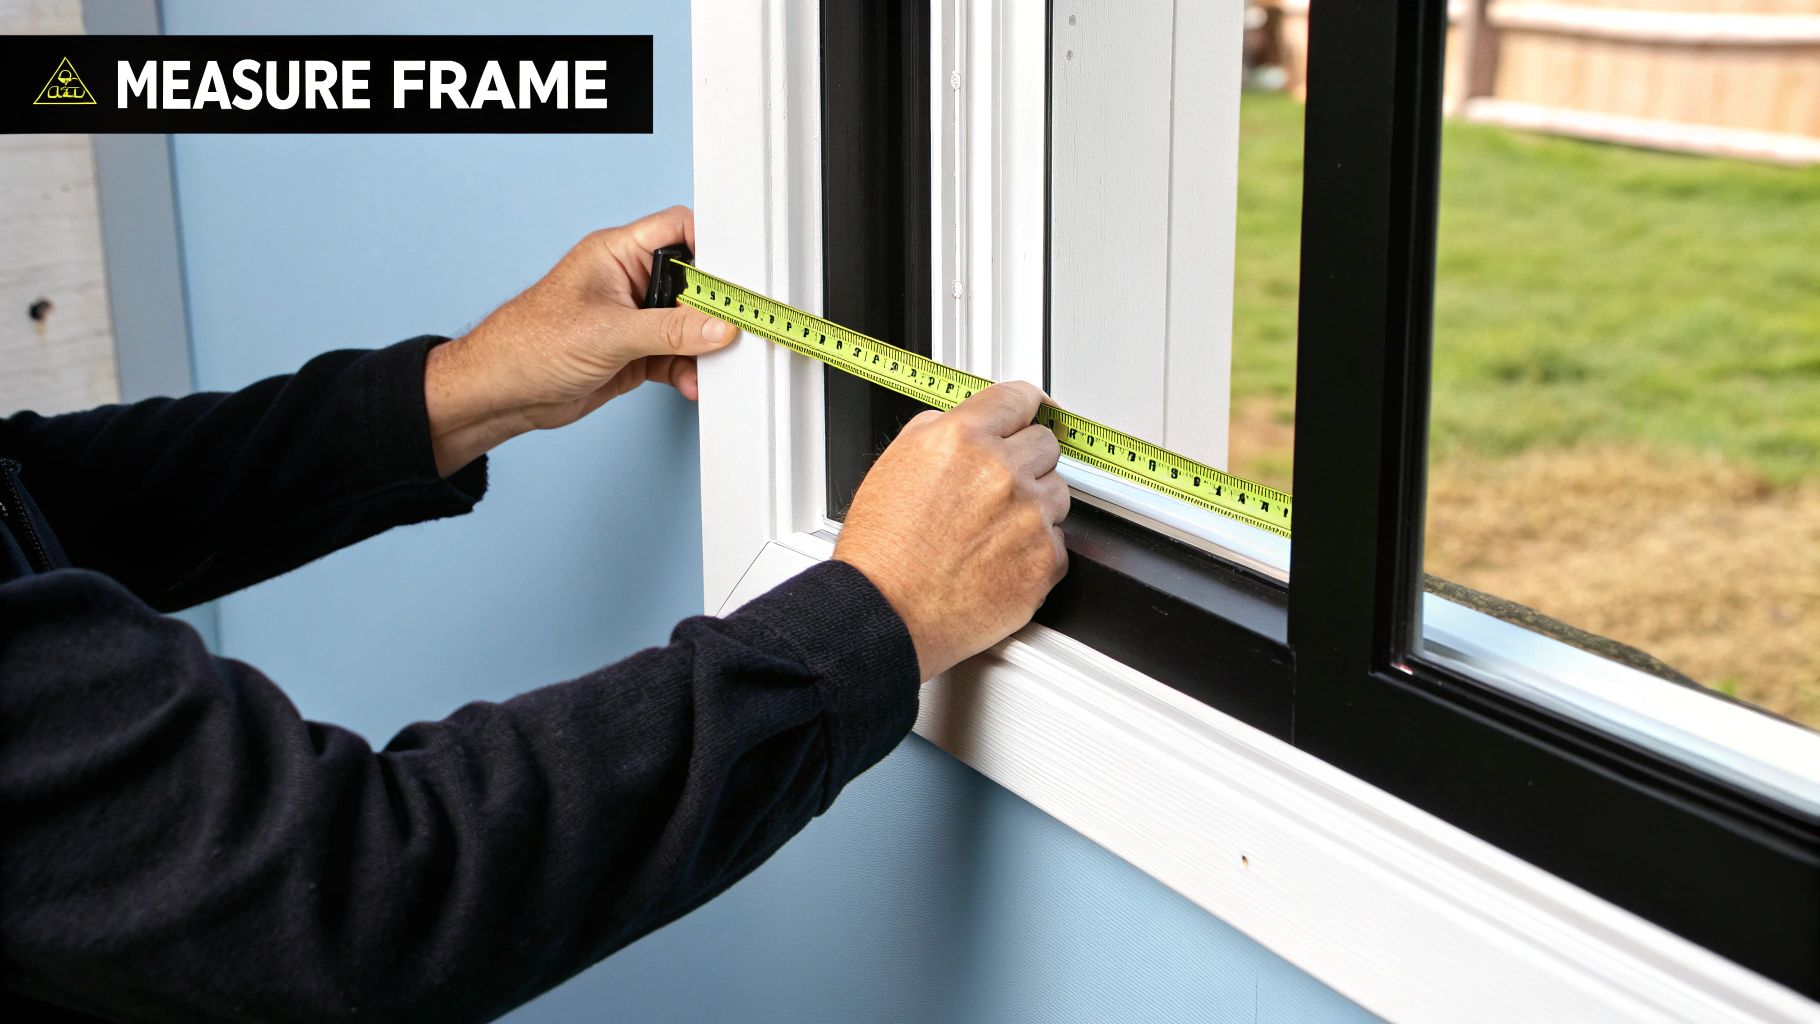
- Tape Measure: Absolutely essential for measuring your frame accurately. You only want to cut your new screen once.
- Clamps (Optional but helpful): A few small clamps are a lifesaver for holding the screen taut while you work, especially if you’re doing the job solo.
Selecting the Perfect Screen Material
With your tools ready, it’s time to think about the screen itself. The material you pick directly impacts your window's durability, how clear your view is, and even your home's energy efficiency.
Your screen material is more than just a barrier; it's a functional part of your home. A pet owner in a hot climate will have very different needs than someone focused purely on visibility. Choose a material that solves a problem for you.
Your choice of material really comes down to your specific needs, whether you're fending off a curious cat or blocking harsh sunlight. Below is a quick comparison to help you decide.
A Quick Guide to Screen Materials
Use this comparison to choose the perfect screen material for your window rescreening project.
| Material Type | Best For | Pros | Cons |
|---|---|---|---|
| Fiberglass | General use, budget-friendly projects | Flexible, won't dent or crease, affordable | Can tear more easily than metal, lower visibility |
| Aluminum | Clarity, durability, and a classic look | Excellent visibility, strong and long-lasting | Can dent or crease permanently, more expensive |
| Pet-Resistant | Homes with cats or dogs | 7x stronger than standard screens, tear-resistant | Thicker mesh reduces visibility and airflow |
| Solar Screen | Sun-facing windows, energy efficiency | Blocks 80-90% of solar heat, reduces glare | Darkens rooms, significantly reduces visibility |
The two most common options you'll encounter are fiberglass and aluminum. Fiberglass is the go-to modern choice because it’s flexible, affordable, and won't hold a crease or dent like metal can.
Aluminum, on the other hand, is known for offering a crisp, clear view and superior strength. Its popularity is reflected in the market size; the global market for aluminum window screens was valued at around $2.5 billion in 2025 and continues to grow.
For those unique situations, specialty screens are the way to go. Pet-resistant screening is much thicker and tougher, designed to stand up to claws and paws. Solar screens are engineered to block a huge amount of the sun's heat and UV rays—a total game-changer for rooms that get blasted by the afternoon sun.
To dive deeper into these options and figure out what’s best for your home, check out our guide on https://sparkletechscreenservice.com/best-window-screen-material/.
A Practical Guide to Replacing Your Window Screen
Alright, let's get down to it. You’ve got your tools and materials, so now comes the satisfying part—actually replacing that old screen. I'll walk you through the process step-by-step, making sure you get a tight, professional-looking result, even if it's your first time.
Tearing Down the Old Screen
First things first, you need to get rid of the old stuff. Lay your screen frame on a workbench or any flat, stable surface. Grab a small flat-head screwdriver, an awl, or even a sturdy pick, and carefully dig into a corner of the frame to pry up the end of the old rubber spline.
Once you get a little bit of it lifted, you can usually just pull, and the whole thing will come out in one long piece. Don't worry if it's old and brittle—it might snap. If it does, just patiently work your way around the frame, pulling out the pieces. After the spline is gone, the old mesh lifts right off.
A Quick Pro Tip: Before you move on, take a second to clean out the channel where the spline was sitting. An old toothbrush, a stiff-bristled brush, or the tip of your screwdriver works great for clearing out any dirt, grime, or leftover bits of spline. A clean channel makes seating the new spline so much easier.
This little bit of prep work is a small detail that really makes a huge difference in the final quality.
Getting the New Screen Measured and Cut
This is where precision pays off. If you want a taut, wrinkle-free screen, you can't just cut the new mesh to the exact size of the frame. You need to leave yourself some extra material to work with.
This image gives you a great visual for what you need to do before you start installing.
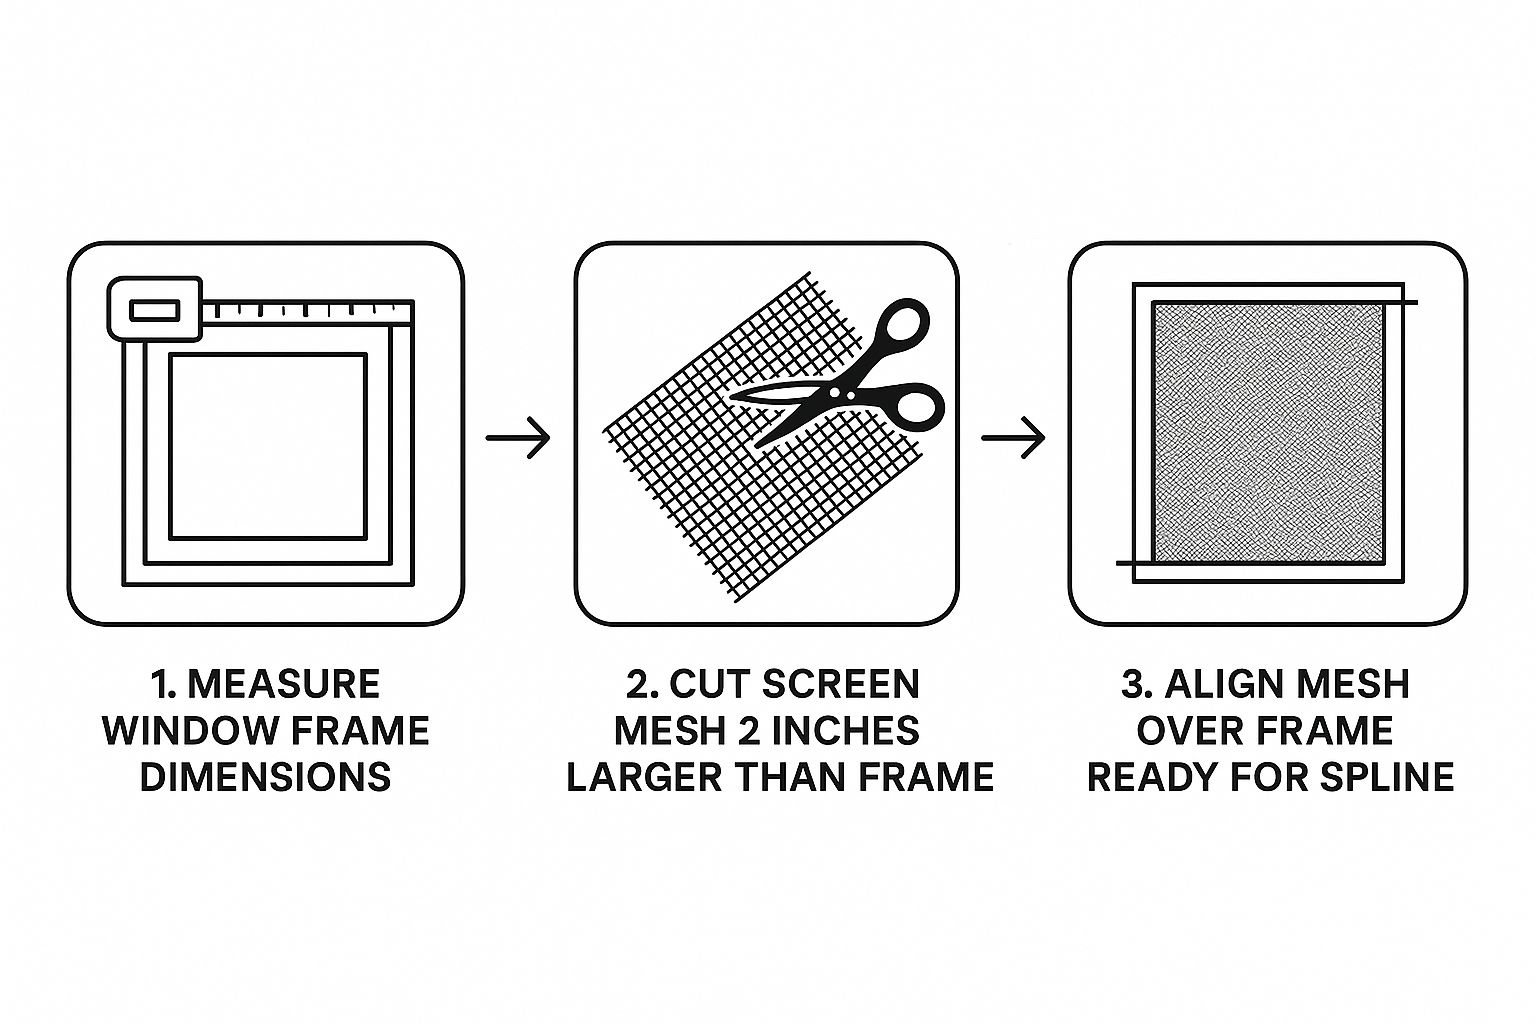
The key takeaway here is that overlap. It’s what gives you the leverage to pull the screen tight as you lock it in with the spline.
Here's the simple rule I always follow:
- Measure the Frame: Grab your tape measure and get the height and width of the frame itself.
- Add Your Margin: Add four inches to both of those measurements. This gives you a generous two-inch overlap on all four sides.
- Cut the Mesh: Roll out your new screen mesh on a flat surface and use your measurements to cut it to size with a sharp utility knife. Always use a fresh blade for the cleanest cut.
Using the Spline Roller Like a Pro
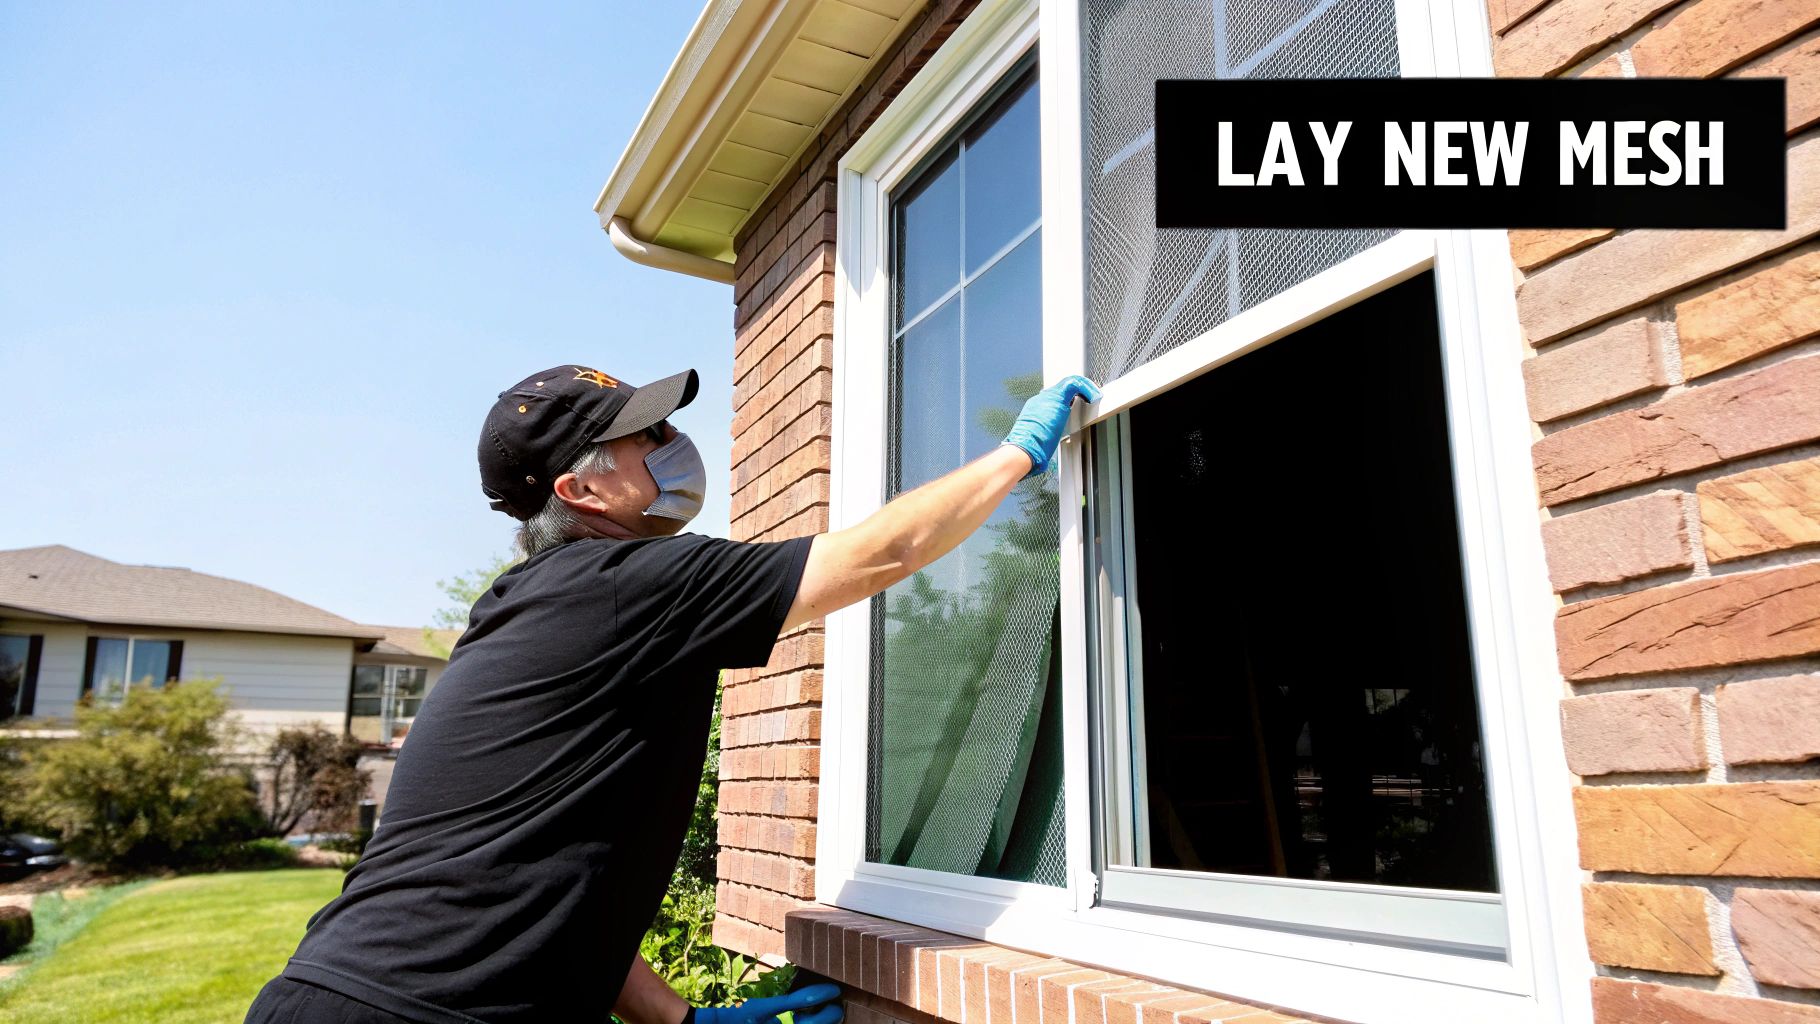
Now for the main event. Lay your freshly cut screen mesh over the frame, making sure it's centered with that two-inch overlap on each side.
Start by grabbing your spline roller and using the convex (the rounded, pizza-cutter-like) wheel. Gently roll it along one of the longer sides, pressing the mesh down into the channel. This creates a neat little groove for the spline to sit in.
Next, take the end of your new spline and press it into a corner. Now, switch to the concave (grooved) wheel of your roller. Apply firm, steady pressure and roll the spline right into the channel, locking the screen in place. You should feel it pop in—a very satisfying feeling! Work your way all the way down that first side.
If you'd like a more detailed visual on this part of the process, our complete guide on how to install screens can be a big help.
Move to the opposite side of the frame. This time, as you roll the spline in, gently pull the screen mesh taut to eliminate any slack. Once the two long sides are done, repeat the process for the two shorter sides. Your screen should now be as tight as a drum. All that's left is to trim the excess mesh with your utility knife for a perfectly clean finish.
Learning this hands-on skill is more than just a weekend project; it's part of a growing trend in home improvement. The window repair industry is projected to hit USD 16.24 billion by 2033, which shows just how much homeowners value keeping their homes in top shape.
How to Avoid Common Rescreening Mistakes
Even a project as simple as rescreening a window has a few classic traps you can fall into. I've seen it countless times. Knowing what to watch out for is the key to getting a great result without any headaches.
The most common rookie mistake? A sagging screen. It’s frustrating, but thankfully, it’s an easy fix. The culprit is almost always uneven tension when you were rolling in the spline. If you step back and see a sag, don't worry. Just use your utility knife or a flathead screwdriver to gently pry up the spline on the sagging side and the one next to it. Give the screen a gentle, firm pull to tighten it up, then roll the spline back into its channel. That small adjustment makes all the difference.
Another classic blunder is cutting the new screen mesh too short before you even start. You really want to give yourself a generous two-inch overlap on all four sides. If you skimp on this, you won't have anything to grip and pull when you're trying to get the screen taut. It makes getting that tight, professional finish nearly impossible.
The Tiny Detail That Can Stop You Cold
There’s one little thing that can bring your whole project to a standstill: using the wrong size spline. I can't stress this enough. If the spline is too thin, it won't have enough pressure to hold the screen in place, and it’ll just pop right out of the channel. Go too thick, and you'll fight every inch of the way, risking damage to the screen or even bending the frame itself.
The best way to avoid this is simple: take a small piece of your old spline with you to the hardware store. Match it up directly to what’s on the shelf. This takes all the guesswork out of the equation and guarantees you walk out with the right size.
Knowing about these potential hiccups ahead of time helps you work with confidence. Of course, having the right gear is just as important for preventing damaged frames and crooked cuts. If you're not sure what you need, take a look at our guide to the essential window screen repair tools to get fully prepared.
By keeping these tips in mind, you'll sidestep the common frustrations and get a flawless finish on your first try rescreening a window screen.
Insider Tips for a Professional Finish
After you've done this once or twice, you start to pick up on the little things—the small tricks that take your work from looking "good enough" to looking truly professional. These are the details that ensure your newly screened window not only looks fantastic but holds up for years to come.
One of the best techniques I've learned is to "pre-roll" the screen mesh. Before you even think about putting the spline in, take the convex (rounded) wheel of your roller and gently press the screen into the channel. This simple action creates a perfect groove and adds just the right amount of tension to the mesh. When you finally install the spline, the result is an incredibly taut, wrinkle-free finish.
Adapting to the Elements
Here's another great tip, this time for the spline itself. If you're working on a cooler day, you'll notice that vinyl spline gets stiff and stubborn. Trying to force it into the channel can be a real battle.
The fix is surprisingly simple: just warm up the spline a bit. Grab a hairdryer, put it on a low setting, and wave it over the spline for a few seconds. This makes the vinyl much more pliable and cooperative, allowing it to seat perfectly in the groove without a fight.
This small step can save you a ton of frustration. Taking on a DIY project like this is a smart move, and you're not alone. Screen repair is a huge part of the home improvement industry, with a projected global market size of around $2 billion by 2025. You can dig into more insights on this growing market at Verified Market Reports.
Finally, when it's time to trim the excess screen, always angle your utility knife away from the spline. It’s a simple habit that prevents you from accidentally slicing into your brand-new screen and leaves you with a flawless, clean edge every time.
A Few Common Questions About Rescreening
Even a simple DIY project can throw you a curveball. Before you get started, let's clear up a couple of the most common questions people have when they're rescreening a window for the first time. Getting these details right from the start will save you a headache later on.
What Size Spline Do I Need?
Getting the right spline size is critical for a tight, professional-looking screen. The absolute easiest way to nail this is to snip off a small piece of the old spline and take it with you to the hardware store. You can match it up perfectly.
If you can't do that, your next best bet is to measure the channel in the screen frame itself. Most of the time, you'll find that residential windows use a spline with a diameter between .125" and .250". A little pro tip: if you're stuck between two sizes, go with the slightly larger one. It'll give you a much more secure fit.
Can I Get Away With Rescreening the Window While It's Still in the Frame?
I get why you'd ask this—it seems like it would save a ton of time. But trust me on this one: you really need to take the screen frame out.
The only way to get that taut, drum-tight finish is by working on a flat surface where you can apply even pressure all the way around. Trying to do this job vertically while the frame is still in the window is a recipe for a saggy, wrinkly screen that just won't hold up.
The cost savings are a huge motivator for DIY rescreening. You can usually grab all the materials you need for a standard window for under $20. Compare that to hiring a pro, which can run anywhere from $30 to over $100 per screen. The savings really add up if you have more than one to do!
If you've given it a shot and decided it's not for you, or if you're just looking at a whole house full of torn screens, that's where we come in. Sparkle Tech Screen Service can take care of it for you. We provide quick quotes and can usually offer same-week service for all your screen repairs.
Feel free to get in touch with us today.


