


A ripped or worn-out screen door isn't just an eyesore—it's an open invitation for every bug in the neighborhood. When you're looking for replacement screens for screen doors, you're trying to find that sweet spot between durability, how clear the view is, and any special features you might need, like protection from the sun or a determined golden retriever.
Let's walk through how to pick the right screen to get your door back in business.
Understanding Your Screen Door Replacement Needs
A screen door does more than just keep flies out. It's what lets you enjoy a cool breeze and sunshine without inviting the outdoors all the way in. When that screen gets damaged, you lose that simple pleasure.
Deciding on a replacement screen isn't a one-size-fits-all deal. The right choice really comes down to your lifestyle, your local climate, and what you're trying to achieve.
Think about it like buying tires for your car. You wouldn’t put slick racing tires on a truck you take camping, right? It’s the same idea here. The screen that works perfectly for a quiet, shaded back porch is going to be completely different from one that gets baked by the afternoon sun and doubles as a trampoline for your dog.
Key Factors To Consider
Before we get into the different materials, take a second to think about what you really need. Answering a few straightforward questions now will make the whole process a lot easier.
- What’s the main priority? Are you just trying to keep mosquitoes out? Or do you also need to block intense sunlight, stand up to pet claws, or get the clearest possible view of your backyard?
- What’s your climate like? If you live somewhere hot and sunny, UV protection becomes a big deal. If you're in a buggy, wooded area, a finer mesh might be more important.
- Who uses this door the most? Is it a high-traffic zone for kids and pets? Or is it opened gently only a few times a day?
Your answers will immediately point you in the right direction. For instance, a homeowner in a hot climate might find a solar screen is the best investment they can make to lower AC bills. On the other hand, a family with two energetic dogs will probably see pet-resistant screen as an absolute must-have.
A good replacement screen doesn’t just fix a hole. It’s a chance to upgrade your door to make your home more comfortable and functional for the way you actually live.
To get a quick lay of the land, here’s a simple chart that breaks down the common screen types. This should give you a good starting point for figuring out which material is right for you before we dive into the nitty-gritty details of each one.
Quick Comparison of Screen Door Replacement Options
This table summarizes the most common replacement screen materials and their primary functions to help you identify the best fit for your home's needs.
| Screen Material | Primary Benefit | Best For |
|---|---|---|
| Fiberglass | Flexibility & Affordability | Standard insect protection in low-traffic areas. |
| Aluminum | Durability & Crisp View | A classic, sturdy option that resists sagging. |
| Pet-Resistant | Tear & Puncture Resistance | Households with active cats, dogs, or small children. |
| Solar/Sun | UV & Heat Reduction | Homes in hot, sunny climates to lower energy costs. |
Now that you have a basic idea of what's out there, let's take a closer look at what makes each of these materials tick.
A Practical Guide to Screen Door Materials
Choosing the right material for your replacement screen is easily the most important decision you'll make. It’s a lot like picking the right fabric for a piece of clothing; you wouldn’t wear a thin cotton shirt to do yard work, just like you wouldn’t use a basic screen if you have a dog who loves to scratch at the door.
Each material offers a unique blend of durability, visibility, and function. This choice directly impacts how well your screen door performs and how long it holds up. So, let's break down the four most common options for replacement screens for screen doors to find the perfect fit for your home.
The Flexible Favorite: Fiberglass Screens
Standard fiberglass is what you’ll find on most screen doors right from the factory. It's the most common and budget-friendly material out there, making it the go-to choice for a quick and easy replacement. Because it's a flexible, woven material, it’s also very forgiving to work with—a huge plus if you're tackling this as a first-time DIY project.
Think of it as a durable, high-tech fabric. It won't crease, dent, or unravel if you make a little mistake during installation. That flexibility comes with a trade-off, though. Over time, especially in places with intense sun, fiberglass can get brittle and is more likely to tear than its metal cousins.
Pros of Fiberglass:
- Affordable: The most cost-effective option available.
- Forgiving Installation: Its flexibility makes it easy to install without permanent creases.
- Good Airflow: The standard weave allows for excellent ventilation.
Cons of Fiberglass:
- Lower Durability: It can tear more easily than other materials.
- Prone to Stretching: May sag over time in larger screen panels.
- UV Degradation: Can become brittle and weak after years of sun exposure.
The Classic Choice: Aluminum Screens
For a crisper, more traditional look, aluminum screens are a fantastic option. If fiberglass is like a fabric, think of aluminum as a thin, finely woven sheet of metal. This stiffness gives you outstanding visibility—a really sharp, clear view of your backyard.
That rigidity also means aluminum is far less likely to sag, which is perfect for bigger screen doors or large porch enclosures. The downside? It’s a bit trickier to install. If you bend or crease it, that mark is there for good. It's also more prone to denting from an errant ball or a bump. Still, for many homeowners, the clearer view and improved durability are well worth the extra care needed.
The Heavy-Duty Hero: Pet-Resistant Screens
For the 45% of households with furry family members, a standard screen door can feel like a disposable item. This is where pet-resistant screens come to the rescue. They're made from a vinyl-coated polyester that is worlds tougher and thicker than standard fiberglass.
This stuff is engineered to withstand claws, paws, and the enthusiastic push of an excited dog. While this extra strength is a lifesaver, it does mean you sacrifice a bit of visibility and airflow. But for most pet owners, not having to rescreen the door every few months is a trade they’re happy to make.
It's a big market—durable screen components are now valued at over $24 billion. A huge chunk of that is driven by homeowners needing to replace old screens, but pet owners are a major force, causing 35% of all screen replacements due to claw and tear damage.
The Energy-Saving Innovator: Solar Screens
Solar screens, often called sun screens, are the unsung heroes of home energy efficiency. Their main job is to block a huge portion of the sun's heat and damaging UV rays before they even hit your window glass.
Think of a solar screen as a pair of high-quality sunglasses for your home. It cuts down on glare, reduces heat, and protects your floors and furniture from fading, all while keeping a decent view and letting the breeze in.
They’re usually made from a very tightly woven vinyl-coated mesh. While they cost more upfront, solar screens can absolutely pay for themselves by slashing your A/C bills, especially in sunny climates. The tighter weave also adds excellent daytime privacy. We’ve gone deeper into the pros and cons in our guide to choosing the best window screen material.
To help you visualize the differences, we put together a quick comparison of what each material brings to the table.
Screen Material Feature Comparison
This table breaks down the key features of each material, comparing everything from how tough they are to how much they'll likely cost.
| Material | Durability Rating (1-5) | Visibility | Average Cost | Key Feature |
|---|---|---|---|---|
| Fiberglass | 2 | Good | $ | Budget-friendly & flexible |
| Aluminum | 4 | Excellent | $$ | Crisp view & resists sagging |
| Pet-Resistant | 5 | Fair | $$$ | Resists tears & punctures |
| Solar Screen | 4 | Good | $$$$ | Blocks heat & UV rays |
Hopefully, seeing the options side-by-side makes it easier to pinpoint which material is the right investment for your home and lifestyle.
Choosing the Right Screen for Your Home
Not all screens are created equal. Just like you'd pick different tires for a sports car versus an off-road truck, the right screen for your door depends entirely on what you need it to do. Thinking about its primary job is the first step to finding a replacement that actually solves your problems, whether that's keeping bugs out, blocking the sun, or just surviving your dog.
At its core, every screen is a bug screen. That's the baseline—a simple barrier that lets the breeze in and keeps the pests out. But screen technology has come a long way. Now you can get screens that do everything from lowering your energy bills to giving you a clearer view of your backyard. It's usually a balancing act between things like visibility, durability, and airflow.
And people are definitely investing in better screens. The market for retractable screen doors, which rely on these advanced materials, is projected to soar to $10,382.4 million by 2025. Here in North America, with over 130 million homes sporting screen doors, a whopping 40% of sales are for replacements, mostly due to pet damage and harsh weather. This just proves how vital a good, functional screen is, especially in buggy areas that see 25% more replacements annually. You can discover more insights about the screen door market to see how these trends influence what's available.
Standard Insect Screens
This is your classic, no-fuss screen. Typically made from fiberglass or aluminum, its job is simple: stop common insects like flies and mosquitoes. The mesh is woven just tightly enough to do that while still letting plenty of air and light through.
If your only goal is to open up the house for a fresh breeze without inviting every bug in the neighborhood, a standard screen is a solid, budget-friendly choice. It’s the reliable workhorse of the screen world.
Solar Screens for Beating the Heat
For homes that get blasted by the sun, solar screens are a total game-changer. Think of them as a pair of high-quality sunglasses for your house. They're made with a much denser weave and special materials designed to soak up and deflect the sun's heat and UV rays before they can bake your living room.
A good solar screen can block up to 90% of the sun's heat. That means a cooler house, less work for your air conditioner, and real savings on your monthly energy bills. Plus, the tighter weave adds a nice layer of daytime privacy.
Of course, there’s a small trade-off. That dense mesh means you'll get a little less light and airflow compared to a standard screen. But for most people in sunny climates, the comfort and energy savings make it an easy decision.
High-Visibility and "No-See-Um" Screens
Sometimes, the goal is either to see more of the outside world or to block the absolute tiniest of intruders.
- High-Visibility Screens: These are engineered with super-fine threads that make the mesh almost disappear. The result is a stunningly clear, unobstructed view. They’re perfect if your door opens up to a gorgeous garden, a lake, or any view you don’t want to look at through a grid.
- No-See-Um Screens: As the name implies, these are for stopping those infuriatingly tiny biting gnats known as "no-see-ums." The mesh weave is incredibly tight, creating an almost impenetrable barrier against even the smallest pests. If you live near the coast, a marsh, or a wooded area, this is your best defense. The trade-off is slightly reduced airflow, but it's a price worth paying for a bite-free home.
In the end, it all comes down to what matters most to you. Once you pinpoint your main priority—be it the view, energy savings, or maximum bug defense—you can pick a screen that perfectly fits your home and lifestyle.
How to Measure for Your New Screen
Getting your measurements right is the single most important step for a successful screen replacement. It’s a bit like getting a suit tailored—even the highest quality fabric won’t look good if the fit is wrong. A precise measurement is what guarantees your replacement screens for screen doors will have that tight, professional finish, and it saves you from wasting material.
The classic rookie mistake is measuring the old, stretched-out screen fabric. Don't do it! After years of sun, rain, and use, that old mesh has likely sagged and warped, so it's not a reliable guide. You need to measure the frame itself, specifically where the new screen will live.
Measuring the Screen Frame Correctly
For a truly accurate measurement, you have to ignore everything but the channel, or groove, where the rubber spline wedges the screen into place. That groove is the true boundary.
- Get the Width: Start by placing your tape measure inside the spline channel on the left side of the frame. Pull it straight across to the inside of the channel on the right side. Jot that number down.
- Get the Height: Now, do the same thing vertically. Measure from the inside of the top channel down to the inside of the bottom channel. Write that down, too.
- Add Extra for Handling: This part is critical. Always add at least two to three inches to both your width and height measurements. This extra material is your working margin, giving you enough slack to pull the screen tight as you install it without coming up short.
So, if your frame measures 30 inches wide by 78 inches tall, you’ll want to buy screen material that's at least 36 inches wide. This gives you plenty of wiggle room. For a more detailed walkthrough, our guide on how to measure for your screen door covers all the little details to ensure a perfect fit.
Selecting the Right Spline Size
Think of the spline as the zipper that locks your screen into the frame. It's a flexible cord, and using the wrong size is where many DIY projects go sideways. If the spline is too thin, your screen will pop right out. If it’s too thick, you’ll fight to get it in and might even damage the frame.
The perfect spline is one that fits snugly into the channel with the new screen mesh folded in. It should take firm, steady pressure with a spline roller to pop into the groove, creating a drum-tight seal.
The easiest way to find the right size is to take a small piece of your old spline to the hardware store and find its match. If your old spline is crumbling or gone, you can measure the width of the channel in the frame instead. Most screen doors use a spline with a diameter between .125 inches (1/8") and .175 inches.
Common Spline Diameters:
- .125" (1/8"): Very common for window screens.
- .140" (9/64"): A go-to size for many standard screen doors.
- .175" (11/64"): Often needed for thicker materials like pet-resistant or heavy-duty solar screens.
Taking a few extra minutes to measure the frame and spline carefully is the secret to a smooth installation. This little bit of prep work will save you a ton of frustration and make sure your new screen looks fantastic.
Your Step-by-Step DIY Installation Guide
Ready to tackle your screen door replacement? It's a really satisfying project that you can definitely knock out in an afternoon. Getting a professional, tight-as-a-drum finish is all about creating even tension across the mesh. Think of it like stretching a canvas for a painting—no wrinkles, no sags, just a perfect, flat surface.
This guide will walk you through the whole process, from gathering your supplies to making that final trim. We’ll break it down into simple stages so you can get a durable, great-looking result.
Gathering Your Essential Tools
Before you start, let's get your tools lined up. You don't need a pro-level workshop for this, just a few key items that make the job a whole lot easier.
- Spline Roller: This is your MVP. It has two wheels: a rounded one (convex) to press the screen mesh into the groove and a grooved one (concave) to seat the spline securely on top.
- Utility Knife: You’ll want a fresh, sharp blade for this. It’s crucial for getting a clean cut when you trim the excess screen and spline at the end.
- Flathead Screwdriver or Pliers: Perfect for digging out the old, brittle spline that doesn’t want to cooperate.
- Clamps (Optional but Recommended): A few small clamps are a lifesaver. They hold the new screen in place while you work, so it doesn't shift around and cause headaches.
Having these simple tools on hand will make installing your replacement screens for screen doors go so much more smoothly.
This diagram is a great visual reminder of that critical first step: getting accurate measurements for a perfect fit.
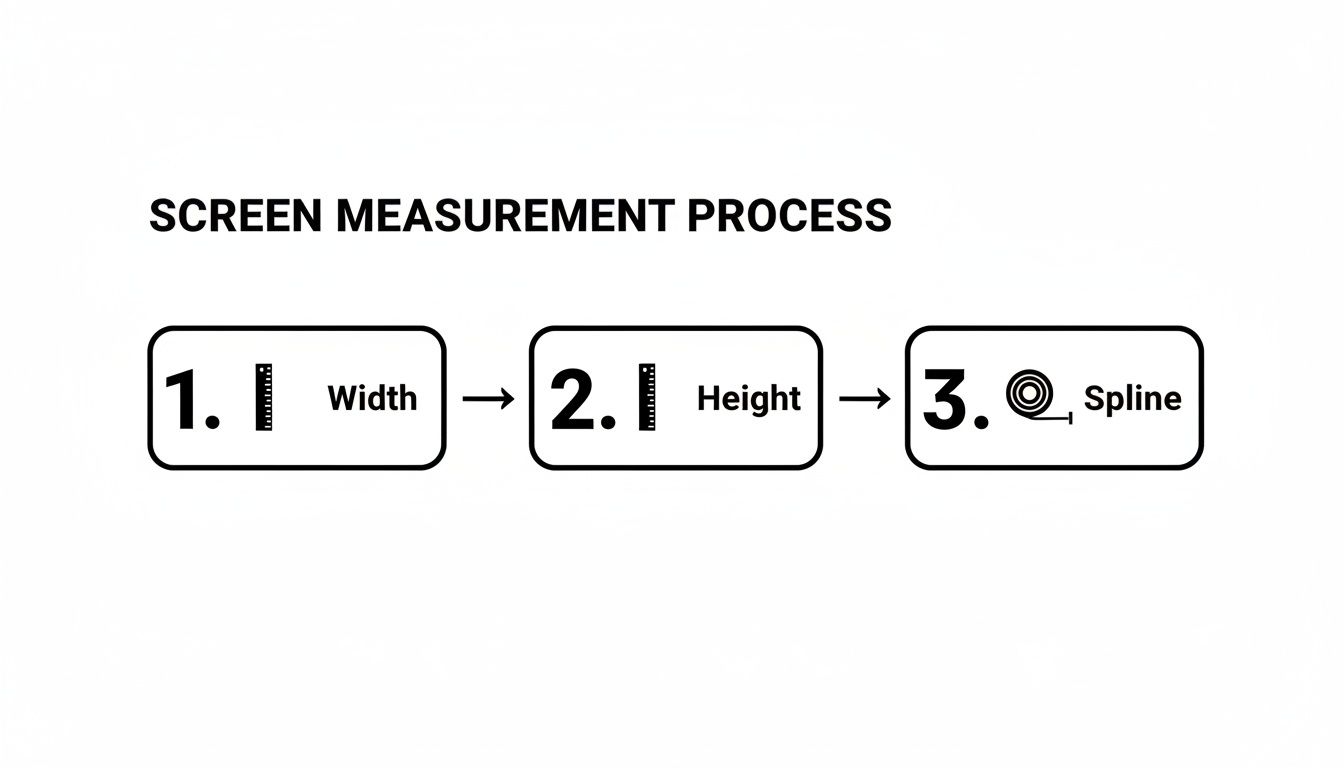
As you can see, it all comes down to measuring the frame's width and height, then matching the spline diameter. Nail these three things, and you're set up for success.
The Installation Process Step-by-Step
Alright, with your tools and new screen ready, it's time to get to work. Find a good flat surface to lay the screen door on—a large table or a pair of sawhorses is ideal.
- Remove the Old Screen and Spline: Find an end of the old spline and use your screwdriver or pliers to pry it up. Once you get it started, it should pull out of the groove pretty easily. The old screen will then lift right out.
- Lay Out the New Screen: Unroll your new screen mesh over the door frame. Make sure you have at least an inch of overhang on all four sides. If you're using clamps, now's the time to secure one side of the mesh to the frame.
- Begin Installing the Spline: Start in a top corner. Use the convex (rounded) wheel on your spline roller to gently push the screen fabric into the channel for about 6-8 inches.
- Insert the New Spline: Now, switch to the concave (grooved) wheel. Place the end of your new spline over the mesh you just pressed in, and use firm, steady pressure to roll it into place. This locks the screen down tight.
- Apply the 'Bowing' Technique: Here’s a pro tip to prevent a saggy screen. As you roll the spline down the second long side, apply a bit of inward pressure toward the center of the frame. This creates a slight "bow" which will pull the screen taut once all four sides are done.
- Trim the Excess: With the spline fully seated, grab your utility knife. Carefully trim off the extra screen material. A good trick is to angle the blade away from the new spline to avoid accidentally slicing it.
For a closer look, our detailed guide on how to install new screens has some great visuals that can help clarify these steps.
The secret to a tight screen isn't about pulling the fabric as hard as you can. It’s about creating consistent, even tension as you roll the spline into its channel, letting the tool do the work for you.
Nuances for Security Screen Installation
While the basic idea is the same, installing a security screen is a different ballgame. These screens are a serious part of the home security market—in fact, U.S. data shows that homes with them experience 60% fewer break-ins.
Security screens often use tough stainless steel mesh that can resist cuts 10 times better than standard fiberglass. Because the material is so much more rigid, it requires specialized tools and techniques to get the tension just right. It’s a job that demands a bit more muscle and precision.
DIY vs. Hiring a Pro: What's Right for Your Screen Door?
So, you're ready for a new screen. The big question now is: should you roll up your sleeves and do it yourself, or is it time to call in a professional? Honestly, it usually boils down to a classic trade-off between your time and your budget.
Replacing a basic screen is a fantastic DIY project for most people. If your door frame is in good shape and you've got a couple of hours, you can absolutely get a great result. There's a real sense of satisfaction that comes from pulling that new screen perfectly tight.
But sometimes, what looks like a simple job can spiral into a frustrating mess. Knowing when to tackle it yourself and when to hand it over to an expert is the secret to getting it done right without the headache.
When to Call a Professional
Certain situations are just better left to the pros. Trying to muscle through these without the right experience can lead to wasted screen material, a sloppy finish, or even a busted door frame.
It's probably time to make a call if you're facing any of these challenges:
- Oversized or Oddly-Shaped Doors: Think about those big sliding patio doors or custom-arched screen doors. Getting the tension just right across a large surface is an art form—one that pros have mastered to prevent sagging.
- Bent or Damaged Frames: A bent frame can make it almost impossible to get a new screen to sit flat. A professional can often straighten and repair the frame, saving you the cost of a whole new door.
- Tough, Specialty Materials: Some materials, like heavy-duty pet screens or certain types of aluminum mesh, are incredibly stiff. A pro has the specialized tools and techniques to install them without creating permanent creases or wrinkles.
- Tricky Sliding Screen Doors: Getting a slider out, replacing the screen, and putting it back in so it glides smoothly on its track can be a real pain. Professionals make sure it’s re-squared and adjusted perfectly.
When you hire a professional, you're not just paying for labor. You're paying for their experience, their speed, and the guarantee of a perfect, tight screen that will last.
A Quick Cost Comparison
Let's talk numbers. The financial difference is pretty clear.
A DIY replacement is incredibly budget-friendly. You're typically just buying the screen mesh and a cheap spline roller, often for a total of less than $50. If your project is straightforward, it's hard to beat that price.
Professional installation, naturally, costs more because it includes materials and labor. You can expect to pay anywhere from $100 to $250, sometimes more depending on the door size and the type of screen you've chosen.
Yes, the upfront cost is higher, but what you're really buying is peace of mind. No surprise trips to the hardware store for a different size spline, no fighting with wrinkles, and no wasted material from a mis-cut. For more complex jobs, paying an expert to get it right the first time is an investment that pays for itself.
Frequently Asked Questions About Screen Door Replacement
Even with a solid plan, a few questions always come up when you're tackling a screen replacement. Let's walk through some of the most common ones so you can feel totally prepared for your project.
How Often Should I Replace My Screen Door Mesh?
A good rule of thumb is that standard fiberglass screen mesh will give you about 5-7 years of solid service. If you've invested in a tougher material like aluminum or a pet-resistant screen, you can easily expect a decade or more, assuming it's well-maintained.
But honestly, the calendar isn't the only thing you should be watching. Your screen will tell you when it's time for a change.
Keep an eye out for these tell-tale signs:
- Obvious rips, holes, or punctures that let pests in.
- Sagging that you can't seem to fix, creating gaps along the edges.
- Mesh that looks faded, brittle, or chalky from years of sun damage.
What’s the Easiest Screen Material for a Beginner to Install?
If you're doing this yourself for the first time, you absolutely want to go with fiberglass mesh. It’s the most forgiving and user-friendly material out there, hands down.
Think of it like a flexible fabric. It's pliable and easy to work with, so you can pull it tight without worrying about making a permanent mistake. Metal screens, like aluminum, can be a real headache for a novice—one wrong move and you've got a permanent crease or dent. Fiberglass saves you that frustration.
Can I Replace the Screen Without Taking the Door Off?
Yes, you often can, especially with sliding screen doors. They're designed to be lifted right out of their tracks, which makes it simple to lay them on a flat surface and get to work.
For a traditional hinged screen door, it's possible to do the replacement with the door still hanging, but it's not ideal. Most pros (and experienced DIYers) will tell you that taking the door off and placing it on sawhorses is the way to go. It makes the whole process easier, faster, and gives you a much tighter, more professional-looking result.
Ready to get your screen door looking and functioning like new? Sparkle Tech Screen Service offers expert installation and repairs for every kind of bug and sun screen. We make it easy with quick quotes and same-week service. Visit us online at https://sparkletechscreenservice.com or text/call us today


