


When you’re staring at a damaged window screen, you really only have two choices: patch it or replace it. For a small hole, a simple patch will do the trick. But for bigger tears or worn-out mesh, you'll need to re-mesh the whole frame. The good news is that a full replacement is a pretty straightforward job you can knock out in under an hour with just a few cheap tools.
Your Game Plan for Window Screen Repair
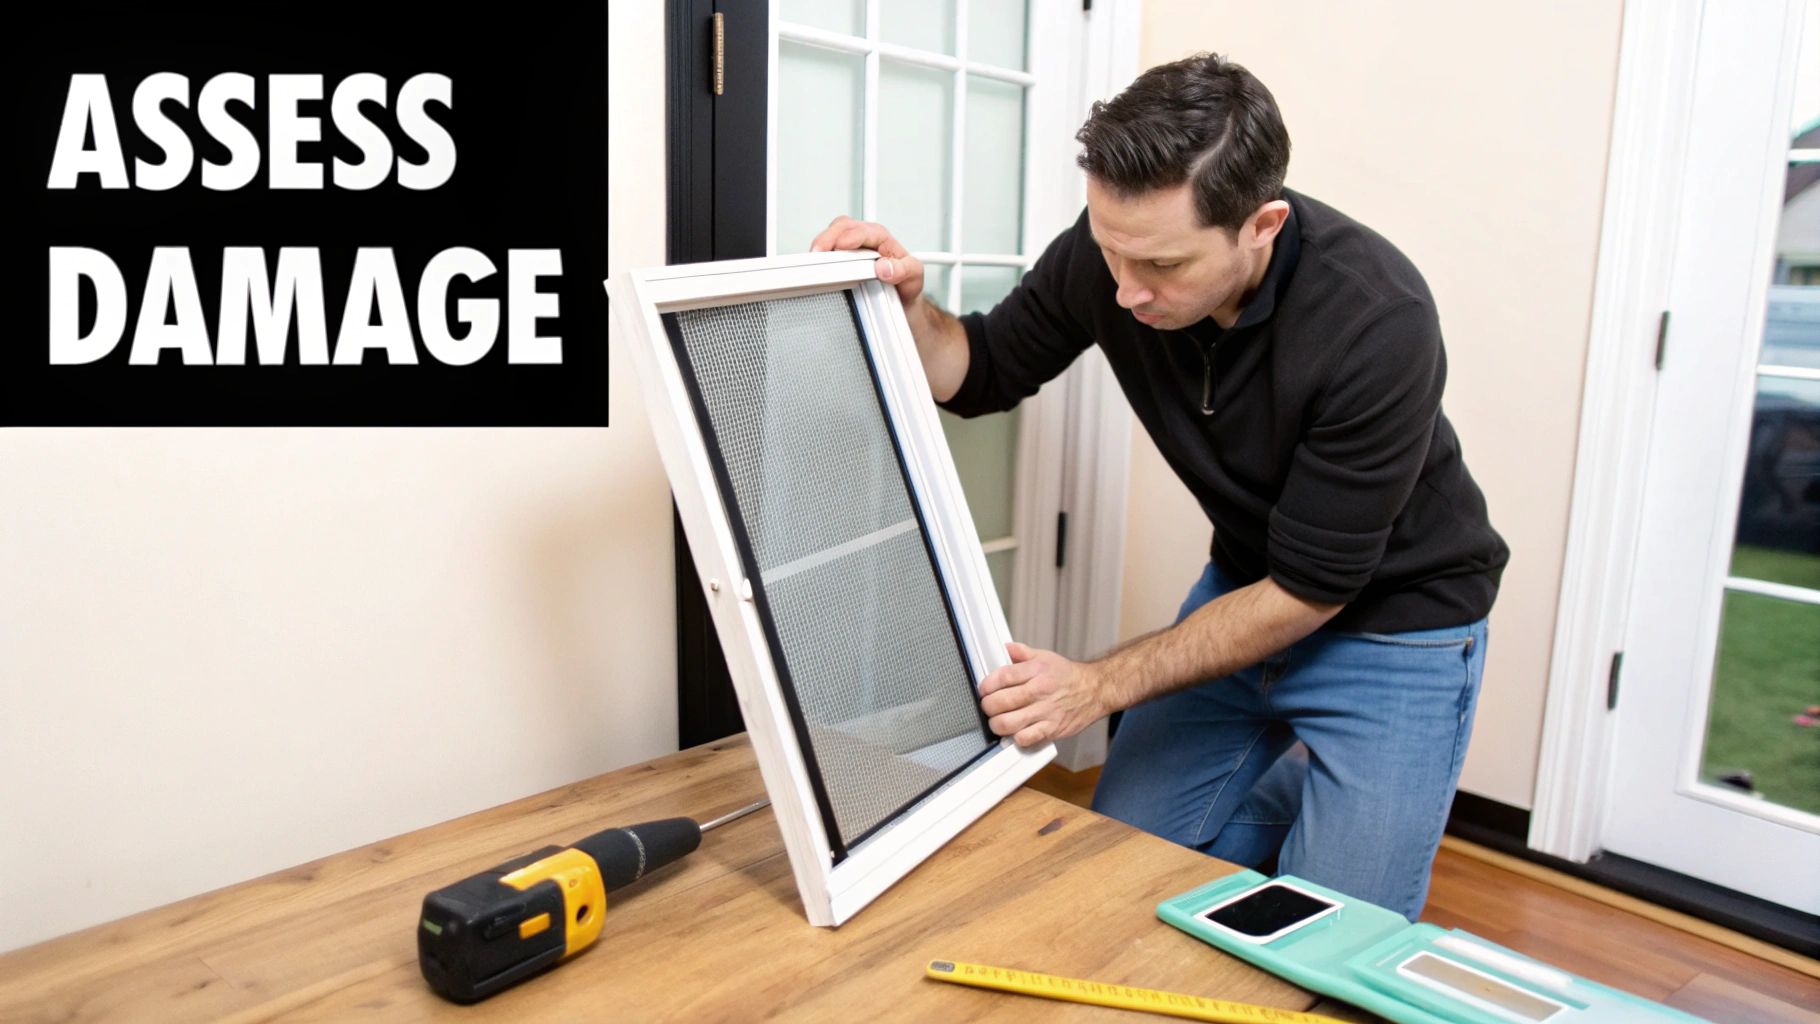
Before diving in, let's figure out what we're dealing with. Fixing a window screen is one of those satisfying DIY projects that gives you immediate results—your home looks better, and you keep the bugs where they belong. A solid repair starts with a good look at the problem.
Is it a tiny snag from a cat's claw? A big rip from a rogue tree branch? Maybe the screen mesh is totally fine, but the frame itself got bent in a storm. Each scenario calls for a slightly different fix, so figuring out the real issue is your first step.
To help you quickly diagnose the problem and decide on the best course of action, here's a quick reference table.
Quick Guide to Common Window Screen Problems and Solutions
| Problem | DIY Fix Difficulty | Recommended Solution | When to Call a Pro |
|---|---|---|---|
| Small Hole (<1 inch) | Easy | Use a pre-made patch kit or a dab of clear waterproof sealant. | If you want an invisible repair or the screen is a specialty material. |
| Large Rip (>3 inches) | Medium | A full re-meshing is the best long-term solution. | If the frame is also damaged or you're short on time. |
| Loose/Sagging Screen | Medium | Replace the spline and re-stretch the existing mesh, or re-mesh entirely. | If the frame is warped, preventing a tight fit. |
| Bent/Damaged Frame | Hard | Requires straightening or replacing the frame, which can be tricky. | Almost always. Frame repair requires specialized tools and skills. |
This table should give you a good starting point. For most common tears and sagging issues, a DIY approach is perfectly manageable.
Assess the Damage and Choose Your Path
The big decision is whether you can get away with a patch or if you need to replace the entire screen mesh. A good rule of thumb is to look at the size and location of the damage. If you have a clean tear smaller than a quarter, a patch kit will probably work just fine.
However, it's time for a full replacement if you're looking at any of these issues:
- Large Rips: Anything longer than three inches is tough to patch well. It just won't hold up over time.
- Brittle Mesh: If the screen feels stiff, cracks when you touch it, or looks faded and sun-beaten, its lifespan is over.
- Multiple Holes: Slapping patches all over the place looks messy and is more trouble than it's worth.
- Sagging Screen: A loose screen means the mesh has stretched out or the spline has shrunk and lost its grip. A complete re-mesh is the only real fix.
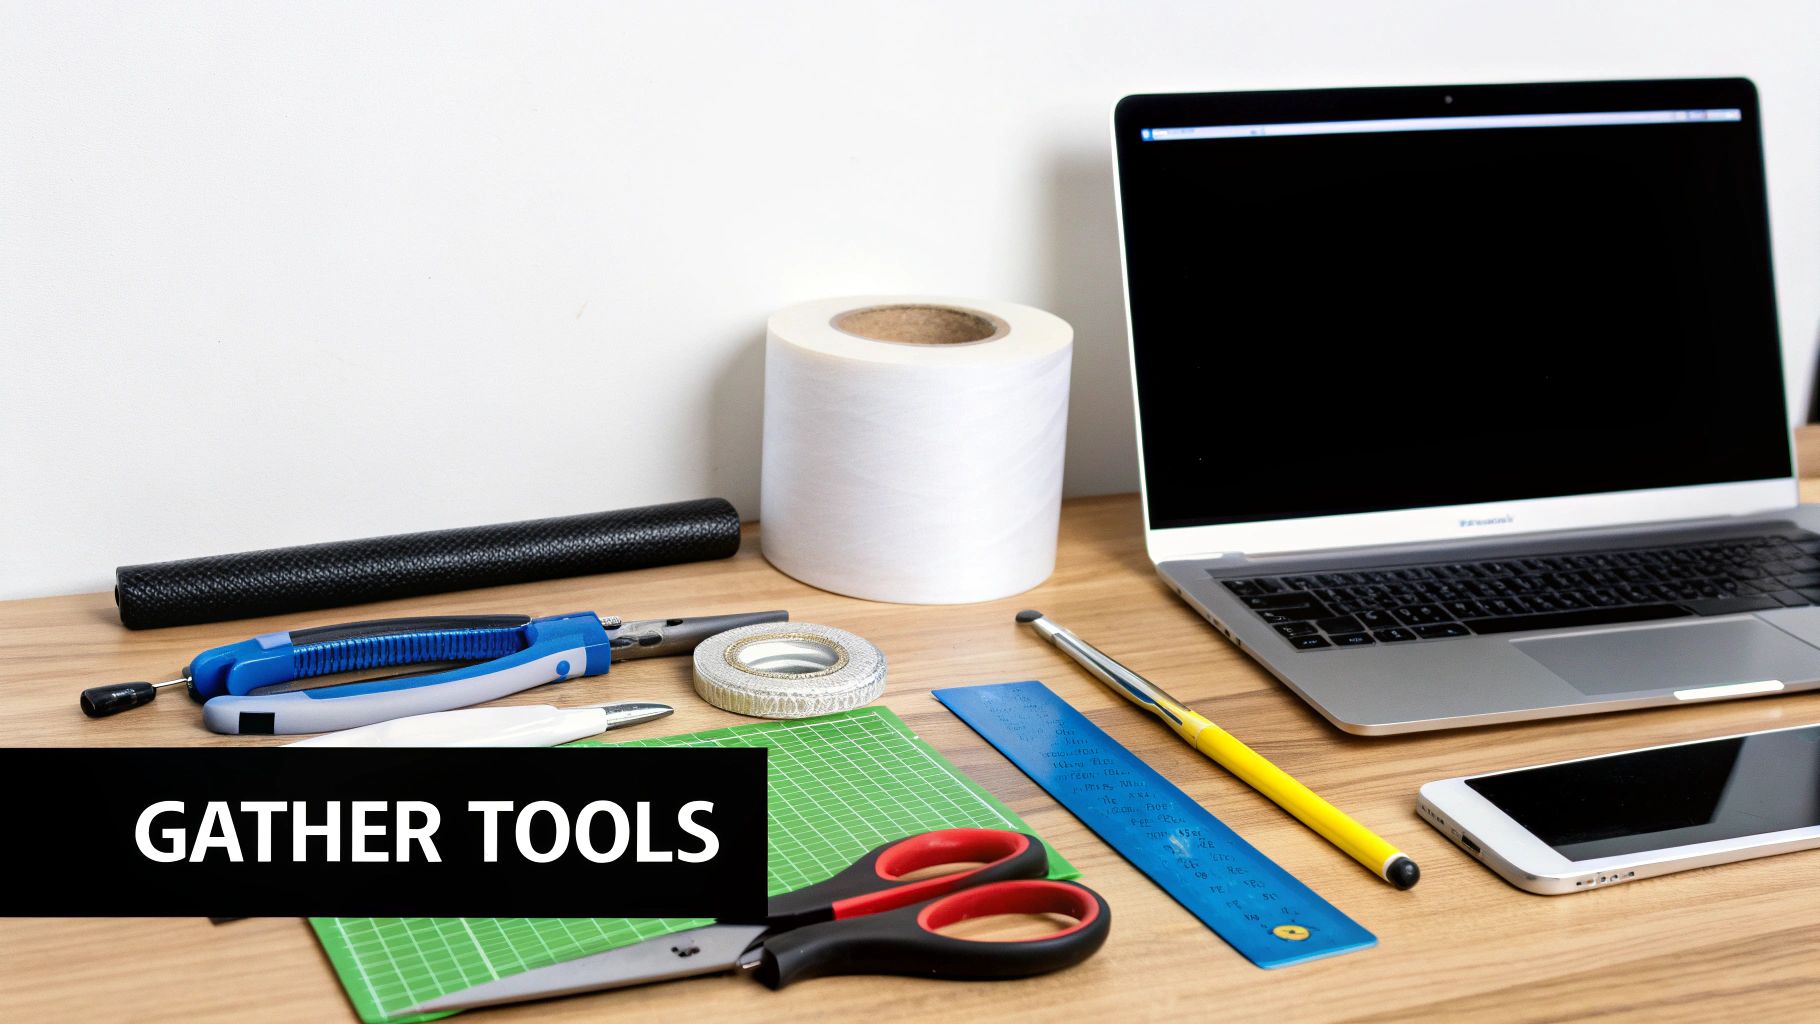
Identifying Your Materials and Tools
Once you know your plan, it's time to gather your supplies. First, you need to figure out what kind of screen material you have. The two most common are fiberglass (it's flexible and usually gray or charcoal) and aluminum (which is stiffer and has a metallic look). You'll want your replacement to match unless you're intentionally upgrading.
I've seen so many people try to improvise without the right tools, and it never ends well. A spline roller, which costs less than $10, is absolutely essential. It's specifically designed to push the spline into the frame’s channel without ripping the new mesh—a screwdriver will tear it every time.
Before you head to the hardware store, make a clear list. You’ll need the new screen mesh, the right diameter spline (that's the rubber cord that holds the screen in), and a spline roller. Pro tip: snip off a small piece of your old spline and take it with you to guarantee you buy the correct size. A little prep work here saves a ton of frustration later and ensures you get a clean, professional-looking result.
Getting Your Tools and Materials Together
Before you can tackle that torn screen, you need to have the right gear on hand. Trust me, showing up prepared is half the battle. It not only makes the job go smoother but also makes the difference between a shoddy patch and a repair that looks like it was done by a pro.
The great news is you don’t need a massive workshop full of expensive equipment. Most screen repairs, from a quick patch-up to a complete re-meshing, can be handled with just a few essential items.
Your Core Toolkit
Let's start with the non-negotiables. You probably have some of these lying around the house, but a couple of them are specialized and absolutely worth picking up for this project.
- Utility Knife or Scissors: You’ll need a sharp blade to get a clean, straight cut on the new screen mesh. A fresh blade in your utility knife is your best bet here.
- Tape Measure: This one’s a no-brainer. Measure twice, cut once—it’s an old saying for a reason, and it will save you from wasting brand-new screen material.
- Flathead Screwdriver: A small, thin one works wonders for digging out the old, brittle spline without gouging the frame’s channel.
- Spline Roller: This is the one tool you absolutely cannot skip. It has a wheel on each end: a concave one to press the spline deep into the channel and a convex one to gently crease the mesh into the corners first. Seriously, don't try to substitute a screwdriver for this job; you will rip your new screen. I've seen it happen a hundred times.
For a deeper dive, check out our complete guide to window screen repair tools.
The single biggest mistake I see DIYers make is trying to save a few bucks by skipping the spline roller. It's designed to apply even, rolling pressure that seats the spline without snagging the mesh. Trying to use a screwdriver creates focused, sharp pressure that will tear a fiberglass screen instantly.
Choosing the Right Materials
Once your tools are ready, you need the right materials for the repair itself. This is just as important as having the proper equipment. The type of mesh and the size of the spline you pick will determine how your finished screen looks and holds up over time.
Screen mesh isn’t a one-size-fits-all product. Each material has its own pros and cons, so think about what your home really needs before buying.
- Fiberglass Mesh: This is the standard for a reason. It’s affordable, flexible, and very forgiving to work with. Unlike metal, it won't hold a crease or dent, making it the perfect choice for most homes.
- Aluminum Mesh: If you want something a bit tougher with better visibility, aluminum is a great option. It’s more durable than fiberglass but can be dented and is less forgiving if you make a mistake during installation.
- Pet-Resistant Mesh: Have a cat who thinks your screen is a climbing post? This stuff is a lifesaver. It’s a heavy-duty polyester mesh that's about seven times stronger than the standard fiberglass material.
- Solar Screen: For windows that get blasted by the sun, this is a fantastic upgrade. It's designed to block a significant amount of heat and UV rays, which can help lower your cooling bills while adding a bit of daytime privacy.
Finally, you’ll need the screen spline. That’s the rubbery cord that holds the mesh tightly in the frame. Splines come in different diameters, and getting the exact size is critical. Too thin, and your screen will sag. Too thick, and you'll never get it seated in the channel. The best way to get it right? Snip a small piece of the old spline from your screen and take it with you to the hardware store to find a perfect match.
Tackling Small Holes and Tears in Your Screens
It’s happened to all of us. You’re enjoying a nice breeze, look over at your window screen, and there it is—a small, annoying little hole. Your first thought might be that you need to replace the whole thing, but for minor damage, that’s usually not necessary. A quick patch job can get the job done, keep the bugs out, and save you a good bit of money.
This kind of fix is perfect for those little punctures and snags—maybe the size of a dime or smaller. They can come from anywhere: a pet's claw, a stray spark from the grill, or just general wear and tear. I’ll walk you through two of the easiest and most reliable ways to handle these small-scale repairs.
The Screen Patch Method: Quick and Easy
The simplest solution by far is using a pre-made screen patch kit, which you can grab at just about any hardware store. These are basically small sections of screen material with a strong adhesive backing. Think of them as a heavy-duty bandage for your screen.
Now, you can’t just peel and stick it on and expect it to last. If the screen is dirty, that patch will be on the ground in a week. A little prep work makes all the difference.
- First, get it clean. Take a cloth with a bit of soapy water or rubbing alcohol and gently wipe down the area around the hole. You need to get rid of all the dust and pollen so the adhesive can get a solid grip.
- Next, trim the frays. See those little wires sticking out around the tear? Snip them off with small scissors. A clean edge helps the patch lay flat and stick properly.
- Finally, apply the patch. Peel off the backing, center it over the hole, and press down hard. I mean, really give it some pressure for a good 30 seconds, working from the middle out to the edges.
For extra staying power, especially on a screen you open and close a lot, I highly recommend putting a patch on both sides. It creates a much stronger, more durable repair.
A word of caution: I’ve seen people try to use duct tape or packing tape in a pinch. It never works. That adhesive just isn't made to stand up to sun and rain, and you'll be left with a gross, sticky residue that’s a bigger headache than the original hole.
The Sealant Trick for Tiny Punctures
What if the hole is super tiny, more like a pinprick? A patch can look like overkill in that situation. For these little spots, my go-to is a dab of clear, waterproof sealant or even a touch of super glue.
This creates a repair that’s practically invisible. It plugs the hole to stop tiny insects without you having to look at a clunky patch on your otherwise perfect screen.
The process is pretty similar to the patch method. You’ll want to start by cleaning the area to ensure the sealant bonds well. Then, just apply a tiny drop of clear silicone or super glue right on the puncture. A toothpick is the perfect tool for working it gently into the mesh.
Be ready to wipe away any excess immediately with a clean cloth before it dries. Once that's done, just let it cure for a few hours as the instructions on the tube direct.
This is a fantastic trick, but it’s strictly for the smallest of holes. If you try to fill a bigger tear with glue, you’ll just end up with a brittle, ugly mess that will crack and fall apart in no time. The real key to a good DIY screen repair is matching the fix to the size of the problem.
Replacing the Entire Screen Mesh Like a Pro
When a small patch just won’t do the trick, it's time to re-mesh the whole screen. A full replacement is your best bet for screens suffering from big rips, a constellation of small holes, or that brittle, faded look that comes from years in the sun. This is the only way to get that sharp, clean appearance back and make the screen functional again. And honestly, it's not nearly as tough as it sounds.
Re-meshing a screen is one of those surprisingly rewarding DIY projects you can knock out in less than an hour. All you really need is a flat surface and a couple of key tools. Before you know it, you'll have a screen that looks brand new—tight, secure, and ready to keep the bugs out.
Setting Up and Tearing Down
First things first, get that screen out of the window. You’ll want to lay it on a stable, flat surface like a workbench, a set of sawhorses, or even a clean spot on the garage floor. Trust me, trying to do this while the screen is standing up is a fast track to a saggy, frustrating mess.
Once it's lying flat, your job is to get that old, damaged mesh out. The mesh is held in the frame by a rubbery cord called a spline, which sits inside a channel around the frame’s edge.
- Look for the end of the spline, usually tucked away in a corner.
- Grab a small flathead screwdriver or an awl and carefully pry up one end.
- Once you've got a hold of it, you can just pull the entire spline right out of the channel. It usually comes out in one satisfying piece.
With the spline gone, the old mesh just lifts right off. It’s a good idea to give the frame’s channel a quick cleaning with a brush or cloth to get rid of any built-up grime. A clean channel helps the new spline seat perfectly.
Measuring and Cutting the New Mesh
Time for the new material. Unroll your new screen mesh and lay the empty frame on top. The key here is to cut a piece of mesh that’s bigger than the frame.
As a rule of thumb, leave at least one to two inches of extra mesh hanging over all four sides. This gives you something to grip while stretching the screen and prevents you from coming up short. Use a sharp utility knife against a straight edge for a nice, clean cut.
If you’re going to make a mistake, make it by cutting the mesh too big. You’ll trim off all the excess later, so a generous overhang is your best friend. There's nothing worse than getting three sides installed only to discover the fourth side won't reach.
Installing the New Mesh and Spline
This is where the magic happens, and your spline roller becomes your most important tool. Drape the new mesh over the frame, ensuring the overhang is pretty even on all sides. For a more detailed walkthrough, our guide on how to replace window screen mesh is a great resource.
Start on one of the shorter sides. Use the convex (rounded) wheel of your spline roller to gently push the mesh into the channel. This creates a little groove and gets it ready for the spline. Next, grab your new spline, start it in a corner, and use the concave (grooved) wheel to press it firmly into the channel right over the mesh.
Here’s a quick visual on the basics of a simple patch repair, which follows a similar logic.
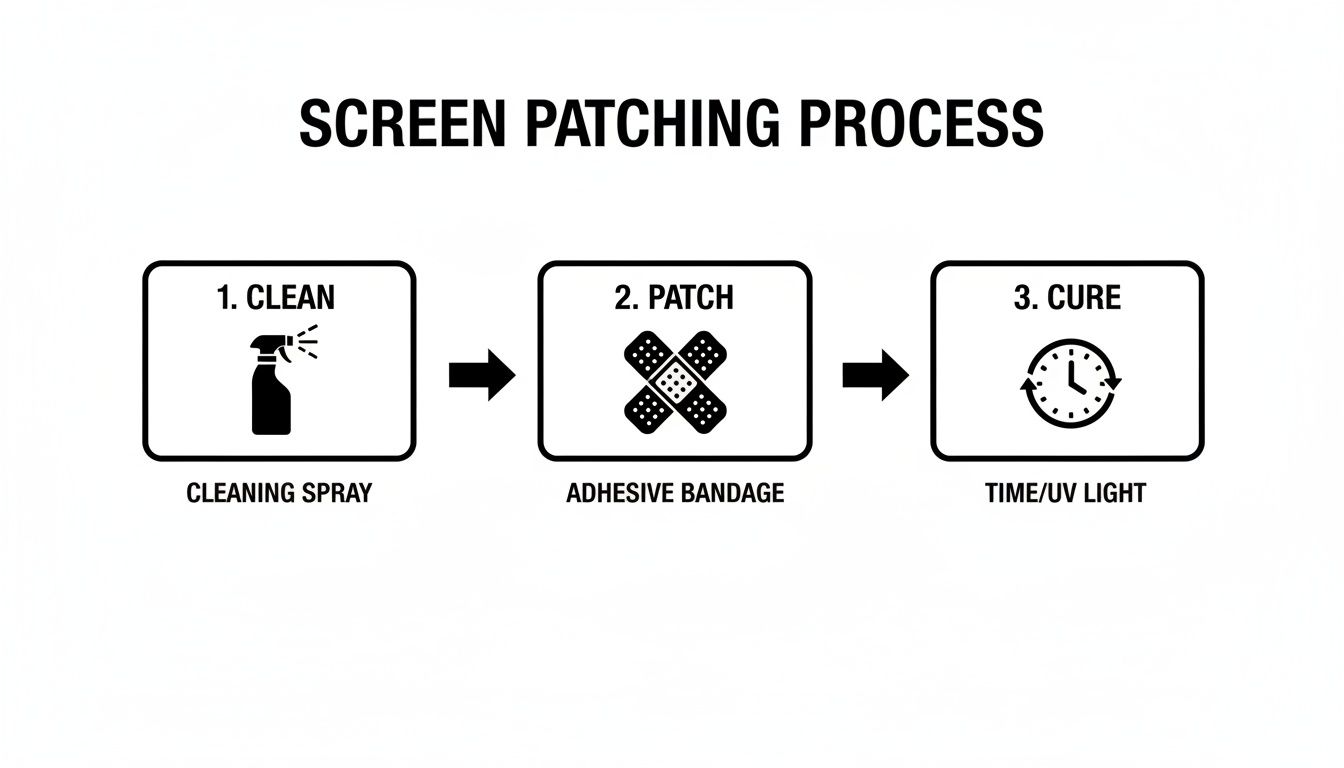
The takeaway here is that any good screen repair, big or small, starts with a clean surface and finishes by letting the materials set properly.
With the first side done, move to the opposite side. Pull the mesh taut—not so tight that you bend the frame, but just enough to pull out any slack. Repeat the process: roll the spline into the channel to lock the mesh in place. Do the same for the last two sides. You'll see the mesh get nice and tight as you go.
Finishing Touches for a Flawless Look
Once the spline is all the way in, your screen should be tight like a drum. The very last step is trimming the excess mesh.
Take your sharp utility knife and run the blade carefully along the outside of the spline. Angling the blade away from your new screen is crucial to avoid an accidental slice. This will give you a perfect, clean edge that looks totally professional.
Now, stand it up and take a look. You just re-meshed a screen from scratch, a skill that will save you some serious cash and keep your home looking sharp for years to come.
Troubleshooting Bent Frames and Hardware Issues
Sometimes the problem with your window screen isn't the mesh at all. You can have a brand-new, perfectly tight screen, but if the frame itself is bent or warped, you’re just leaving an open invitation for bugs. A wonky frame can also be a real headache to get back into the window.
While not as common as a simple tear in the mesh, these structural issues are critical. If you ignore a bent frame or broken hardware, the screen won't seal properly, which pretty much defeats the whole point of having it.
Assessing and Straightening a Bent Frame
Before you start wrestling with a bent frame, take a second to see what you're up against. Is it just a slight bow, or is it seriously twisted out of shape? The good news is that minor bends are usually fixable with a little patience.
First, lay the screen on a perfectly flat surface, like a garage floor or a sturdy workbench. This will show you exactly where the bend is. For a gentle curve, you can often correct it by carefully applying pressure in the opposite direction. I like to place a block of wood under the highest point of the bend and another on top, then use a C-clamp to slowly squeeze it back into alignment. Go slow and check your progress often so you don't overdo it.
For tougher bends, especially those near the corners, you might need to get a bit more persuasive. A couple of rubber mallets or even pliers—just make sure to wrap the jaws in a cloth to avoid scratching the paint—can help you gently tap the aluminum back into shape. The key here is slow, steady force. Aluminum is workable, but it will definitely crack if you get too aggressive. It’s surprising how often frames get bent; research suggests it happens in up to 40% of cases from things like hail or just dropping the screen during cleaning.
Remember, the goal is a frame that sits flush in the window opening. It doesn’t have to look brand new, but it does need to create a solid seal. If you see a hard crease or a crack in the metal, it's time to stop and just replace the frame.
Replacing Broken Corner Pieces
Those little plastic or metal corners are what hold the whole frame together. After years in the sun, they get brittle and can easily snap, leaving you with a wobbly, shapeless frame. Fortunately, swapping them out is a cheap and simple fix.
You can grab replacement corners at any big-box hardware store. Here’s how to do it:
- Pop the old corner out. Gently pry the frame sections apart at the broken corner. A few taps with a rubber mallet can help nudge the old, broken plastic out of the frame channel.
- Clean out the channels. Make sure the inside of the aluminum frame is free of any leftover debris or plastic shards. A quick once-over with a small screwdriver can clear it out.
- Slide the new corner in. Line up the new corner piece and give it a few firm taps with your mallet to seat it into one side of the frame.
- Join the frame. Now, connect the other side of the frame, tapping it securely onto the new corner until the mitered edges meet up nicely.
A single new corner can bring a wobbly frame right back to life, making it a whole lot easier to work with when you're ready to install the new mesh. For a deeper dive, check out our dedicated guide on how to fix a window screen frame.
Fixing Common Hardware Failures
It’s almost always the small, moving parts that give out first. Those little pull tabs snap off, or the tension springs that hold the screen in place get weak. These are the kinds of hardware failures that turn using your screens into a daily annoyance.
- Pull Tabs: These little plastic tabs are a lifesaver when you need to remove your screens. If yours are broken, you can easily slide new ones into the spline channel before you roll in the new spline.
- Tension Springs: These are the flat, springy metal clips on the sides of the screen that create a snug fit in the window channel. If they’re missing or have lost their spring, the screen will rattle around. Just like the pull tabs, you can just slide new ones into the channel before re-meshing.
Fixing the mesh is one thing, but making sure the frame and hardware are solid is just as important for your home's security. It's a good idea to learn other ways to secure windows from burglars to keep your home protected.
Knowing When to Call a Professional
There’s a ton of satisfaction in a successful DIY project, no doubt about it. But a truly savvy homeowner knows where to draw the line. Fixing a tiny tear in a window screen is a perfect Saturday afternoon task, but some screen repair jobs can get complicated—fast. Recognizing when you're getting in over your head is the key to saving yourself time, money, and a whole lot of frustration.
Some situations are just immediate red flags. Anything involving a second-story window, for instance, is a job for a pro. The risk of a serious fall is just not worth it. I’ve also seen plenty of well-intentioned homeowners try to wrangle an oversized sliding screen door on their own, only to end up with a bent frame and a saggy, useless screen. Those big sliders are incredibly awkward to handle without the right technique and a second set of hands.
When Expertise Matters Most
Things also get tricky when you're dealing with specialty materials. If you have solar screens or other custom-fit options, handing the job off to an expert is almost always the right call. These materials are more expensive, and one bad cut or improper pull can ruin the whole sheet of mesh, wasting your investment. A properly installed solar screen is drum-tight and effectively blocks heat, but a wrinkled or loose one just won't do its job.
Here are a few other clear signs that it's time to pick up the phone and call a service like Sparkle Tech:
- Serious Frame Damage: You might be able to gently bend a minor warp back into place, but a cracked corner or a badly twisted frame requires professional tools to fix or replace without compromising the window.
- Custom Shapes: Arched, circular, or trapezoid windows look fantastic, but they are a nightmare to screen without experience. Getting the mesh cut and splined perfectly into an unusual shape is a true craft.
- Screened-In Porches or Patios: This isn't just a bigger window screen; it's a completely different ballgame. Getting the tension right across massive panels to prevent sagging is a skill that comes from years of experience.
While a simple DIY patch might only set you back $10-30 in materials, a professional repair averages around $317. That investment can bring a 50-70% ROI by boosting your home's curb appeal and energy efficiency. It's no wonder that window and door repairs are projected to be a $2.5 billion industry by 2025—homeowners clearly value getting the job done right the first time. You can read more about the growing windows market.
The Professional Advantage
In the end, calling a pro is about guaranteeing a flawless fit and ensuring your screens last as long as they should. This is especially true in harsh climates like Arizona, where screens in places like Sun City or Sedona can degrade 20% faster from the relentless UV exposure. A professional installation is a smart move that pays for itself.
An expert has the right tools, uses the correct materials for your specific needs, and tensions the screen perfectly. That means no premature sagging and years of reliable protection for your home. If you're ready for a fast, reliable solution, you can easily find a window screen repair service near you to handle the job correctly.
Your Top Window Screen Repair Questions, Answered
Even with a step-by-step guide, it's normal to have a few lingering questions before you start a home repair project. Every window and every home is a little different. Let's tackle some of the most common things people ask so you can move forward with confidence.
What's the Best Screen for a Hot Climate?
If you live in a place with intense sun, like we do here in Arizona, a standard screen just won't cut it. Your best bet is a solar screen.
While regular fiberglass or aluminum mesh is fine for keeping bugs out, solar screens are specifically designed to block anywhere from 65% to 90% of the sun’s brutal heat and UV rays. Making this one change can seriously drop your cooling costs and stop your furniture and floors from fading.
If you've got pets who love to claw at the screens, a heavy-duty, pet-resistant mesh is another fantastic, durable option.
How Do I Get My New Screen Perfectly Tight?
Getting that perfect, drum-tight finish is all about technique, not brute force. You'll need a large, flat work surface. Once you have the new mesh laid out over the frame, start by pressing the spline into the channel on one of the shorter sides.
Then, move to the opposite side. This is the key part. Pull the mesh gently taut—just enough to remove the slack—as you roll the spline into its groove. Do the same for the remaining two sides.
The real secret is to apply steady, gentle tension as you go. You're not trying to stretch the mesh, just smooth it out. If you pull too hard, you'll end up with a bowed, warped frame. Let your spline roller do the work of seating the screen, and you'll get that crisp, professional look.
Can I Fix a Sliding Screen Door the Same Way?
Yes, the basic steps for re-meshing a sliding screen door are identical. You'll still be pulling out the old spline, laying down new mesh, and rolling it in tight.
The biggest difference is the sheer size. A sliding door is awkward and much harder to manage by yourself. Plus, their frames often have rollers, latches, and other hardware that can get in the way. While the re-meshing part is the same, just wrestling with the frame can be a real challenge.
And if the door frame itself is bent or the rollers are shot, that’s a job you’ll want to hand off to a professional.
A DIY fix can be rewarding, but for tricky jobs like sun screens or big sliding doors, sometimes you just want a flawless result without the frustration. That's where we come in.
For a professional finish every time, trust the experts at Sparkle Tech Screen Service. We offer same-week service and you can get a quick quote by visiting us at https://sparkletechscreenservice.com.


